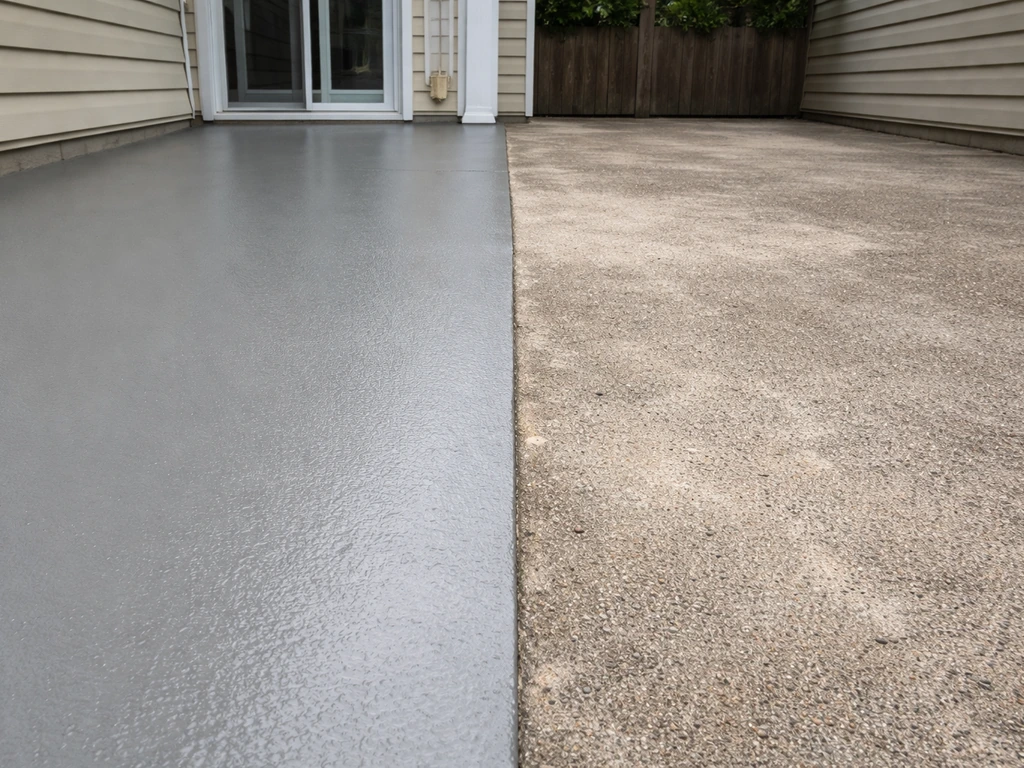
For most concrete porches and patios, a 1-part or 2-part epoxy-based floor coating is the best starting point. It bonds hard to concrete, handles foot traffic and outdoor furniture without scuffing, and resists the moisture that destroys standard exterior paint within a season or two. If your surface has hairline cracks or moves slightly with temperature changes, an elastomeric coating is a smarter pick. And if you have a previously painted or sealed slab that's already peeling, you'll need to strip or prep aggressively before any new product will stick. The right answer comes down to three things: what your surface is made of, what condition it's in, and what weather you're throwing at it.
Best Porch and Patio Paint: Choose, Prep, and Apply

Elise Prescott
29 May 2026
Understand your porch and patio surface and exposure first
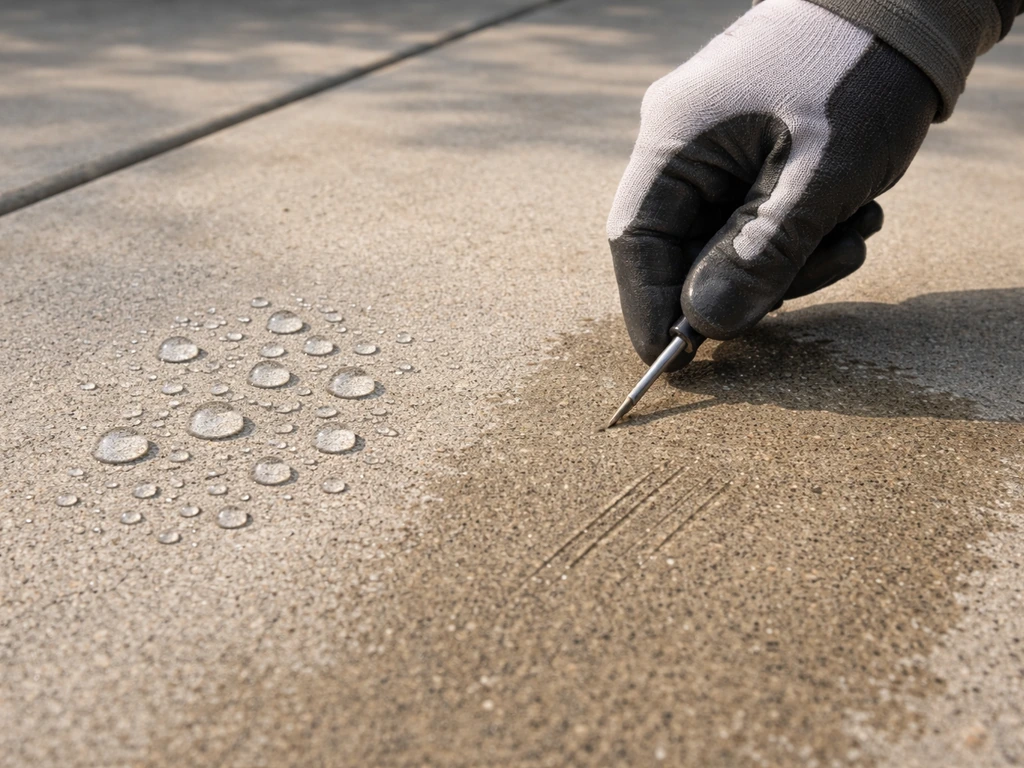
Before you buy anything, spend ten minutes looking at your actual surface. Is it bare concrete, previously painted, or sealed? Tap it, scratch it, and do a quick water-bead test: pour a small cup of water on the slab. If it beads up instead of soaking in, the concrete is sealed or has an existing coating, and most new paints won't bond without serious prep or stripping. If the water soaks in within a few seconds, you're working with bare or etched concrete, which is the easiest starting point.
Exposure matters just as much as surface type. A shaded north-facing porch in Minnesota deals with freeze-thaw cracking and trapped moisture. A south-facing patio in Phoenix or Dallas faces brutal UV, surface temperatures that can hit 160°F, and thermal cycling that cracks coatings that weren't designed for it. Coastal homes add salt air. Each scenario changes what product will actually hold up, which is something worth thinking about if you've ever seen a patio coating that looked great in April and was peeling by August.
- Bare concrete: best adhesion, most product options, needs etching and possibly priming
- Previously painted concrete: adhesion depends entirely on what's under it and how well it's bonded
- Sealed concrete: most new coatings won't adhere without mechanical abrasion or stripping the sealer
- New concrete: must cure for at least 30 days before coating, no exceptions
- Cracked or spalled concrete: repair cracks first or choose an elastomeric coating rated for crack bridging
Moisture is the hidden killer. Concrete is porous and moisture moves through it via hydrostatic pressure, capillary action, and vapor pressure. If you coat over a damp slab, the moisture will eventually push up from underneath and lift your coating. The ASTM F2170 test measures in-slab relative humidity using probes, and most coating manufacturers set a limit around 75% RH before application. For a DIY check, tape a piece of plastic sheeting flat to the slab for 24 hours. If condensation forms underneath, the slab is too wet to coat right now.
Best paint and coating types for outdoor floors
There's a wide range of products marketed as porch and patio paint, but they're not all the same thing. The category breaks down into a few distinct types, and picking the wrong one for your surface and climate is the most common reason DIY projects fail. Choosing the best patio paints for your surface and climate helps prevent peeling, fading, and slippery finishes over time porch or patio coating.
1-part epoxy floor coating (best for most homeowners)
Products like Behr Premium Self-Priming 1-Part Epoxy or Rust-Oleum RockSolid Garage Coat are the workhorses of residential porch and patio coating. They're water-based, easy to apply with a roller, and tougher than standard latex porch paint. Behr's 1-part epoxy specifies letting new concrete cure 30 days before applying and waiting at least 72 hours before heavy foot traffic after application. Rust-Oleum's RockSolid is ready for foot traffic in 8 to 10 hours and vehicle traffic in 24 to 36 hours depending on temperature and humidity. These are genuinely good products for a clean concrete porch with moderate traffic.
Elastomeric coatings (best for cracked or flexible surfaces)
If your patio has hairline cracks, settlement movement, or is in a climate with big temperature swings, an elastomeric coating is worth the extra investment. Products in this category are formulated with high elongation, meaning they flex with the surface instead of cracking. Some systems, like blank" rel="noopener noreferrer">Sika Thorolastic-850, are rated for up to 700% total elongation, which is overkill for a typical patio but speaks to the class of material. More accessible options like Rust-Oleum Zinsser WaterTite Flexible Primer and Finish offer up to 160% stretch, resist moisture and mildew, and don't yellow or chalk over time. Many elastomeric coatings are also blank" rel="noopener noreferrer">breathable, meaning they allow water vapor to pass through the film rather than trapping it, which matters a lot on slabs in humid climates.
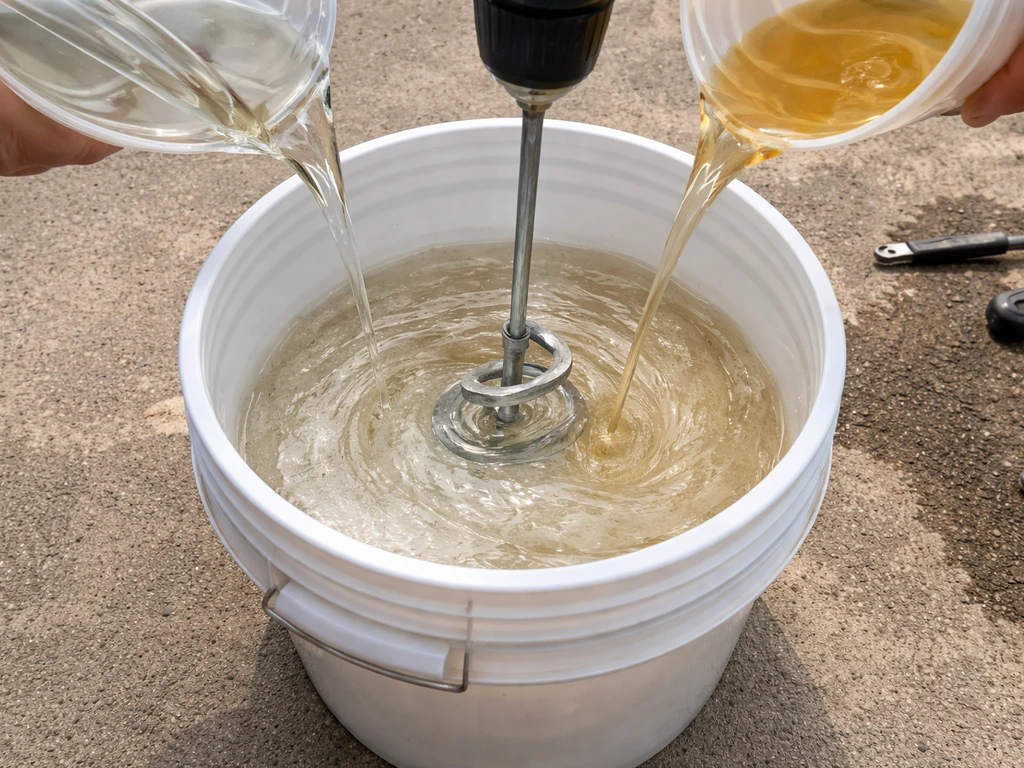
2-part epoxy systems (best for high-traffic or garage-adjacent patios)
Two-part epoxy involves mixing a resin and hardener on-site, and the result is a significantly harder film than 1-part products. The tradeoff is that pure epoxy yellows under UV, which is why most outdoor epoxy systems are paired with an aliphatic urethane topcoat. Aliphatic urethanes are UV-stable, meaning they won't amber or chalk in direct sun the way standard epoxy does. If you go this route, products like ArmorPoxy's system add a clear urethane topcoat with a non-skid additive, because a glossy clear coat on a wet patio is a slip hazard. Rust-Oleum's RockSolid Clear Coat can be applied once the base coat has dried hard or after at least 12 hours, and if you miss the 30-day recoat window, you'll need to clean and degrease again before adding more coats.
Standard latex/acrylic porch paint (low cost, lower durability)
Standard exterior latex porch and floor paint is the cheapest option and the most likely to disappoint you in 12 to 18 months. It's fine for a covered porch with minimal traffic and low moisture exposure, but it won't hold up to pooling water, direct sun, or heavy foot traffic the way an epoxy or elastomeric product will. If your patio sits close to a pool or gets regular splash moisture, you’ll want to look for the best pool patio paint options that are built to resist chemicals and frequent wetting pooling water. If you're cost-constrained, it's better to apply a good 1-part epoxy product correctly once than to repaint with latex every couple of years.
| Coating Type | Best For | UV Resistance | Crack Bridging | DIY Difficulty | Relative Cost |
|---|---|---|---|---|---|
| 1-Part Epoxy | Clean bare concrete, moderate traffic | Good | Minimal | Easy | Moderate |
| Elastomeric Coating | Cracked slabs, humid/freeze-thaw climates | Good-Excellent | Yes (up to 700% elongation) | Easy-Moderate | Moderate |
| 2-Part Epoxy + Urethane Topcoat | High traffic, garage-adjacent, premium finish | Excellent (with urethane topcoat) | No | Moderate-Hard | Higher |
| Standard Latex/Acrylic Porch Paint | Covered low-traffic porches | Fair | No | Easy | Low |
Choosing finish, color, and durability for traffic and UV
For outdoor patio floors, skip high-gloss finishes. They show every scuff, highlight imperfections in the slab, and become dangerously slippery when wet. Satin is the practical sweet spot: it's easier to clean than flat, more forgiving than gloss, and looks good longer. Matte works well on covered porches where you want a natural stone-like look, but it shows dirt more and is harder to wipe down after a rainstorm.
Color choice is more than aesthetic. Dark colors absorb more heat, which accelerates thermal cycling and can cause coatings to soften and crack faster in hot climates. In Texas or Arizona, lighter tones like warm grays, sandy beiges, and off-whites keep the surface cooler and are more UV-stable over time. In rainy Pacific Northwest climates, lighter colors also show algae and mildew growth more quickly, so medium tones tend to be more practical. If you're choosing colors for the patio overall, it's worth thinking about how the floor color ties into the broader design, something worth exploring when looking at patio color ideas more broadly. If you're trying to decide on the best patio colors for your space, focus on how the shade will look in sun and how it affects heat build-up patio color ideas.
For any outdoor patio with foot traffic, add a non-skid additive to at least your final coat. Rust-Oleum's aluminum-oxide Anti-Skid Additive is compatible with epoxy, latex, and oil-based coatings and can be mixed directly into the paint before rolling. Behr's 1-part epoxy documentation also specifies an optional non-skid floor additive for the same reason. This is especially important near pools, in rainy climates, or on any step or slope. It costs almost nothing and can prevent a serious fall.
Prep and priming checklist for long-lasting adhesion
Preparation is where most DIY patio paint jobs succeed or fail. You can buy the best product on the market and have it peel in six months if the surface wasn't properly cleaned, etched, and dried. Here's what the process actually looks like.
- Clear and clean the surface: remove all furniture, sweep, and use a concrete cleaner and degreaser (like Rust-Oleum's Cleaner and Degreaser) to eliminate oil, grease, salt residue, and organic matter. These contaminants break the bond between coating and concrete.
- Test for moisture: tape a 24-inch square of plastic sheeting to the slab for 24 hours. Condensation underneath means the slab has high moisture vapor transmission. Consider waiting for drier conditions or using a moisture-tolerant primer.
- Patch cracks and spalls: fill hairline cracks with a concrete patching compound or flexible caulk rated for concrete. For deeper spalls, use a concrete repair mortar. Let all repairs cure fully before coating.
- Etch or abrade the surface: acid etching (using a diluted muriatic acid or a proprietary concrete etch product like Rust-Oleum Concrete Etch) opens the pores of bare concrete for better penetration and adhesion. Rinse thoroughly and let dry completely.
- Deal with existing coatings: if paint is peeling or loose, use a wire brush, floor grinder, or floor sander to remove it. Rust-Oleum's guidance is direct: wire brush off all loose and peeling paint, make sure the floor is clean and dry. Feathering edges won't cut it if large sections are failing.
- Prime if required: on uncoated concrete, Behr recommends applying their Concrete and Masonry Bonding Primer before the finish coat. Some 1-part epoxy products are self-priming on bare concrete, but always check the product data sheet. Elastomeric systems often have a dedicated primer step.
- Let it dry completely: surface and air temperature should be between 50°F and 90°F, with no rain forecast for at least 24 hours. Applying in high humidity slows dry time significantly and can trap moisture under the film.
How to apply porch and patio floor paint
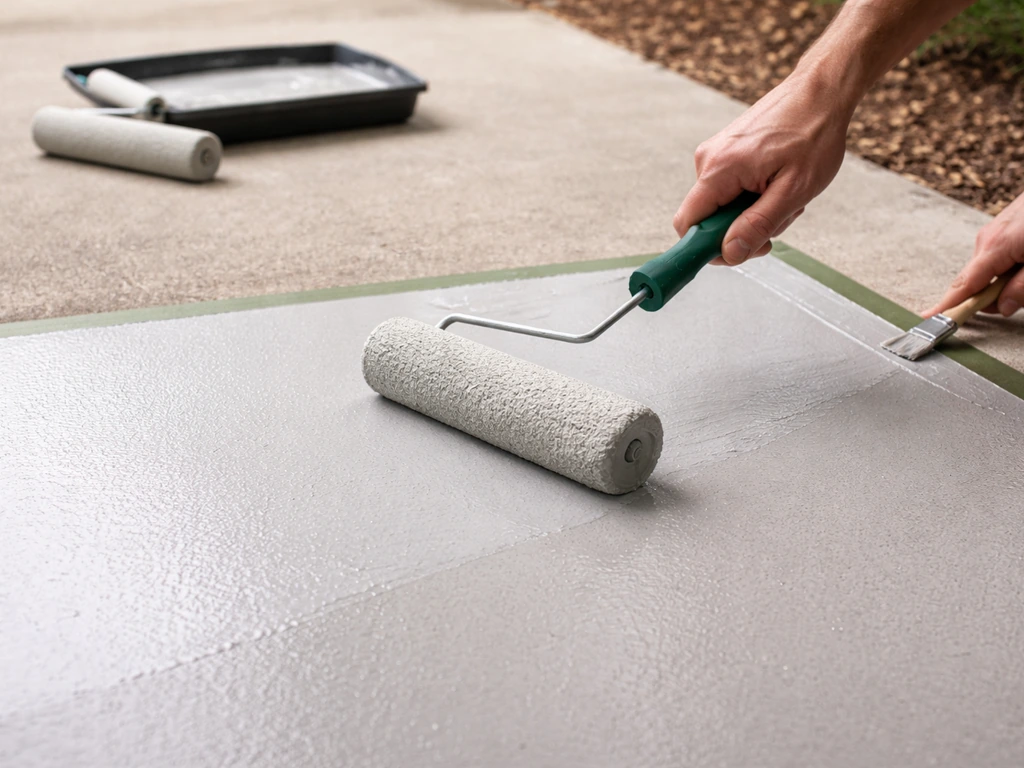
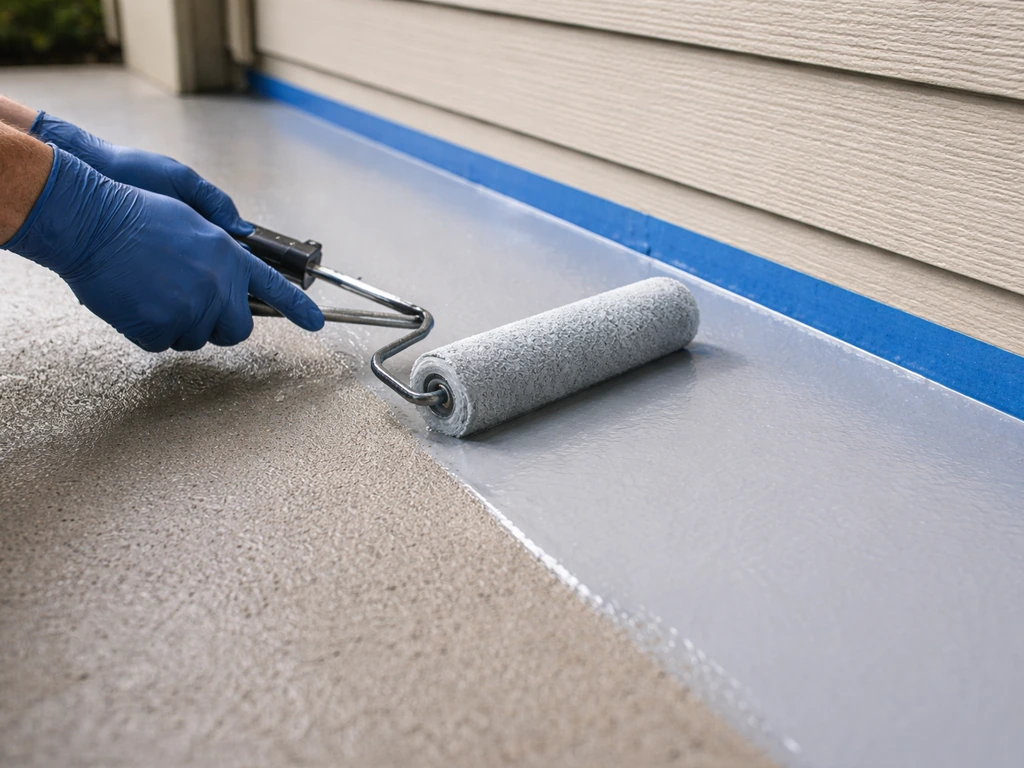
Once prep is done, application is straightforward. For most homeowners coating a typical concrete porch or patio, a 3/8-inch nap roller is the right tool. It holds enough product to cover the surface evenly without over-applying, and it works the coating into the texture of the concrete better than a foam roller. Cut in corners and edges with a brush first, then roll the field in sections, working from the far end toward your exit point so you don't paint yourself into a corner.
- Stir, don't shake, your coating to avoid introducing bubbles into the film.
- For 2-part epoxy, mix the resin and hardener exactly as specified. Watch your pot life: products like Sika's FTP Primer have a pot life of roughly one hour at 77°F, and working past that point means the material is already curing in the bucket.
- Apply thin, even coats. Two thin coats outperform one thick coat every time. Thick coats trap solvent, don't cure evenly, and are more likely to sag or bubble.
- Add your non-skid additive to the final coat only, not the base coat, so it sits at the surface where it provides traction.
- For large patios over 400 square feet, a floor-grade airless sprayer can speed up application, but back-roll immediately after spraying to ensure even penetration into the concrete texture.
- Don't apply in direct sunlight on a hot day. Surface temperatures above 90°F cause coatings to dry too fast, which leads to bubbling, uneven film build, and poor adhesion.
Curing, recoating, and maintenance to prevent peeling and fading
Dry time and cure time are not the same thing. A 1-part epoxy coating might be dry to the touch in a few hours, but it hasn't reached full hardness. Rust-Oleum RockSolid is ready for foot traffic in 8 to 10 hours, but that doesn't mean you should drag furniture across it. Behr's 1-part epoxy specifies 72 hours before heavy foot traffic, and the full cure that lets the coating reach its rated hardness and chemical resistance typically takes 5 to 7 days. Don't rush it.
For recoating, timing windows matter. Rust-Oleum's RockSolid Clear Coat can be applied after the base coat has dried hard or after a minimum of 12 hours. If you wait longer than 30 days to add a second coat, you need to clean and degrease the surface again before recoating, because dust, contaminants, and surface oxidation will have built up. This is a step a lot of DIYers skip and then wonder why their second coat peels.
For long-term maintenance, the goal is simple: keep the surface clean and catch problems before they become failures. Sweep regularly to remove abrasive grit that scratches the coating. Rinse with water after salt use in winter. For mildew-prone climates (think the Southeast or Pacific Northwest), wash annually with a diluted bleach-and-water solution or a deck wash rated for coated concrete. Inspect the coating each spring and touch up any chips or thin spots before water gets underneath them. A spot repair takes 30 minutes. A full strip and recoat takes a weekend.
Most quality porch and patio coatings will last 3 to 5 years under normal residential use before needing a fresh coat, longer if the surface was well prepped and the coating is maintained. Pool-adjacent patios see more wear from chemicals and splash moisture, which shortens that window, a topic worth thinking through if you're dealing with a pool surround specifically.
Common mistakes and when to call a pro
The mistakes that kill porch and patio paint jobs almost always happen during prep, not application. Coating over a damp slab, skipping the etch step, painting over a sealed surface without testing adhesion first, and applying in hot direct sunlight are the top offenders. A close second is choosing the wrong product for the climate, like using a standard latex porch paint on a sun-blasted Southwest patio and expecting it to last more than a year.
- Applying to concrete less than 30 days old: the slab is still curing and off-gassing, and no coating will bond reliably
- Skipping moisture testing: a surface that looks dry can still have high vapor pressure, especially in spring or after heavy rain
- Painting over an incompatible sealer: if your concrete has a penetrating silane or siloxane sealer, most coatings won't bond to it without grinding or shot blasting the surface first
- Using interior epoxy or garage floor coatings marketed for interior use: they may not be UV-stable or rated for the thermal cycling of an outdoor surface
- Applying only one coat: one coat is almost never enough for durability on a high-traffic floor
- Ignoring the non-skid additive: a glossy or satin porch floor is a slip hazard when wet
When should you call a pro? If your slab has active cracks that are growing or shifting, widespread spalling deeper than about a quarter inch, or significant moisture intrusion issues (like a slab that stays wet days after rain), a coating is a band-aid, not a fix. A contractor who works with concrete coatings can assess whether the underlying issues need to be addressed first, and they have access to professional-grade floor grinders and shot blasters that produce better adhesion profiles than DIY etching alone. If you're also thinking about upgrading the full patio structure, shade, or layout at the same time, it can make sense to get a contractor involved early so the coating work fits into the broader project rather than having to redo it after other changes are made.
For most homeowners with a reasonably sound concrete slab in average condition, this is absolutely a DIY-friendly project. Once you know what type of coating you need, you can focus on finding the right products and tools at nearby retailers or online for where to buy patio paint DIY-friendly project. Pick the right product for your surface and climate, take the prep seriously, give it time to cure, and you'll have a porch or patio that looks sharp and holds up for years. If you're comparing options for the best patio Colorado Springs homeowners can maintain, start by matching the coating type to your slab condition and sun exposure patio coating. That's genuinely all it takes.
FAQ
How can I tell if my concrete is too sealed or too damp for the best porch and patio paint?
Do not assume concrete is “dry” just because it feels dry. If water-bead testing shows sealing or the plastic-sheiting test shows condensation, wait and improve ventilation, or you may need to address the moisture source before coating.
Can I paint over an existing porch or patio coating instead of stripping it?
Yes, but only after you confirm the old layer is well bonded and compatible. Start by cleaning and checking adhesion with scratches or tape tests, then follow the manufacturer instructions for overcoating, because some coatings require stripping when the surface is glossy or contaminated.
What weather conditions should I avoid when applying porch and patio paint?
For epoxy-based systems, temperatures that are too cool can slow cure and increase the chance of moisture entrapment, while very hot direct sun can cause uneven flashing. Aim for mild, stable temperatures and avoid painting when the slab surface will be hot enough to “flash dry” early.
When do I need a primer for porch and patio paint, and when is it optional?
Use a primer when the product system calls for it, or when you have bare but porous concrete that is not properly etched. Overcoating without the correct primer is a common reason for peeling even when the paint type seems right.
Is it enough to add a non-skid additive to only one coat?
No. If a coated surface stays slippery when wet, adding traction to only the top coat may not be enough. Plan to add the non-skid additive to the final coat (or system-required layer) and consider extra attention near steps, ramps, and pool edges.
How long should I wait before moving furniture or grilling on a freshly painted patio?
Don’t rely on “dry to touch.” Full cure is what determines chemical resistance and furniture-safe handling. If you move heavy items too early, you can trap marks in the still-soft film that later look like permanent flaws.
What should I do if my porch coating starts chalking or looks dull after installation?
If the coating is chalking or powdering, it can indicate UV failure, an incompatible topcoat, or improper surface cleaning. Stop and identify the cause, then clean and correct the surface before recoating, otherwise the new layer can fail too.
Can I recoat porch and patio paint after the recommended window, and how do I recover?
If the first coat has passed the allowed recoating window, you usually need to clean and degrease before adding more coating. Extending beyond the window without surface prep commonly causes lifting and delamination at coat edges.
What’s the best way to patch chips or thin spots instead of repainting the whole patio?
For small failures like chips, remove loose coating down to a stable edge, clean, and feather the area. Spot repairs work best when you match the sheen and traction properties to the surrounding surface.
Can I use cleaners, sealers, or stains near the patio after painting it?
Generally, yes, but prioritize compatibility. Oil-based products, solvent-heavy cleaners, and certain sealers can interfere with adhesion. If you must stain or seal nearby areas, keep the treated areas protected until the coating has fully cured.
At what point is coating just a temporary fix and I should contact a concrete-coatings contractor?
Call a pro if cracks are actively expanding, you see recurring damp spots, or there is spalling beyond a light surface layer. These can indicate movement or moisture vapor pressure problems that a coating cannot permanently hide.