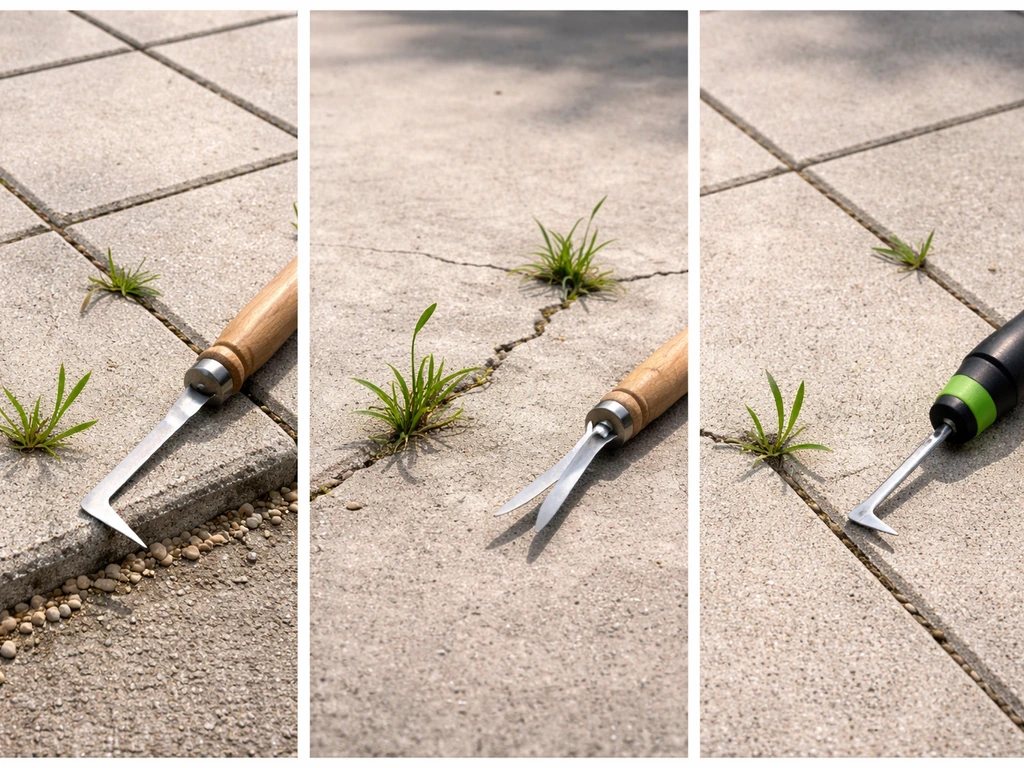
For most patio weeding jobs, a dedicated crack weeding tool or weeding knife is the best starting point. GARDENA’s EcoLine patio weeder is designed for cleaning patio gaps and uses a stainless-steel blade made from more than 45 percent recycled material EcoLine patio weeder uses a stainless-steel blade made from more than 45 percent recycled material. Options like the Fiskars X-series Weeding Knife or the Lee Valley Crack Weeder (10 inches long, hardened-steel blade) are built specifically for the tight gaps between pavers and in concrete joints, and they get weeds out root and all without gouging your surface. If you have a larger patio with heavy growth or deep-rooted weeds, step up to something like the Fiskars Xact Weeder with its long stainless-steel blade, or a long-handled oscillating hoe that lets you work standing up. Heat tools and powered trimmers are useful in the right situations, but they come with real trade-offs covered below.
Best Patio Weeding Tool: Compare Options and How to Use

What makes a patio weeding tool different
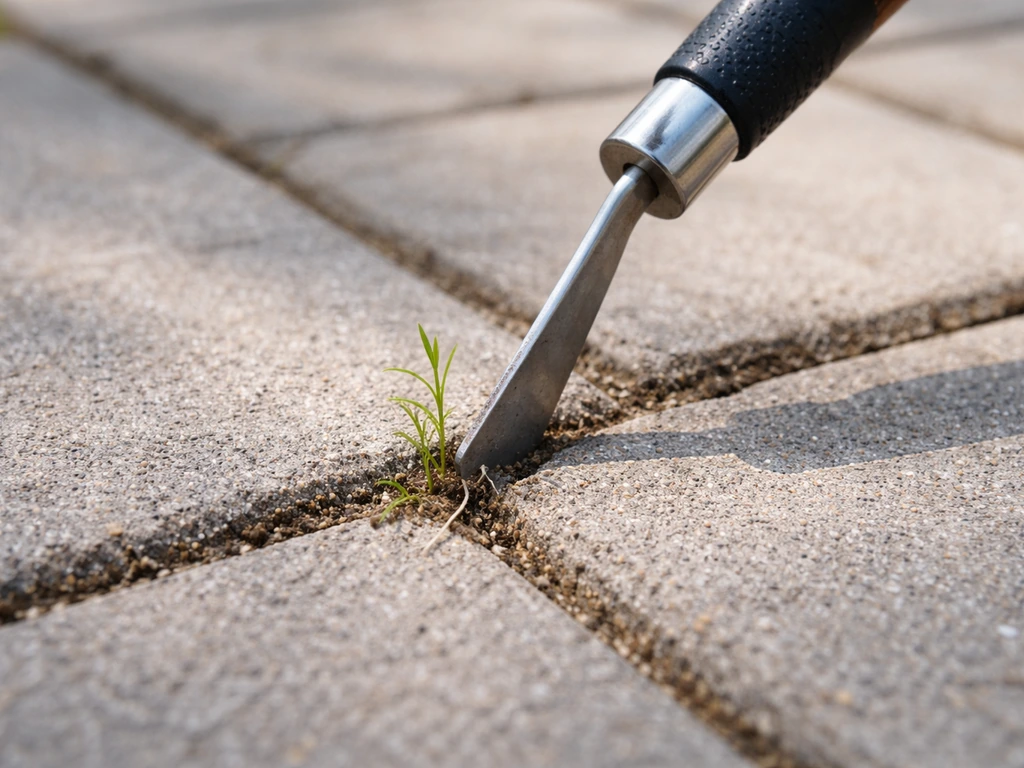
A patio weeder is not the same as a garden weeder, and the distinction matters. In a garden bed you have open soil, so almost any hoe or trowel works fine. On a patio you are dealing with hard surfaces, narrow joints or cracks (often 3/8 to 1 inch wide), and materials like concrete, natural stone, porcelain, or clay brick that can be scratched, chipped, or have their jointing sand disturbed if you use the wrong tool with too much force.
Weeds on patios grow differently too. They mostly colonize the joints because debris and moisture accumulate there, creating a soil-like medium that seeds can exploit. Some species tunnel their roots sideways under the pavers. That means a flat hoe that skims the surface is not enough. You need a blade that can enter a narrow gap, sever the root below the surface, and ideally lever the whole plant out without prying up the paver or scraping the face of the stone. Tools designed for this job have thin, stiff blades (usually hardened or stainless steel), a pointed or angled tip, and handles sized either for close-up hand control or enough reach to work without constant kneeling.
Best tools by patio surface and weed location
Not every tool suits every surface. Here is a practical breakdown by patio type and where the weeds are actually growing.
| Patio Surface / Situation | Best Tool Type | Why It Works Here |
|---|---|---|
| Concrete pavers with standard sand joints | Crack weeder / weeding knife | Thin blade fits 3/8"–1" joints without disturbing surrounding sand |
| Natural stone (flagstone, slate, travertine) | Hand weeding knife + small trowel | Gentle enough to avoid scratching irregular surfaces; precise root removal |
| Poured concrete with expansion joints | Crack weeder or long-bladed weeding knife | Gets into narrow expansion gaps; less risk of chipping concrete edges |
| Brick patio with wide joints | Oscillating hand hoe or crack weeder | Wider joints allow a broader blade; oscillating action cuts roots on push and pull |
| Porcelain or ceramic tile patio | Hand weeding knife only | Tile edges chip easily; avoid any metal scraping on the tile face |
| Surface weeds (not in joints) | Long-handled weeder / stand-up weeder | Saves your knees; leverage removes taproots from shallow topsoil at edges |
| Heavy weed growth across large area | Powered string trimmer (edging attachment) + follow-up hand weeder | Trims bulk growth quickly; hand tool finishes roots in joints |
One thing worth knowing about natural stone: it varies a lot regionally. Flagstone common in the Southwest tends to have wide, irregular joints, which actually makes crack weeders easier to use. If your patio is a tightly-laid bluestone common in the Northeast, joints can be very narrow and you may need the thinnest blade available.
Top tool recommendations: quick wins vs. heavy-duty
Quick wins for everyday patio weeding
- Fiskars X-series Weeding Knife: Slim stainless-steel blade designed specifically for weeds between paving stones and narrow areas. Great for maintenance-level weeding when you catch growth early. Affordable and easy to store.
- Lee Valley Crack Weeder: 10 inches overall length, hardened-steel blade, molded plastic handle. Excellent for kneeling work on small to mid-size patios. The short length gives you good control in tight joints.
- GARDENA EcoLine Patio Weeder: Stainless-steel blade ground on both sides (made from over 45 percent recycled material), designed specifically for driveways and terraces. Good if you want an eco-conscious option without sacrificing performance.
Heavy-duty options for stubborn or deep-rooted weeds
- Fiskars Xact Weeder (315540): Long stainless-steel blade that splits plants, cuts roots, and extracts deep-rooted weeds. Step up to this when you have dandelions, dock, or any taproot species that laugh at surface-level scraping.
- Long-handled oscillating (stirrup) hoe: For larger patios where kneeling for an hour is not realistic. The oscillating head cuts on both the push and pull stroke, making it faster for clearing wide areas of surface and border weeds.
- Powered string trimmer with edging attachment: Useful for heavy or overgrown patios, especially around edges and borders. Cornell's mechanical control guidance notes that string trimmers work best with consistent technique, keeping the line parallel to the surface to avoid flicking debris back at you or into joints.
- Propane weed torch: Effective for killing top growth quickly across joints. Important caveat: never use near dry mulch, wood fencing, or any combustible material. This tool is for open, non-combustible hardscape only, and it kills top growth rather than roots, so expect regrowth without follow-up treatment.
A note on heat and steam: research from the California Invasive Plant Council's non-chemical BMP work indicates there is no solid evidence that steam or hot-water treatments kill weed seeds in the soil, and heat can actually stimulate some seeds to germinate. So while a torch may brown off visible growth fast, it is not a root or seed solution on its own.
How to weed patios without damaging pavers or concrete
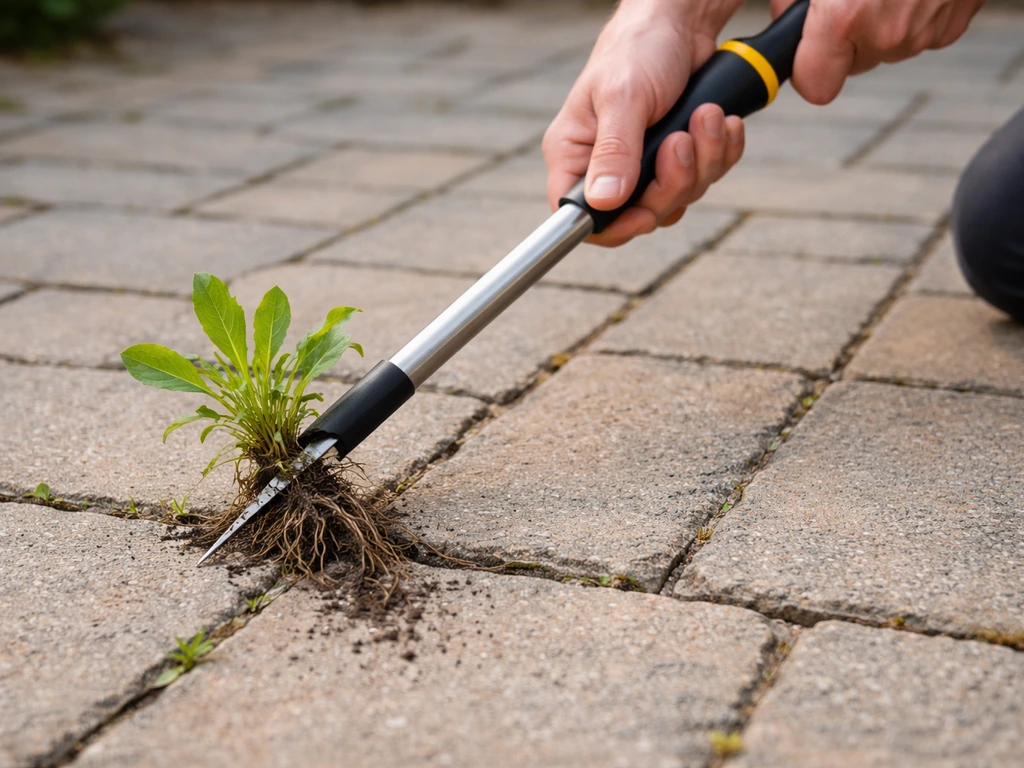
The most common mistake homeowners make is using too much lateral force, prying against the edge of a paver instead of cutting the root straight down. Here is the approach that protects your surface:
- Insert the blade into the joint at a slight angle, not perpendicular. Angling the tip toward the root lets you sever it without needing to lever sideways against the paver face.
- Use a push-and-twist motion rather than a lever. On deep-rooted plants, push the blade down alongside the root, then twist slightly to break it off rather than pulling straight up with the paver as your fulcrum.
- On scored or polished concrete surfaces, wrap the handle end of the tool in cloth or use a plastic-handled tool to avoid metal-on-stone contact if you need to rest the tool on the surface.
- Avoid metal blades on porcelain tile faces. If weeds are growing at the grout line of a tiled patio, use the blade only inside the grout joint, not across the tile surface.
- Do not use a pressure washer as your primary weed removal method. High pressure can wash jointing sand out of paver joints (one industry factsheet notes jointing sand can be inadvertently removed during cleaning), and it doesn't remove roots. If you do pressure wash after weeding, angle the nozzle at roughly 45 degrees to the joint rather than straight in, and keep pressure moderate.
If your patio uses polymeric sand in the joints, be especially careful. Products like QUIKRETE HardScapes Polymeric Jointing Sand and Sakrete PermaSand are designed to harden and resist weed growth, but aggressive digging or high-pressure washing can break the bond. blank" rel="noopener noreferrer">Sakrete PermaSand (polymeric jointing sand) is formulated for filling joints between pavers or bricks and is designed to reduce weed growth and help resist joint washout and insect penetration. If you crack up or remove polymeric sand during weeding, plan to re-apply after you are done removing all the weeds. When rewetting polymeric sand, use a shower setting on your hose nozzle, not a fine mist and not a jet, as specified in installation guidelines from multiple manufacturers. After you weed, a garden hose with a shower setting can help you rinse joints safely before you reapply polymeric sand if needed.
Step-by-step weeding workflow and cleanup
Having a consistent process saves time and prevents you from spreading weed seeds around the patio before you can collect them. Here is the workflow I use and recommend:
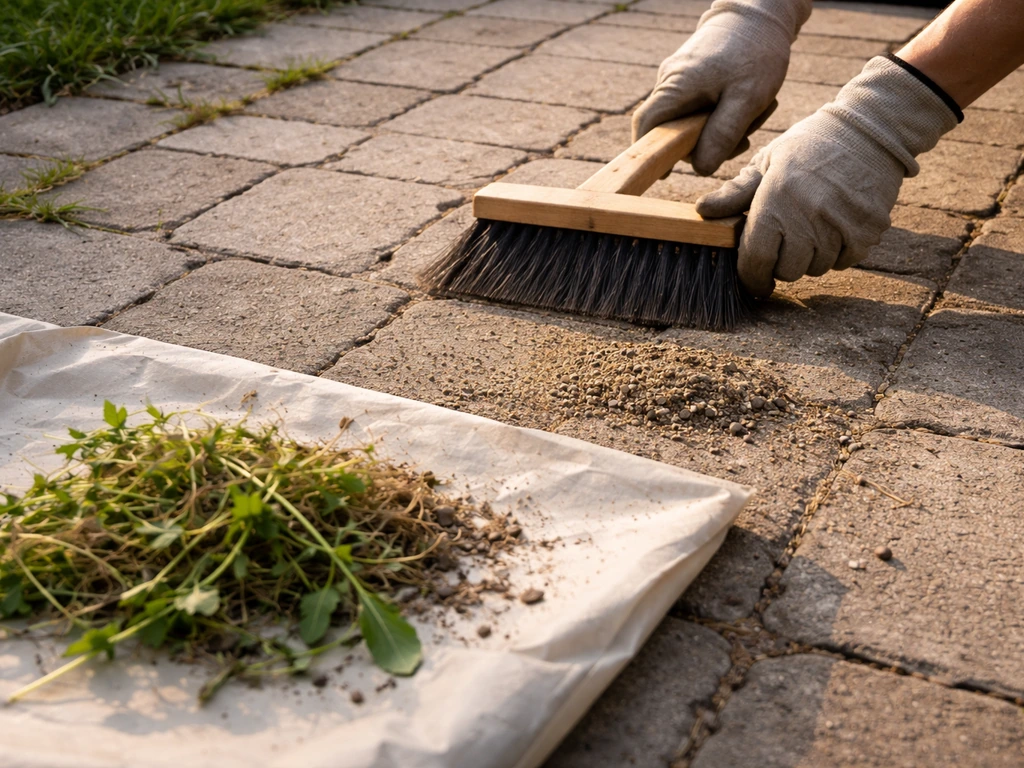
- Do a dry sweep first. Before you start pulling anything, sweep loose debris off the surface with a stiff outdoor broom. This removes seeds sitting on top and makes the joints visible. A good outdoor broom for patio use is also handy for final cleanup.
- Weed before plants go to seed. Cornell's turfgrass and landscape guidance specifically flags preventing weeds from going to seed as a key goal in mechanical control. If you see seed heads forming, those plants become priority one.
- Work section by section across the patio. Do not scatter pulled weeds behind you. Have a bucket or bag right next to you and drop every pulled plant into it immediately.
- Get the root. For crack weeders and weeding knives, confirm you have the root in hand before moving on. If the top snaps off and the root stays, mark that spot (a small stone on top works) and come back with the Xact Weeder or a longer blade tool.
- After weeding, sweep dry sand or polymeric jointing sand back into gaps. Any disturbed joint needs to be refilled promptly or you are just creating better growing conditions for the next round of weeds.
- If re-applying polymeric sand: follow manufacturer guidance for wetting (shower setting, not jet or fine mist), and allow full cure time before traffic. Most products need 24 to 48 hours.
- Final sweep and hose-down. Sweep the patio surface clean, then rinse at low pressure to remove any remaining debris. Check joints again after drying and top up sand if any has washed out.
After weeding is also a good time to think about the rest of your patio cleaning routine. Pairing weeding with regular sweeping using a quality outdoor broom or patio brush keeps debris from accumulating in joints and reduces future weed pressure significantly. If you want a simple option for routine patio cleanup between deeper weeding sessions, the best patio brush can help you sweep debris out of cracks and joints. If you want the easiest long-term maintenance, choose the best patio broom for sweeping debris out of joints before weeds take hold a quality outdoor broom or patio brush. If you want a simple upgrade, choose the best outdoor broom for patio use to sweep joints clean and reduce future weeds quality outdoor broom or patio brush. If you want to keep things tidy between weed sessions, good patio storage can also protect tools and supplies from moisture and clutter.
Safety, weed control limits, and do/don't tips
Things to keep in mind before you start
- Weed torches near combustible materials are genuinely dangerous. Do not use a propane weed torch near dry grass, wood fences, deck boards, mulch beds, or any structure. This is a tool for open hardscape only.
- Steam and boiling water do not sterilize the soil. They may kill surface growth but research indicates they do not reliably kill weed seeds in the ground, and may stimulate germination in some cases. Do not rely on them as a prevention strategy.
- Near irrigation lines or buried drip systems: be careful with sharp crack weeders in areas where you know shallow irrigation runs close to the surface, especially at patio edges where drip lines are often installed.
Do and don't quick list
| Do | Don't |
|---|---|
| Remove weeds before they set seed | Let seed heads form and then pull (you'll scatter seeds) |
| Use a blade thin enough for your joint width | Force a wide blade into a narrow joint and pry |
| Refill disturbed joints with sand after weeding | Leave open joints exposed after weeding |
| Use shower setting when wetting polymeric sand | Use a fine mist or high-pressure jet on polymeric sand |
| Work in sections with a collection bucket close by | Toss pulled weeds onto the patio surface |
| Wait 14 days before pressure washing newly installed pavers | Pressure wash fresh paver joints before sand has cured |
| Keep torch away from any combustible material | Use a weed torch near mulch, fences, or dry vegetation |
How to choose based on budget, time, and patio size
Here is the honest decision framework. You do not need to spend a lot to solve most patio weed problems, but the right tool does depend on your specific situation.
| Your Situation | Best Tool Pick | Budget Range |
|---|---|---|
| Small patio (under 150 sq ft), light weeds, occasional maintenance | Fiskars X-series Weeding Knife or Lee Valley Crack Weeder | Under $25 |
| Mid-size patio, regular joint weeds, some deep-rooted plants | Fiskars Xact Weeder + GARDENA EcoLine Patio Weeder | $25–$60 for both |
| Large patio (300+ sq ft), heavy growth, don't want to kneel | Long-handled oscillating hoe + crack weeder for follow-up | $30–$70 |
| Overgrown or neglected patio with bulk top growth | Powered string trimmer (edging mode) + crack weeder + new polymeric sand | $80–$150+ depending on trimmer |
| Budget-first, quick fix today | Any crack weeder under $20 (Lee Valley, GARDENA EcoLine) | Under $20 |
| Premium, long-term solution | Quality crack weeder + polymeric sand re-application after weeding | $50–$100 plus sand cost |
If your patio is large, badly overgrown, or has pavers that have shifted and opened up wide joints, it may be worth getting a contractor's eyes on it before you invest heavily in tools. Refilling joints with polymeric sand is a realistic DIY project, but only after all weeds are fully cleared and any pavers re-leveled. Doing that right the first time saves you from repeating the whole process in a season.
On the time side: a small patio with light weeds takes 20 to 30 minutes with a good crack weeder. A larger neglected patio can take several hours across multiple sessions. If you are short on time, tackle it in sections over a few weekends, prioritizing any plants that are near flowering or have visible seed heads first. Keeping up with it using a regular broom or outdoor vacuum after weeding is done is the easiest way to keep future sessions shorter. An outdoor vacuum designed for patio debris can also help keep joints clear after you weed, making future cleanups easier.
FAQ
What’s the best patio weeding tool if my weeds keep coming back in the same joints?
Use your crack weeder, but focus on two things first: remove the entire root mass below the surface, then clean debris out of the joint afterward. If you have polymeric sand, any broken bond can trigger fast regrowth, so plan to reapply polymeric sand only after all visible plants are removed and the joints are rinsed safely (shower setting, not a jet).
Can I use the best patio weeding tool on sealed pavers or sealed concrete?
Be cautious with any tool that scrapes the face of the stone. Keep the blade action inside the joint only, because sealed surfaces can still chip at edges if you pry. If weeds are mostly on the surface between pavers, a handheld crack weeder may not reach enough, and you may need targeted removal plus joint re-cleaning rather than deeper digging.
How do I avoid damaging joint sand when using a crack weeder?
Cut downward, not sideways. Aim for a narrow entry point directly where the weed emerges, then lever the plant out with minimal prying against the paver edge. If you see joint sand crumbling or the weed has a long taproot, stop and switch to a thinner, stiffer blade or a longer reach tool designed for controlled vertical cut depth.
What tool should I choose if my patio joints are wider than 1 inch or the pavers are uneven?
A standard crack weeder may not be able to separate the root cleanly without extra leverage. In that case, consider a longer blade weeder or a long-handled oscillating hoe that lets you work with controlled angles, and prioritize re-leveling shifted pavers after the weeds are gone so you are not constantly repeating the same root removal in widening gaps.
Is there a way to weed a patio without disturbing polymeric sand?
Yes, but it requires gentler technique and a strict sequence. Remove plants only in the joint channel, avoid high-pressure rinsing before you pull everything, and after weeding use a shower setting to rinse without washing out the entire joint. If the polymeric sand bond is already compromised, expect to reapply after the patio is fully weed-free and dry enough for the re-sand step.
Should I weed after a rain or before one?
Weed after the surface has loosened but before joints are saturated. Slightly damp joints help the blade sever roots with less dust and less scraping force, but fully wet joints can make the soil-like buildup slippery, increasing the chance you pry against paver edges. A quick test on one weed helps you judge how much resistance you’ll get.
What’s the best patio weeding tool for weeds that grow between pavers instead of in the joints?
A crack weeder targets joints, so for between-paver growth you’ll need a tool with a tip that can get under the root edge without gouging the top surface, or use repeated surface cuts that sever small roots rather than digging deeply. If the weeds are persistent in the same between-stone area, sweeping debris out and improving drainage around that zone often matters as much as the cutting tool.
How do I remove weed roots that are “tunnel” style under pavers?
Don’t just skim with a flat hoe. Use the thinnest stiff blade you can manage and try to cut the roots at the emergence point, then lever the plant out once the stem is freed. If the root keeps re-sprouting, repeat only after brushing out the joint debris and confirming you removed the intact crown, not just the visible top growth.
What’s a safe way to handle cleanup after using a patio weeding tool?
Collect plant material immediately and bag it, then do a controlled sweep of the joints right afterward. This reduces the chance of seed spreading. If you plan to re-sand polymeric joints, sweep first so you are not working on loose grit that can block sand from bonding to the joint walls.
When should I stop DIY and get help for patio weeds?
If pavers are shifting, joints are widely opened, or weed pressure is so heavy that you cannot clear it in a single coordinated session, it’s often smarter to get a contractor to assess drainage and leveling. Re-leveling and proper joint refill after full weed removal can prevent a cycle where the same roots keep exploiting the same gaps season after season.