For most homeowners, the best patio misting system in 2022 is still the best one today: a mid-pressure pump-fed system with stainless nozzles, mounted overhead at 10 to 12 feet, sized to your actual square footage. If your patio is under 400 square feet and you want something you can set up yourself in an afternoon, a tap-fed kit like the DIG BC380 Ocean Breeze handles it for well under $100. If you have a larger space, want serious cooling, or plan a permanent installation, a 150 PSI pump-fed system installed either DIY or by a pro is the move. The rest of this guide will help you figure out exactly which setup fits your patio, your climate, and your budget.
Best Patio Misting System 2022: How to Choose

Elise Prescott
22 Jun 2026
What 'best' actually means for a patio misting system
When someone searches for the best patio misting system, they usually mean: which one will make my patio feel meaningfully cooler without soaking me, flooding my furniture, or requiring a plumber? If you want the best patio misting system for 2021, focus on the same factors above: cooling performance, coverage, pressure, and total cost best patio misting system 2021. That's the right way to think about it, because 'best' varies a lot by situation. A 150-square-foot covered patio in Phoenix has completely different needs than a 600-square-foot open pergola in Houston.
The four things that actually determine whether a system is 'best' for you are: cooling performance (temperature drop you can realistically expect), coverage area (how many nozzles, how far apart, and whether the mist reaches where you sit), operating pressure (which drives droplet size and how quickly the mist evaporates before it hits you), and total cost including installation. If you are comparing options for a modern install, the best patio misting system 2020 is the one that matches your heat, wind, and coverage needs. Nail all four for your specific situation and you've found your best system.
How patio misting systems actually work (and what to expect)
A misting system forces water through tiny nozzles, breaking it into microscopic droplets. Those droplets evaporate almost instantly in hot, dry air, pulling heat out of the surrounding air as they do. That process is called flash evaporation, and it's what creates the cooling effect you feel. The faster the droplets evaporate, the better the cooling and the less you get wet.
Here's the honest reality on temperature drop: research shows most residential misting setups produce air temperature decreases in the range of 1 to 2 degrees Celsius under typical ambient conditions. In controlled studies with very close proximity to nozzles and ideal dry conditions, drops of 6 to 12 degrees Celsius have been measured. The wide range is not a sales gimmick issue, it's physics. Low humidity, moderate wind, and proper nozzle height all push results toward the higher end. High humidity, strong wind, and poor placement push you toward the lower end. If you're in Phoenix or Las Vegas, you'll feel a dramatic difference. If you're in coastal Georgia in August with 85% humidity, even the best system will feel like a modest improvement at best.
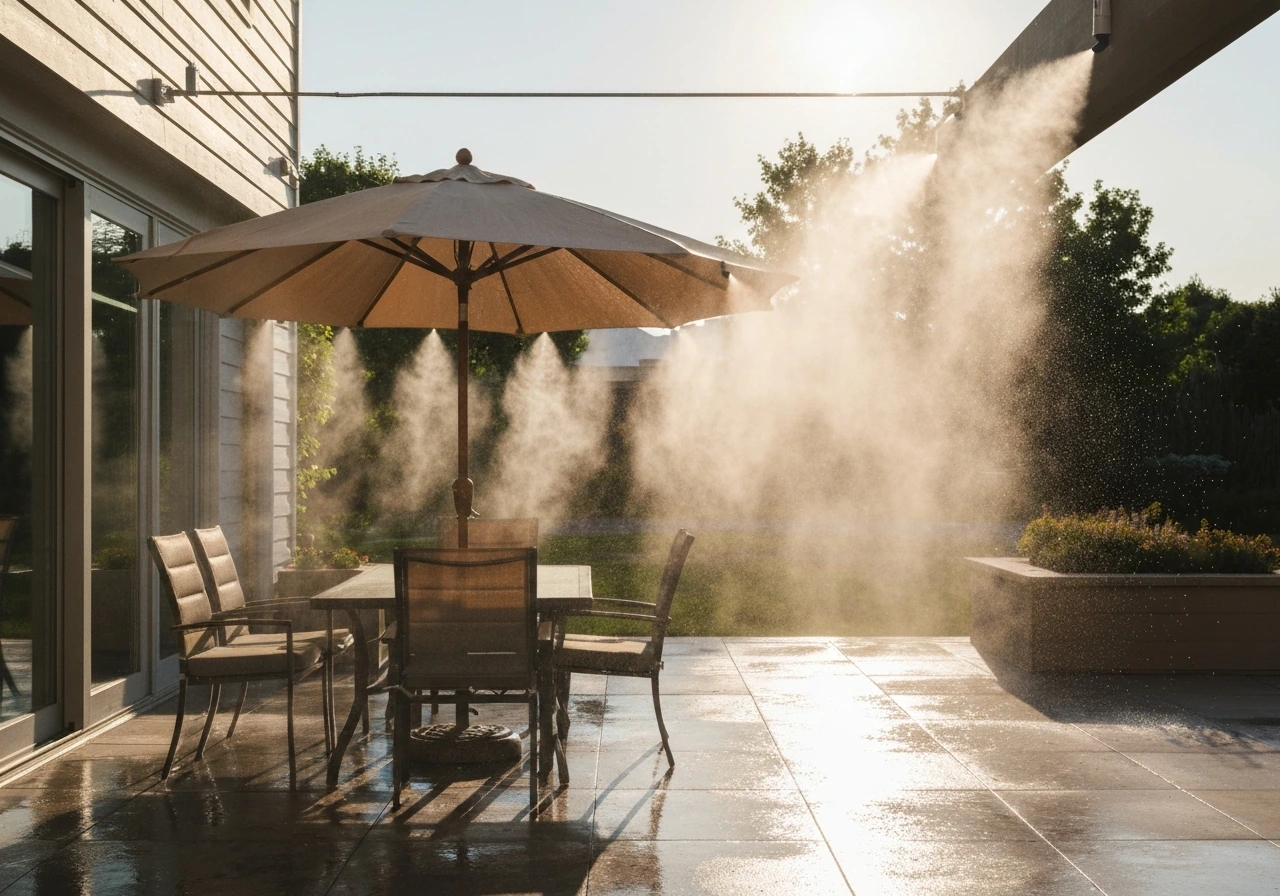
Wind is the other big variable. A light breeze helps carry the mist into your seating area. A strong wind disperses it before it can evaporate in the right place. Open patios with no windbreak are harder to cool well than covered patios with partial enclosure.
System types: portable vs permanent, pump-fed vs tap-fed
There are really two decisions to make: how the system gets its pressure, and how it's mounted. These two choices determine almost everything else about cost, performance, and complexity.
Tap-fed (low pressure) systems
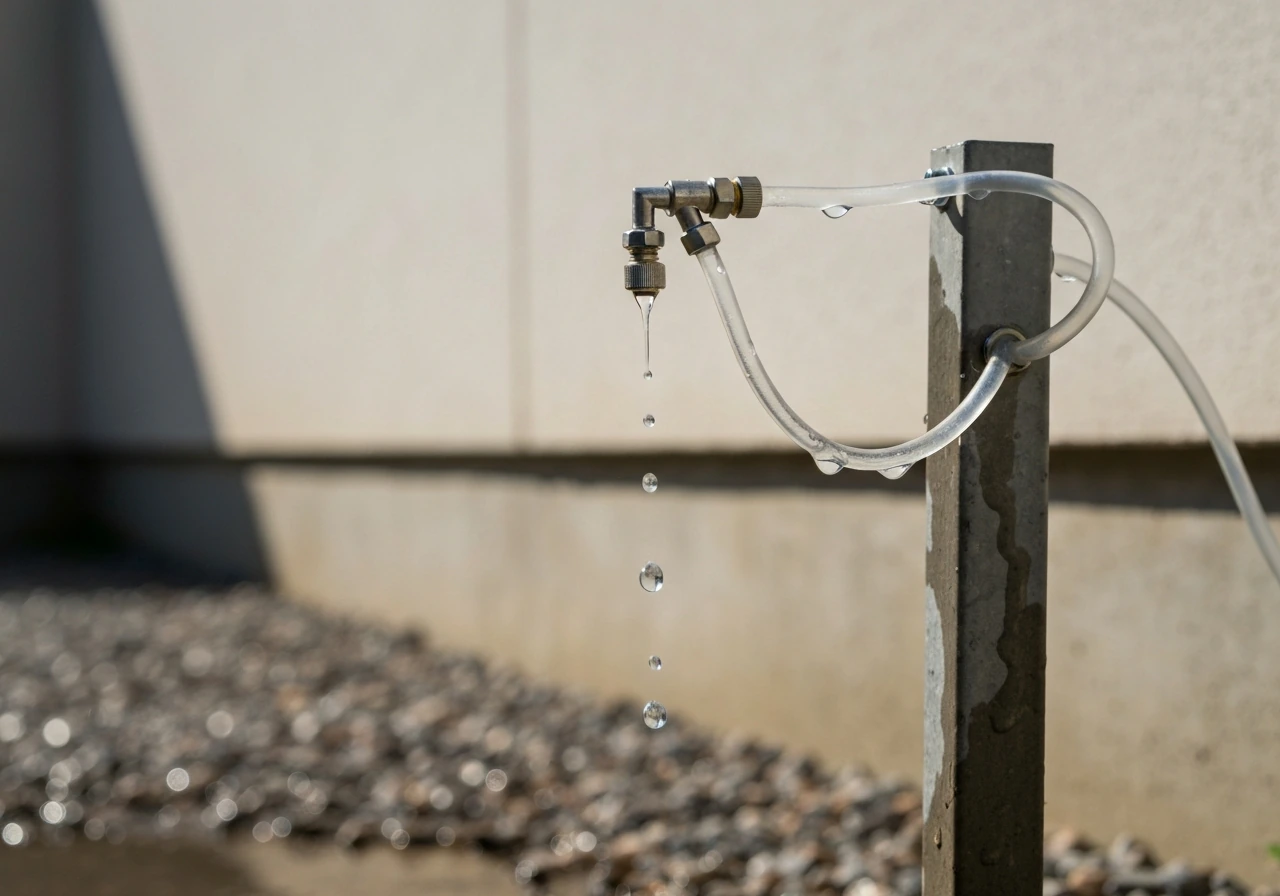
These connect directly to a standard garden hose bib and use your home's existing water pressure, typically 50 to 70 PSI. That's enough to push water through nozzles, but the droplets are larger than what you get from a high-pressure pump, so some mist falls before evaporating. On a dry, hot day this is completely fine. They're inexpensive, easy to install, and work well for patios under 400 square feet. The DIG BC380 Ocean Breeze kit, for example, covers up to 400 square feet using 50 feet of 3/8-inch poly pipe and ten 0.8 GPH foggers, all running on standard home water pressure with no booster pump needed.
Pump-fed (mid to high pressure) systems
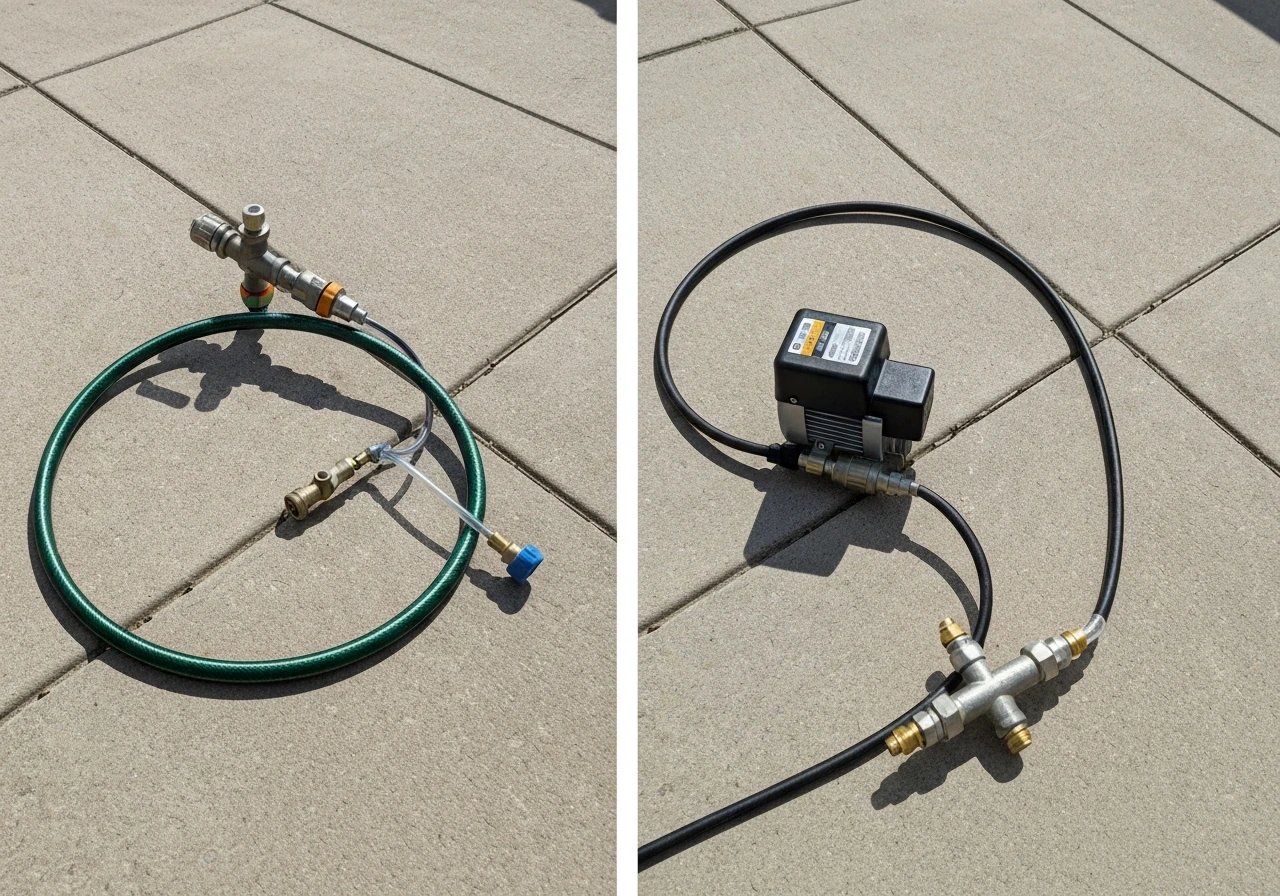
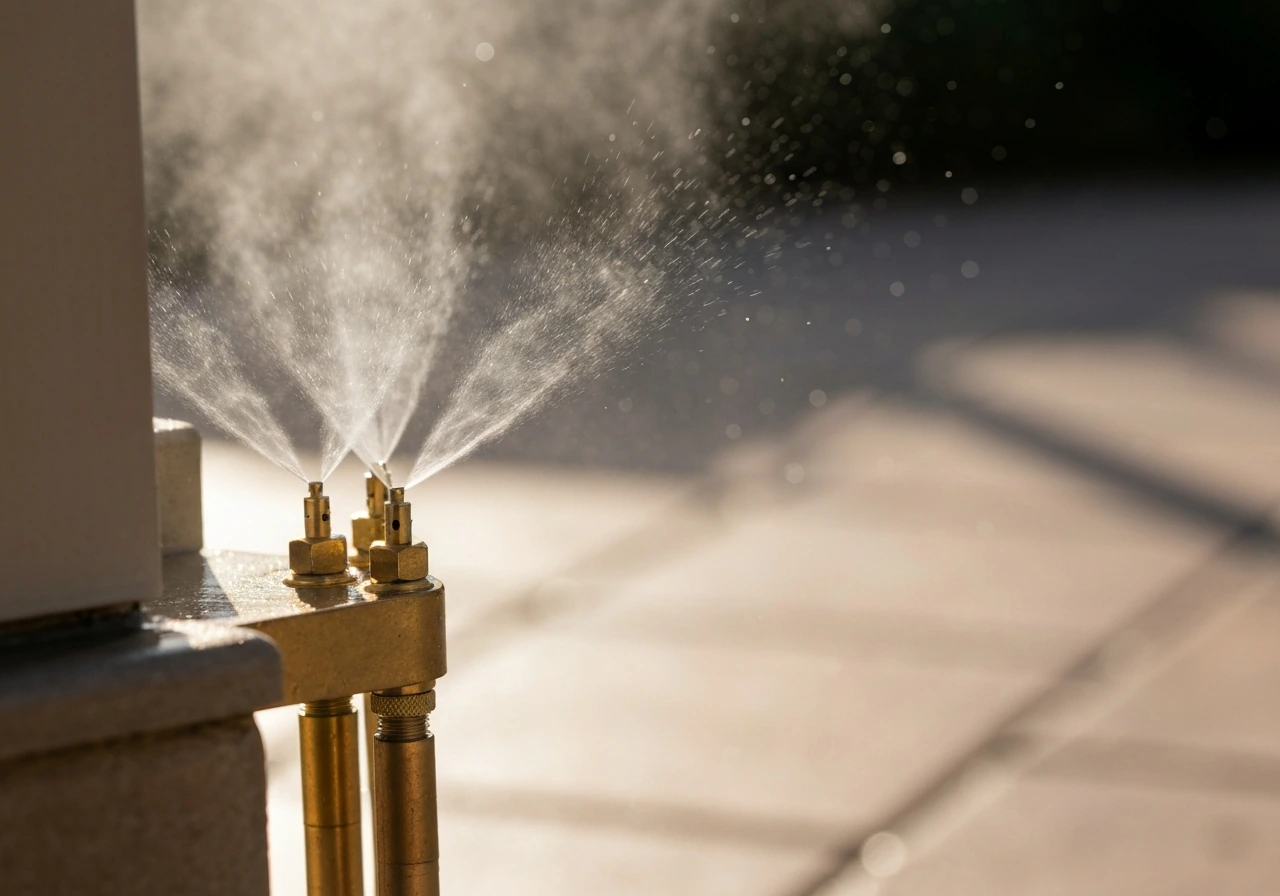
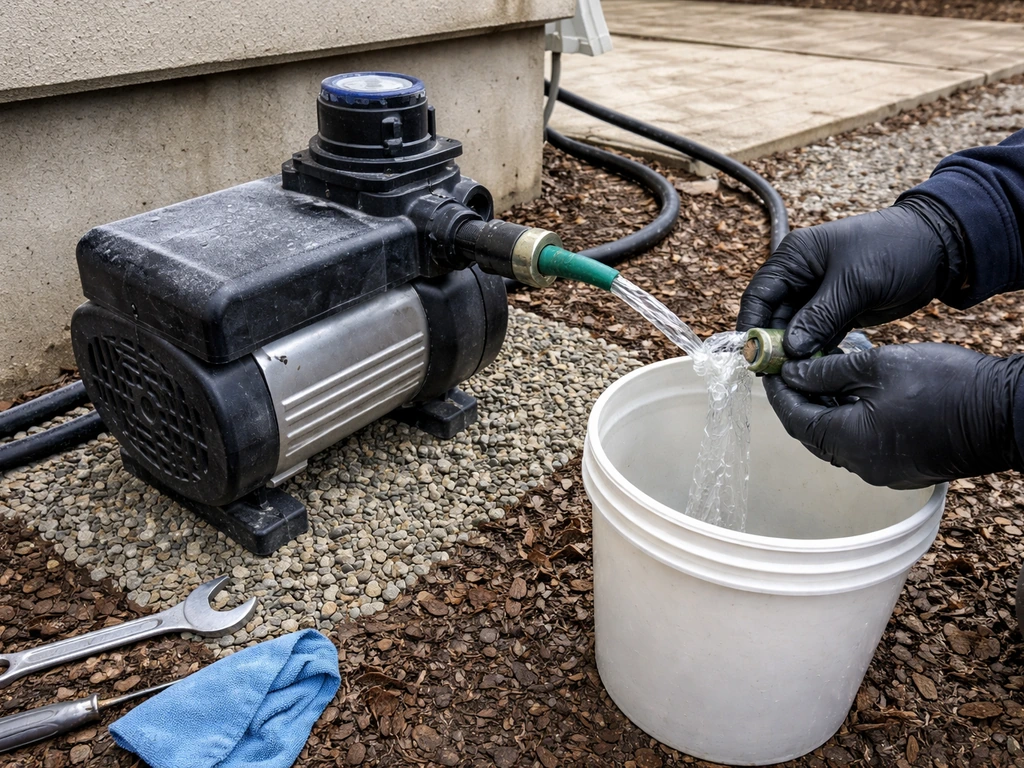
These use a dedicated pump to boost pressure, typically to 150 to 300 PSI. At 150 PSI, droplets are small enough to flash-evaporate in most climates before they hit you. At 300 PSI or higher, you get true fog-quality mist. A NOZZLE SPECIFICATIONS PDF from AeroMist/installation materials provides pressure and nozzle characteristics for low-pressure anti-drip systems, including examples that operate around 300 PSI and below blank" rel="noopener noreferrer">300 PSI and below using low pressure anti-drip systems. A pump like the Aero Mist 150 PSI unit takes standard 50 to 70 PSI home water pressure and boosts it to 150 PSI. These systems cost more upfront (the pump alone runs $200 to $600 depending on capacity), but they outperform tap-fed setups in coverage, droplet quality, and overall comfort. They're the right choice for patios over 400 square feet, open or semi-open spaces, and anyone in a hotter climate. If you are comparing the best patio mister system for your space, the right mix of pressure, droplet size, and coverage area matters just as much as climate.
Portable vs permanent mounting
Portable systems clip or hang temporarily, go up in minutes, and come down at the end of the season. Great for renters or anyone not ready to commit. Permanent systems are zip-tied, screwed, or strapped to your pergola, patio cover, or fascia, with tubing routed cleanly out of sight. They look better, perform more consistently, and hold up through the season without readjustment. For a homeowner with a fixed patio structure, a permanent setup is almost always worth the extra effort.
| System Type | Pressure | Best For | Approx. Cost | Install Complexity |
|---|---|---|---|---|
| Tap-fed portable kit | 50–70 PSI (home supply) | Patios under 400 sq ft, renters, budget buyers | $30–$100 | Very easy, DIY in under an hour |
| Tap-fed permanent | 50–70 PSI (home supply) | Small to mid patios, permanent look without pump | $60–$150 | Easy to moderate DIY |
| Pump-fed mid-pressure (150 PSI) | 150 PSI boosted | 400–1,000 sq ft patios, hot dry climates | $300–$700 installed DIY | Moderate DIY or pro install |
| Pump-fed high-pressure (300+ PSI) | 300 PSI or higher | Large patios, commercial feel, very hot climates | $600–$2,000+ installed | Best with pro install |
Sizing your system, placing nozzles, and planning coverage
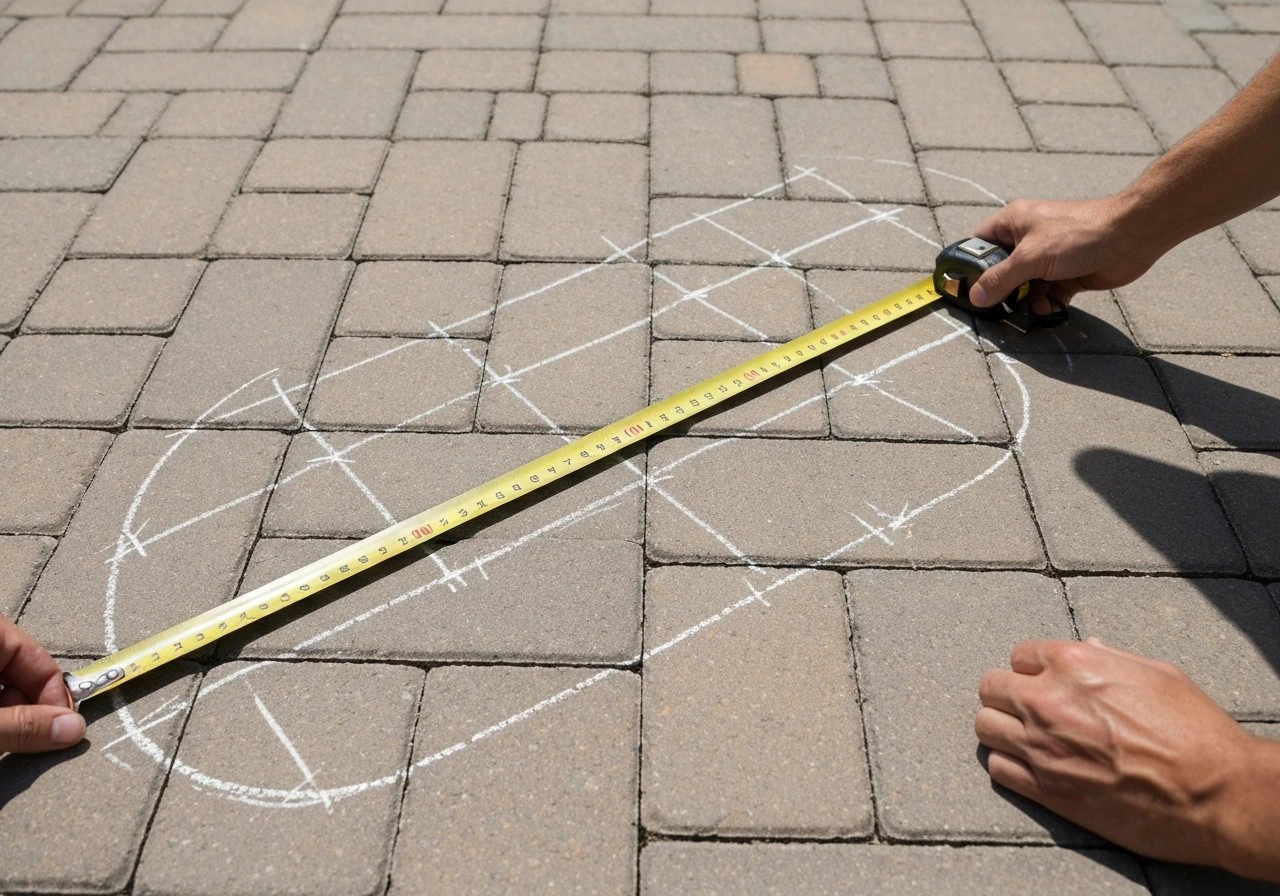
Before you buy anything, measure your patio. Walk it with a tape measure and get the square footage. Cool-Off's sizing guidance breaks it down simply: up to 250 square feet is a low-tier zone (a basic kit works), 250 to 500 square feet is mid-tier (you want more nozzles and potentially a pump), and 500 square feet and above is high-tier (a dedicated pump system is the right call, full stop).
Once you know the square footage, think about nozzle spacing. For a covered patio with one or more closed sides, aerMist recommends keeping inner misting lines at least 14 feet apart. For a covered patio with four open sides, that drops to 12 feet. For a completely open space with no roof, lines should be no more than 6 feet apart to compensate for how quickly the mist disperses. Nozzles along each line are typically spaced 18 to 24 inches apart on a standard residential install.
Mount your misting line at 8 to 14 feet above the ground, with 10 to 12 feet being the sweet spot according to professional installers. At that height the mist has enough air travel time to flash-evaporate before it reaches head level. Aim nozzles outward toward open sides of the patio rather than inward toward seating areas or walls. This keeps the mist where it cools the air entering your space and reduces the chance of wetting furniture or people.
For pump-fed systems, tubing diameter matters more than most people realize. If your pump is more than 15 feet from the misting line, run 3/8-inch supply tubing rather than 1/4-inch to prevent pressure drop that will kill your mist quality at the far end of the line. The same principle applies even further out: MistAway's own installation guidance says to use 3/8-inch tubing from the drum to the first nozzle if that first nozzle is more than 30 feet away. Pressure loss over long small-diameter runs is the single most common reason a system underperforms.
For flow and pump sizing, professional design guidance from MistAway targets 40 to 50 milliliters per minute per nozzle at 200 to 250 PSI. Multiply your planned nozzle count by per-nozzle flow rate to estimate your required pump output in gallons per minute. For a tap-fed kit reference point, the DIG BC380's ten 0.8 GPH foggers use roughly 8 GPH total at full output, which is a useful benchmark for a basic low-pressure setup.
Installation: DIY steps, when to hire a pro, and common mistakes
The DIY path (for tap-fed and mid-pressure pump systems)
- Measure your patio square footage and sketch a basic layout showing the perimeter and any overhead structure.
- Determine nozzle count and spacing based on your patio type (covered or open) using the spacing guidelines above.
- Select your system type: tap-fed kit for under 400 sq ft and simple setups, pump-fed for larger or more demanding installs.
- Run your supply tubing from the water source to the first nozzle. Use 3/8-inch tubing if the run is more than 15 feet.
- Mount your misting line to your patio structure at 10 to 12 feet using zip ties, clips, or saddle clamps every 2 to 3 feet.
- Install nozzles at your planned spacing, pointing outward. Use thread tape on all threaded connections.
- For pump-fed systems, use a T-fitting to split the line close to the pump to balance flow and pressure across both sides of the misting ring.
- Flush the system before installing nozzle inserts to clear any debris from tubing.
- Connect to your water source, turn on, and check for leaks at all fittings. Adjust nozzle direction as needed.
When to hire a pro
For a basic kit, you genuinely don't need a contractor. But if your patio is over 500 square feet, if you want the tubing concealed in channels or through the structure, if you need a dedicated water line rather than a hose bib connection, or if you're mounting on a pergola or patio cover that requires drilling into structural members, a professional installer is worth the money. MistAway notes that professionally installed misting systems cost roughly what a home irrigation system costs, which typically means $800 to $2,500 depending on scale. That's reasonable for a permanent installation that will run for years.
Common mistakes to avoid
- Using 1/4-inch tubing for long supply runs from pump to line — it causes pressure drop and poor mist quality at distant nozzles.
- Mounting the line too low (under 8 feet) — the mist hits people before it evaporates.
- Aiming nozzles straight down into the seating area — this wets furniture and people instead of cooling the air.
- Skipping the inline filter — clogged nozzles are the number one reason systems stop working mid-season.
- Not splitting the line with a T-fitting near the pump — pressure is uneven and far nozzles underperform.
- Installing without GFCI protection on any electrical components (see safety section below).
Water use, filtration, drainage, and winterization
How much water do misting systems use?
A tap-fed kit with ten 0.8 GPH nozzles uses roughly 8 gallons per hour at full output. That's actually pretty modest for the cooling it provides. A mid-pressure pump system with 20 nozzles running at 40 to 50 ml per minute per nozzle is in the range of 12 to 16 gallons per hour. Running three to four hours on a hot afternoon adds up to 36 to 64 gallons. Not trivial, but not alarming either for most water budgets.
Filtration: don't skip it
Standard drip irrigation filters (120 to 155 mesh) are not fine enough for misting systems. Misters require at least 200-mesh filtration because the nozzle orifices are so small that even fine sediment will clog them. Install an inline 200-mesh filter between your water source and the misting line, and check it monthly during the season. If you're in an area with hard water, mineral scale will build up on nozzle tips over time. The fix is easy: soak the nozzle tips in white vinegar for a few hours to dissolve the scale and restore the spray pattern.
Drainage and slope
Make sure your patio surface has adequate slope away from the foundation (typically 1/8 to 1/4 inch per foot). A misting system run for several hours, even a good one, will deposit some water on the surface. If drainage is poor, you'll end up with puddles that create slip hazards and potentially damage your patio surface or adjacent landscaping.
Winterization (don't skip this either)
One freeze can crack your pump housing, split tubing, and damage filter canisters. Even one night below 32 degrees Fahrenheit is enough. Before the first freeze of the season: disconnect the water supply, drain the inlet tubing, relieve pressure at the filter canister (press the red button if yours has one), and remove or open the lowest nozzle on each misting ring so the lines drain fully by gravity. Store the pump indoors. If you're in a climate with no hard freezes (parts of Florida, Southern California, coastal Texas), you can leave the system up year-round, but still flush and inspect filters at the start of each cooling season.
Safety and comfort: what most guides skip
Electrical safety
Any pump-fed system has an electric pump, and that pump will be running near water in an outdoor environment. Per NEC 210.8, any outdoor electrical receptacle in a wet or damp location must be GFCI-protected, and your outlet must have a weatherproof cover. Do not plug your pump into a standard indoor extension cord run out through a window. Use a dedicated outdoor GFCI outlet, and if one isn't close to your pump location, have an electrician add one. This is non-negotiable.
Slip risk
Misting systems do deposit water on the ground, especially on calm days when the mist has less air travel distance before landing. Polished concrete, smooth pavers, and tile get slippery when wet. If your patio surface is any of those materials, either add anti-slip mats in key areas, confirm your drainage slope is adequate, or adjust nozzle direction to push mist further from the primary traffic path.
Wind and humidity effects
Wind above about 10 to 15 mph will carry your mist plume away before it cools the air in your seating zone. On very windy days, the system is largely wasted. In high-humidity climates (relative humidity consistently above 60 to 70%), flash evaporation is slower, meaning more mist lands on surfaces before evaporating. You'll get less cooling and more wetness. This doesn't mean misting systems don't work in humid regions, it means your expectations should be calibrated. The systems covered by articles on best patio misting fans and misting fan combos can sometimes outperform standalone misting lines in humid climates by forcing the evaporation process with directed airflow.
Buying checklist and recommendations by budget
Use this checklist before you buy. Check off each item and you'll know exactly what you need. To choose the best home patio misting system for your setup, use the guidance above on performance, coverage, and installation choices.
- Measured patio square footage (under 250, 250–500, or 500+)
- Identified patio type: covered or open, and number of enclosed sides
- Noted available water pressure at nearest hose bib (most homes are 50–70 PSI)
- Measured distance from water source to planned pump or first nozzle location
- Decided on tap-fed vs pump-fed based on square footage and climate
- Selected 3/8-inch supply tubing if pump-to-line run exceeds 15 feet
- Confirmed GFCI-protected outdoor outlet is within cord reach of pump location
- Planned nozzle spacing based on patio type (6 ft lines apart for open, 12–14 ft for covered)
- Confirmed mounting height target of 10–12 feet on overhead structure
- Included a 200-mesh inline filter in the parts list
- Planned winterization approach based on your climate zone
Recommended options by budget and patio size
| Budget / Situation | Recommended Approach | Key Specs to Look For | Approx. Investment |
|---|---|---|---|
| Under $100 / small patio (under 400 sq ft) | Tap-fed kit like DIG BC380 Ocean Breeze | 50 ft poly tubing, 10 nozzles, expandable, no pump needed | $40–$80 kit |
| $100–$350 / mid patio (250–500 sq ft), dry climate | Mid-pressure tap-fed permanent line with quality brass nozzles | Brass or stainless nozzles, 200-mesh filter, 3/8-inch tubing | $80–$200 parts, DIY install |
| $350–$800 / large patio (400–1,000 sq ft) | 150 PSI pump-fed system, DIY installed | 150 PSI pump, stainless nozzles, T-split line, 200-mesh filter, GFCI outlet | $300–$700 all-in DIY |
| $800–$2,500+ / large or complex install | Professional installation, 150–300 PSI system | Concealed tubing, dedicated water line, stainless nozzles, pro warranty | $800–$2,500+ pro installed |
| Humid climate (Southeast US, Gulf Coast) | Pump-fed system paired with a misting fan | Directed airflow to force evaporation, 150 PSI minimum | $400–$900 depending on scale |
One last practical note on comparing years: systems recommended in 2022 guides are still the right systems today. The core technology hasn't changed meaningfully. What has changed is that pump prices have come down slightly and nozzle options at the mid-tier are better than ever. If you're cross-referencing older reviews about the best patio misting system from 2021 or 2020, the sizing math and installation guidance is still accurate, just confirm current pricing and check that replacement nozzles and filters for any kit are still available from the manufacturer.
Start by measuring your patio, pick the system tier that matches your square footage, confirm your electrical situation before you buy a pump, and plan your winterization approach before the season starts. Do those four things and you'll get real, reliable cooling all season without the frustrations most people run into. A top-quality best patio mist cooling system plan pairs strong cooling with proper coverage and placement so the mist reaches your seating area real, reliable cooling.
FAQ
How do I estimate how many nozzles I need if my patio shape is irregular (L-shaped or multiple zones)?
Treat it as two coverage zones and size each one separately, then split your nozzle count across the zones. If the zones share one main line, keep nozzle spacing consistent and avoid covering a dead corner with long stretches, because that usually creates uneven cooling and more wetting where mist lands first.
Can I use the misting system if I have a ceiling fan or patio heater under the cover?
Yes, but aim for clear airflow patterns. A ceiling fan can either help evaporation (good) or blow mist off target (bad). Run a short test, then adjust nozzle angle outward so the strongest mist stream lands in the seating-side airflow, not directly into the fan blades or heater exhaust.
What droplet size effect should I expect when switching from 150 PSI to 300 PSI?
Higher pressure generally makes finer mist that evaporates faster and feels drier at the seating area. The tradeoff is that fine mist can travel farther in wind, increasing the chance of overspray on walls, plants, or the opposite side of an open patio, so you may need tighter nozzle placement and better windbreaks.
Do I need an anti-drain or check valve to prevent water from flowing back when the system shuts off?
In many setups, a check valve helps reduce drips and water hammer, especially on pump-fed systems with long vertical rises. If your kit does not specify one, look for guidance in the manual or ask the installer, and verify the tubing slope still drains toward the correct low point during shutdown and winterization.
Why does my system sometimes run but feel weak, even though the PSI seems correct?
Common causes are clogged or partially blocked nozzle tips, filter bypass, and pressure loss from undersized tubing runs. Confirm you have at least 200-mesh filtration, then inspect nozzles for uneven spray patterns and measure pressure at the pump output and near the farthest nozzle location if possible.
How often should I clean or replace the 200-mesh filter?
At minimum, check it monthly during use season and clean or replace based on how quickly pressure drops or spray pattern degrades. If you notice heavier misting near the first nozzles and a weak plume at the far end, that is often a filter restriction that needs attention sooner than the monthly schedule.
Is it safe to run a misting system during light rain or right after rainfall?
Avoid running in steady rain or when ground conditions are already wet, because you can increase pooling and slip risk. Also, if your outlet is GFCI-protected but exposed to splash, keep the pump and connections elevated and dry. If you do run briefly after rain, test for drainage and adjust nozzle direction if water accumulates.
What’s the best way to prevent mist from wetting outdoor furniture and cushions?
Use nozzle aiming outward toward the open air space, and raise the mounting height toward the upper end of the recommended range. Also consider adding covers or using breathable cushion covers, because even well-evaporated mist can deposit a light film on fabric during calm, high-humidity afternoons.
How do I winterize correctly if my lowest nozzle sits above the ground or on an elevated line?
You need to ensure the lines drain fully by gravity. If the lowest point is not truly low enough, you may have residual water trapped in sections. Plan winterization so the system has a clear drain path, then remove the nozzle at the lowest ring or open the drain point recommended by your kit instructions.
What water flow increase should I budget for if I run it for 4 to 5 hours daily?
Compute it from your nozzle count and per-nozzle flow rating in the product spec. Then multiply by daily run time and number of days, and compare it to your household water budget. If you see unusually high water use, check for overpressure, leaks at fittings, or nozzles flowing at higher rates due to mineral buildup.