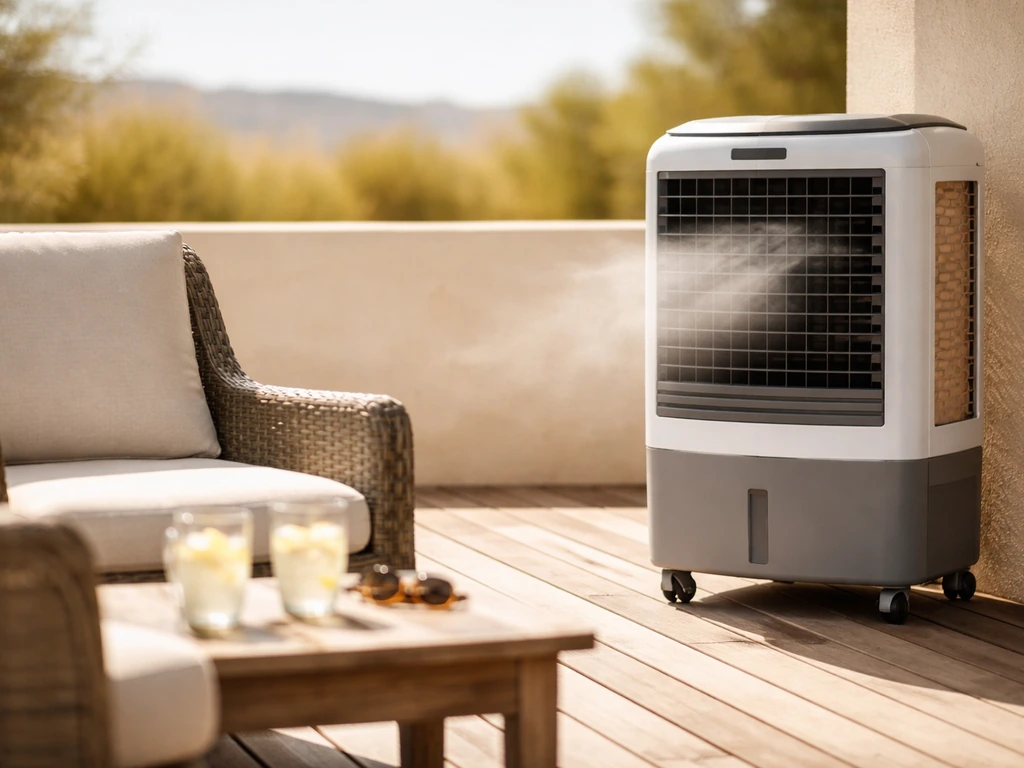
For dry climates (think Arizona, New Mexico, Nevada, inland California, Colorado), a patio evaporative cooler is genuinely one of the best cooling investments you can make outdoors. A well-matched unit can drop air temperature by 15 to 30 degrees Fahrenheit at the discharge, costs a fraction of running a portable AC, and works in completely open spaces where air conditioners are useless.
Best Patio Evaporative Cooler: Buyer Guide by Patio Size

Elise Prescott
29 Apr 2026
The catch is humidity: once outdoor relative humidity climbs above roughly 60% during the hottest part of the day, evaporative cooling becomes noticeably less effective and eventually pointless. If you're in the Gulf Coast, Florida, or the Mid-Atlantic humid corridor, you'll want to look at misting fans or other outdoor cooling options instead.
But if you're in a dry or semi-arid region and you have an outdoor patio baking in the summer heat, the right evaporative cooler will genuinely transform that space. If you're comparing options for the best cooler for patio in a dry or semi-arid region, an evaporative patio unit is often the clear win. In the right dry conditions, a life is good patio cooler can turn hot afternoons into comfortable outdoor time.
Why evaporative cooling works (and when it won't) for patios
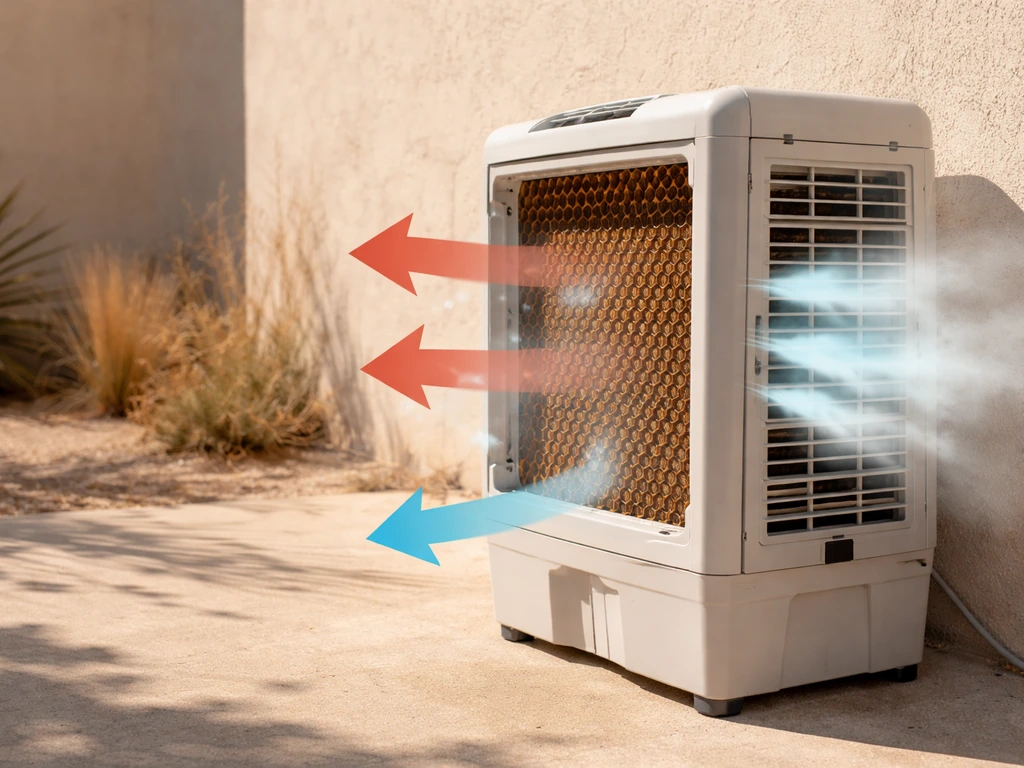
The physics are simple. An evaporative cooler pulls hot, dry outdoor air through water-saturated pads. As water evaporates, it absorbs heat from the airstream, dropping the dry-bulb temperature. The ceiling on how cool it can get is the blank" rel="noopener noreferrer">incoming air's wet-bulb temperature, which is directly tied to humidity. Lower humidity means a bigger gap between dry-bulb and wet-bulb, which means more cooling potential. Higher humidity shrinks that gap until there's almost nothing left to work with.
This is the fundamental reason a patio in Tucson in July (where afternoon relative humidity can sit at 15 to 25% before monsoon season) gets dramatic results, while a patio in Houston in August (where humidity often stays above 70 to 80%) gets almost nothing. Breezair, one of the major evaporative cooler manufacturers, pegs 60% relative humidity as the practical upper limit for useful performance. Above that threshold, you're mostly just pushing warm, damp air around.
Patios create one additional wrinkle that indoor rooms don't have: they're open. On a covered patio, you get partial containment and some shade, which helps both by reducing radiant heat load and giving the cooled air somewhere to collect before it disperses. On an open patio, you need significantly higher airflow to compensate for the fact that cooled air escapes in every direction. This isn't a dealbreaker, but it changes which unit you need and where you put it.
How to size a patio evaporative cooler
Evaporative coolers are sized by airflow measured in CFM (cubic feet per minute). For a fully enclosed indoor space with 10-foot ceilings, the standard rule of thumb is about 500 CFM per 100 square feet, which delivers roughly 30 air changes per hour. That math is a starting point for indoor rooms. For patios, you need to adjust upward, because air leaks out of an open or semi-open space constantly.
Here's the practical sizing approach for a patio. Start with your patio square footage and ceiling or roof height (or estimate 8 to 10 feet for an open patio). Multiply length x width x height to get cubic footage. Then divide by 2 to get a target CFM, which represents roughly 30 air changes per hour.
For an open patio with no roof, multiply that result by 1. 5 to 2x to account for air loss. A covered 200 square foot patio with 9-foot ceilings has a volume of 1,800 cubic feet, suggesting a baseline of around 900 CFM. For that same patio open on three sides, you're realistically targeting 1,400 to 1,800 CFM to feel meaningful cooling in the occupied zone.
| Patio Type | Example Size | Estimated Volume (cu ft) | Recommended CFM Range |
|---|---|---|---|
| Small covered patio | 100 sq ft, 8 ft ceiling | 800 | 800–1,200 CFM |
| Medium covered patio | 200 sq ft, 9 ft ceiling | 1,800 | 1,400–2,000 CFM |
| Large covered patio | 400 sq ft, 10 ft ceiling | 4,000 | 2,500–4,000 CFM |
| Open patio (semi-open, no roof) | 200 sq ft | N/A (open) | 2,500–4,500 CFM |
| Large open patio or deck | 400+ sq ft | N/A (open) | 4,500–6,500+ CFM |
Common portable patio evaporative coolers run from about 1,800 CFM on the small end up to 4,500 CFM for larger mobile units. Larger ground-mounted or permanently installed units reach 6,500 CFM and above. For context, Symphony's mobile lineup spans roughly 1,800 to 4,500 CFM depending on the model, and units like the Breeze Air 6500 hit 6,500 CFM at a noise floor at or below 60 dB. Don't undersize. A cooler that's too small for your space will run constantly, use just as much water, and leave you disappointed.
Key features that matter when comparing models
Not all evaporative coolers are built equally, and the spec sheet differences matter more than the marketing claims. Here's what to actually pay attention to.
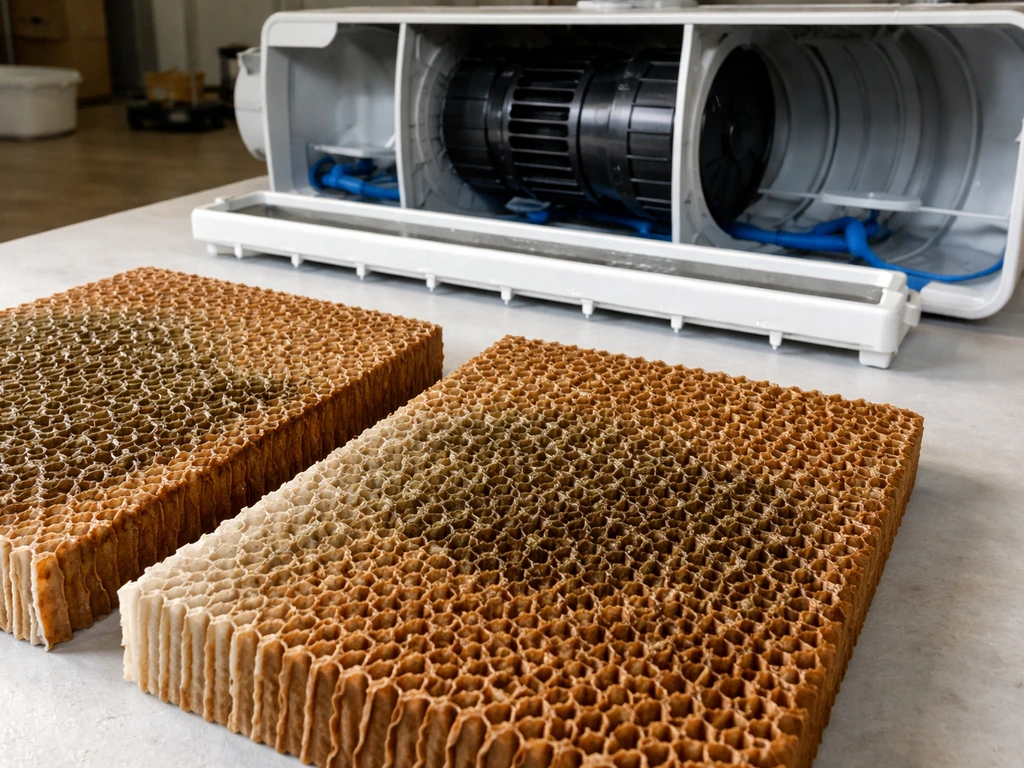
Cooling media (the pads)
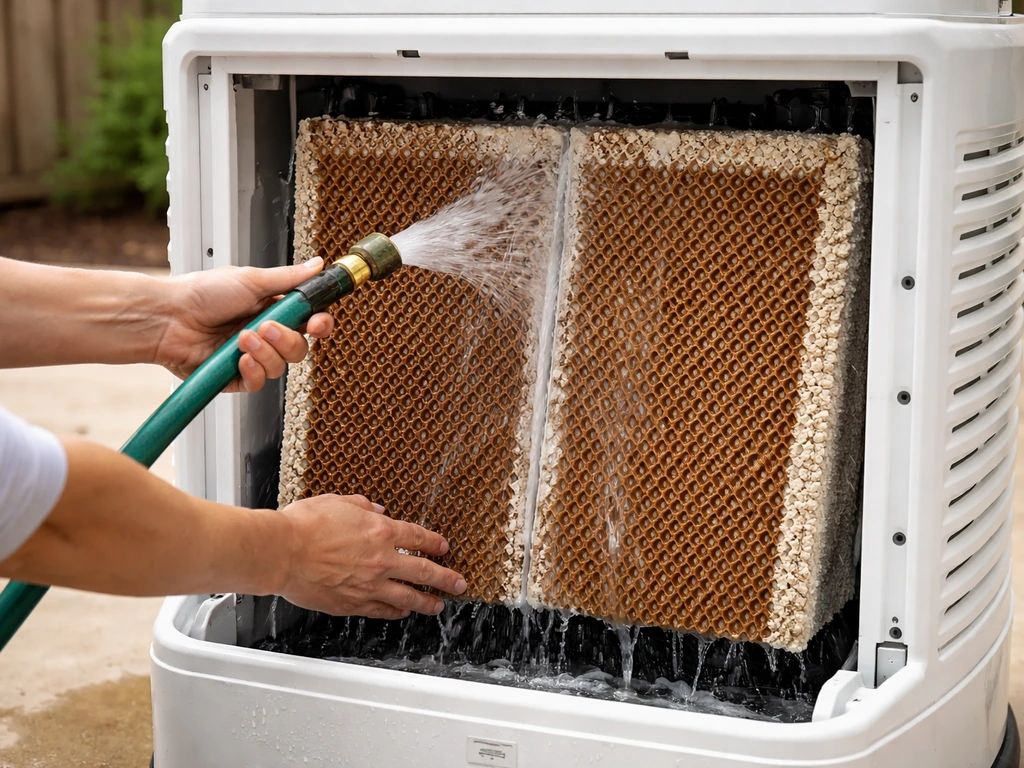
The evaporative pad is the heart of the unit. Rigid cellulose or synthetic honeycomb media (sometimes called Aspen wood wool pads) offers good surface area and evaporation efficiency. Thicker rigid media (100mm or 4 inches) tends to outperform thinner pads by increasing contact time between air and water. Look for pads that are easy to access and replace, because they will need periodic cleaning and eventual replacement, especially in hard-water areas where mineral buildup reduces both airflow and evaporation.
Water supply: tank vs. direct connect
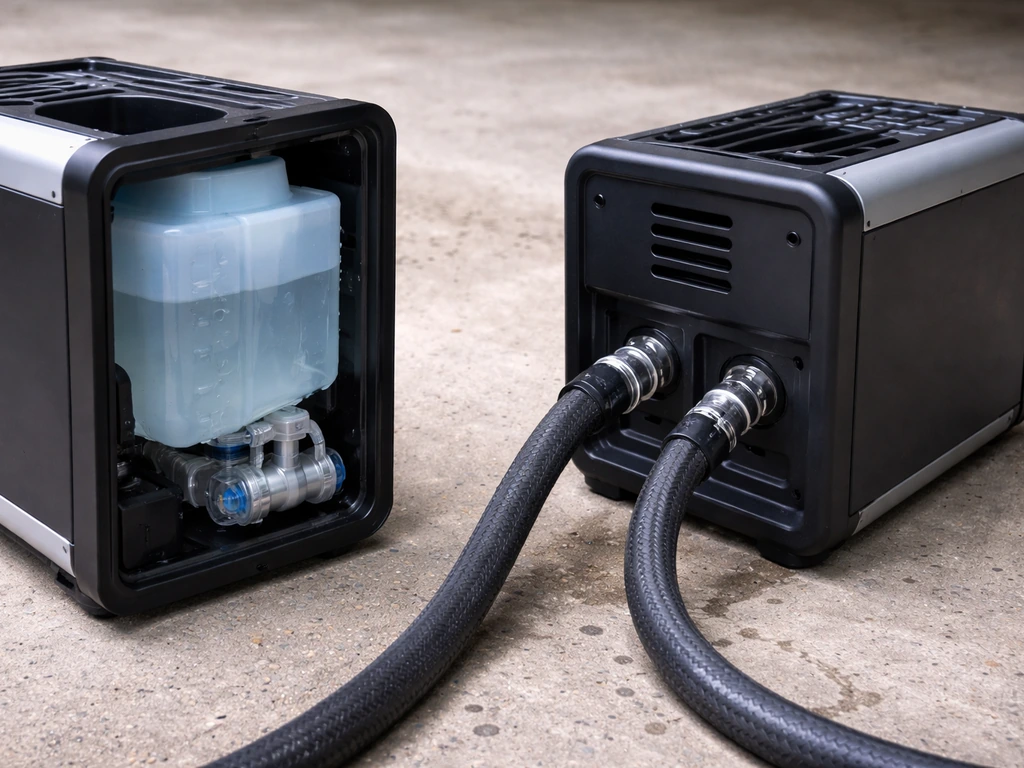
Portable units use an onboard water tank, typically ranging from a few gallons on compact models up to 26 gallons on larger towers like the Symphony Storm 100E. Direct-connect models hook up to a standard garden hose and run continuously without refilling, which is far more practical for all-day patio use. If you're running a cooler for more than a couple of hours at a stretch, direct connection is worth prioritizing. A unit consuming 2 gallons per hour (typical for a mid-size unit like the Breeze Air 6500) will drain a 10-gallon tank in about 5 hours.
Fan motor, CFM, and noise
Direct-drive motors are generally quieter and lower maintenance than belt-driven setups. Check actual CFM specs at rated static pressure, not peak theoretical CFM. Noise is worth checking too: for a patio conversation area, you want to stay at or below 60 to 65 dB at normal use distances. Many portable units run around 55 to 65 dB on high. Always look at the spec at the airflow setting you'll actually use, not just max.
Power consumption and portability
Even large evaporative coolers are extremely energy-efficient compared to air conditioners. The Symphony Storm 100E, for example, draws only 235 watts. A QuietCool QC18DVS delivering 2,600 CFM uses a similarly modest amount of power. This means most standard 15-amp outdoor circuits can run them without issue. For portable units, check that the power cord includes a GFCI (ground-fault circuit interrupter) or plan to plug into a GFCI-protected outdoor outlet, which is required by the NEC for outdoor receptacles. Portacool Cyclone models, for instance, build the GFCI directly into the power cord.
Controls and smart features
For patio use, remote control and multiple fan speed settings are genuinely useful since you may not want to walk over to the unit every time conditions change. A programmable timer and auto-fill valve are nice extras if you're leaving the cooler running while entertaining. Weather-resistant housings (UV-stabilized plastic or powder-coated metal) matter outdoors, especially if the unit lives on a covered patio exposed to afternoon sun or occasional rain splash.
Placement, installation, and water and power setup
Where you put the cooler matters almost as much as which cooler you buy. The goal is to position the unit so cooled air flows across the occupied seating or activity area, not into a wall or across empty space. For a covered patio, placing the cooler at one end and letting air flow lengthwise toward a partially open door or screen (giving the air somewhere to go) works best. Evaporative coolers are one-pass systems: they push 100% outdoor air, so they work best when there's an exhaust path for the warm air they're displacing.
For height, most portable floor-standing units work fine at ground level on a patio. If you're mounting a window or wall unit, position it so the discharge is at head height or slightly above to carry cooled air through the breathing zone. Avoid pointing discharge directly at seated guests from very close range, as the airstream close to the unit can feel damp or too forceful.
For water supply on a patio, run a standard garden hose to the unit's inlet valve if it supports direct connect, which Symphony's mobile coolers explicitly accommodate. Keep the hose length reasonable and protect it from UV degradation with a commercial-grade hose. If you're using a tank-fill unit, locate the cooler close enough to a spigot that refilling isn't a chore. On the electrical side, use only a GFCI-protected outdoor outlet. If your patio doesn't have one, have an electrician add it before running the cooler. Don't use an extension cord that isn't rated for outdoor, wet-location use.
For covered patios where you want a more permanent setup, some homeowners mount evaporative coolers on brackets or stands at the perimeter wall. If you go this route, account for the filled weight of the unit (water adds significant mass) and use appropriate anchoring hardware, similar to the reinforcement guidance that applies to window-mounted units.
Maintenance, cleaning, and seasonal care
Evaporative coolers are low-maintenance compared to AC systems, but they aren't no-maintenance. Mineral deposits from hard water are the main enemy: they clog the pads, reduce airflow, and cut cooling efficiency over time. A basic maintenance routine keeps performance high and extends the unit's life significantly.
During the season
- Inspect and rinse the cooling pads with a garden hose every two to four weeks during heavy use. In hard-water areas, do this monthly at minimum.
- Check the pump and water distribution system (the tube or manifold that drips water over the pads) for blockages or mineral scale. Rinse or descale as needed.
- Wipe down the exterior housing and intake vents to remove dust and debris, which can restrict airflow.
- Mid-season, inspect pads closely. If they're heavily encrusted with mineral deposits, crumbling, or showing reduced airflow, replace them. Most manufacturers sell replacement pads specific to the model.
- Keep the water reservoir clean if your unit uses a tank. Stagnant water encourages mold and algae growth.
End-of-season winterization
- Fully drain the water tank or pan. Leaving standing water over winter causes corrosion, mold, and potential freeze damage.
- If the unit has a drain plug at the bottom of the reservoir, open it and leave it open through winter so any rainwater or condensation drains out rather than pooling.
- Remove and inspect the pads. Replace any that are damaged before storing the unit so it's ready to run in spring.
- Clean the pump and rinse the interior before storage.
- Cover or store the unit indoors or in a protected location if possible, especially in climates with freezing winters.
Spring startup
Before first use each season, inspect the unit thoroughly. Check pads for winter damage or heavy mineral crust. Clean the pump and distribution manifold. Run water through the system before turning on the fan to make sure pads are fully saturated. This prevents the motor from pushing dry, dusty air through at startup and protects the pads from running dry.
Best-pick guidance by patio type and budget
There's no single best patio evaporative cooler for everyone. If you're trying to find the best outdoor evaporative cooler for patio use, focus first on CFM for your open or covered layout and then confirm direct-connect water and humidity fit. The right pick depends heavily on your patio size, whether it's covered or open, your regional climate, and how much you want to spend.
This is why many buyers end up choosing the best portable air conditioner for patio setups that match their humidity and airflow needs. The best patio air cooler is usually the one that matches your patio size and your local humidity, not the highest advertised CFM. Here's how to think through it by scenario.
Small covered patio in a dry climate (100 to 150 sq ft)
A portable tower-style cooler in the 1,800 to 2,600 CFM range is ideal here. You don't need a massive unit, and portability means you can bring it inside or store it easily. Budget options in the $150 to $300 range (compact portable coolers from Honeywell, Symphony, or similar) work well if you're in a reliably dry climate. If you want better build quality and direct-connect capability, mid-range units in the $300 to $500 range deliver noticeably better performance and durability.
Medium to large covered patio in a dry climate (200 to 400 sq ft)
This is the sweet spot for evaporative cooling on a patio. You want a unit delivering 2,500 to 4,000 CFM with direct-connect water capability. Units like the Portacool Cyclone series and mid-to-large Symphony mobile coolers serve this range well at $400 to $800. For a more permanent setup, a side-discharge or down-discharge commercial-grade evaporative cooler mounted at the perimeter wall is worth the installation investment if you use the patio constantly. Expect to spend $600 to $1,500 installed for a semi-permanent mounted unit.
Large open patio or deck in a dry climate (400+ sq ft)
Open patios need significantly more airflow and strategic placement. Look for units at 4,500 CFM and above, ideally two units positioned to create cross-flow rather than one oversized unit trying to push air in every direction. Commercial-grade units like the Breeze Air 6500 (6,500 CFM, 2 gal/hr water use) or QuietCool direct-drive models are strong candidates. Budget $800 to $2,000+ depending on how many units you deploy and whether you need a permanent water line run.
Semi-humid climates (relative humidity 40 to 60% in the afternoon)
Evaporative cooling still works here, but with reduced output. In the high desert Southwest during monsoon season, or in parts of Texas during shoulder season, you'll get maybe 10 to 15 degrees of drop instead of 20 to 30. A patio evaporative cooler is still worthwhile in these conditions if you go up one size category from what the square footage alone suggests. Combine it with shade from a patio cover or sail shade to reduce the radiant heat load, which meaningfully improves comfort even when the cooler's output is limited.
Humid climates (relative humidity regularly above 60% in the afternoon)
Honest answer: a standard evaporative cooler is not the right tool here. The physics simply don't deliver meaningful temperature drop when humidity is high. For these patios, misting fan systems or other outdoor cooling approaches will outperform an evaporative cooler. A patio cover that blocks radiant heat combined with a high-velocity fan may also be more effective than any evaporative solution. If you're in a coastal or Gulf region, it's worth exploring those alternatives before investing in an evaporative unit.
| Scenario | Recommended CFM | Unit Type | Approximate Budget |
|---|---|---|---|
| Small covered patio, dry climate | 1,800–2,600 CFM | Portable tower cooler | $150–$400 |
| Medium covered patio, dry climate | 2,500–4,000 CFM | Portable or semi-permanent | $400–$900 |
| Large covered patio, dry climate | 4,000–5,000 CFM | Semi-permanent or commercial portable | $700–$1,500 |
| Large open patio, dry climate | 4,500–6,500+ CFM (consider 2 units) | Commercial-grade or dual portable | $900–$2,500+ |
| Semi-humid climate (40–60% RH) | Size up one category | Portable with direct connect | $400–$1,000 |
| Humid climate (60%+ RH) | Not recommended | Consider misting fans instead | N/A |
Your pre-purchase checklist
Before you pull the trigger on a unit, run through these quick checks to make sure you're buying something that will actually work for your specific patio and region.
- Check your local afternoon humidity in peak summer. If it's regularly above 60% at 3pm, reconsider the cooler category entirely.
- Measure your patio: length, width, and ceiling or roof height. Calculate cubic footage and use the sizing guide above to find your target CFM range.
- Decide: portable (tank or direct-connect) or permanent mount? If you'll use it daily all summer, direct-connect is worth the extra setup effort.
- Confirm your outdoor outlet is GFCI-protected. If not, budget for an electrician to add one before the cooler arrives.
- Check water access: do you have a spigot or hose bib within reasonable hose distance of your planned cooler location?
- For covered patios, identify an exhaust path (open door, window, vent) so the cooler's airflow has somewhere to go.
- Verify the unit's pad replacement availability and cost before buying. If pads are proprietary and expensive, factor that into the long-term cost.
- Check the unit's weatherproofing rating if it will sit in direct sun or be exposed to occasional rain.
Get those basics confirmed and you'll have a clear picture of exactly which CFM range and unit type fits your patio. To choose the best outdoor evaporative cooler for patio use, focus on the CFM range, your humidity limits, and whether the unit can run with direct-connect water for continuous operation. From there, it comes down to features, budget, and brand preference.
The coolers that consistently earn strong marks in buyer roundups and testing are the ones that combine honest CFM output, quality media, reliable direct-connect water systems, and durable outdoor-rated housings. Match those specs to your patio reality, and you'll have a genuinely useful and comfortable outdoor space all summer long. To find the best patio air conditioner for your conditions, make sure you match the cooling type to your humidity and your patio size.
If you want the best outdoor patio cooling system for your conditions, focus on CFM output, humidity limits, and whether you can run a continuous direct-connect water setup.
FAQ
If my cooler is rated at high CFM, why does it still feel weak on my patio?
Not always. Measure the patio area, then decide whether it is open on multiple sides (more air escapes) or mostly covered (air recirculates locally). For open patios, plan on roughly 1.5 to 2 times the CFM you would estimate from volume alone, otherwise the unit will feel underpowered even if the label CFM looks large.
How can I tell before buying whether humidity will ruin evaporative cooling for my patio?
Humidity can vary by time of day and even by microclimate. If afternoons regularly exceed about 60% relative humidity, expect a sharp drop in comfort and smaller temperature differences. A simple check is to look at a weather forecast humidity chart specifically for your neighborhood and hottest hours, not the daily average.
Do covered patios and open patios really change the cooling requirement?
Yes, but it changes the “how much air you really need.” When the patio is covered and the enclosure reduces escape paths, a lower CFM unit can feel more effective. When the patio is open on three sides or more, you often need higher airflow and a clearer exhaust path so the warmed air can leave.
Where should I put the cooler on the patio so it actually cools people, not just the air nearby?
Place it so the discharge air crosses the seating area, not toward a solid wall or into a dead corner. Because evaporative coolers are essentially one-pass systems, you want a path for the displaced warmer air to exit, such as toward an open doorway, screen opening, or the least obstructed side.
Will direct sunlight on the unit or patio reduce the performance of a patio evaporative cooler?
If your patio gets strong afternoon sun, the cooler may lose effectiveness due to added radiant heat load. Shade can help more than people expect, even if the cooler’s temperature drop is unchanged. Aim to place the unit out of direct sun when possible, or add a sail shade to reduce incoming heat.
Can I use an extension cord with an evaporative cooler on a patio?
You typically should not rely on an extension cord for outdoor, wet-location use. Use a proper outdoor-rated cord if one is unavoidable, but the safer approach is to install or use a GFCI-protected outdoor outlet near the unit. Confirm the cooler includes a GFCI in the cord or that your outlet is GFCI protected.
What specs matter most, CFM or something else, when I compare models?
That “rated CFM” can be misleading unless you compare it under similar conditions and at rated static pressure. Also check noise at the fan speed you will actually use, since many units sound fine at max specs on paper but feel loud in normal conversation settings.
Is direct-connect water always better than a tank for patio evaporative coolers?
It depends on your water source. If you have hard water, you may need to clean pads more frequently and be more aggressive about flushing the system. For continuous use on a large patio event, direct-connect water is usually the practical choice so the unit does not require tank refills mid-party.
Why does pointing the discharge at guests feel uncomfortable even if the patio is cooling?
Most will not be comfortable when standing still right in front of the discharge at close range. If guests complain of dampness or “too strong” airflow, shift the unit farther back or angle it so cooled air sweeps across the seating area.
What maintenance steps should I do before the first hot day of the season?
Yes. Beyond the pads, look for mineral buildup points like the pump and distribution lines, and plan for seasonal pad replacement if mineral crusting is severe. A practical habit is to run water through the system before starting the fan at the beginning of the season to fully saturate the pads.
Would two smaller evaporative coolers outperform one large one on an open patio?
Consider it if you need consistent cooling during long sessions, but placement and exhaust still matter. If you can create cross-flow with two smaller units, you may get more usable comfort than one oversized unit trying to push air everywhere, especially on open patios.
What should I do if my patio humidity is high, but I still want the best outdoor comfort possible?
In high humidity, temperature drop may be too small to feel like true cooling. Instead, prioritize radiant heat control (shade) and high-velocity air movement, such as misting fans or other outdoor cooling options. Evaporative cooling can still help slightly, but comfort expectations should be adjusted.