
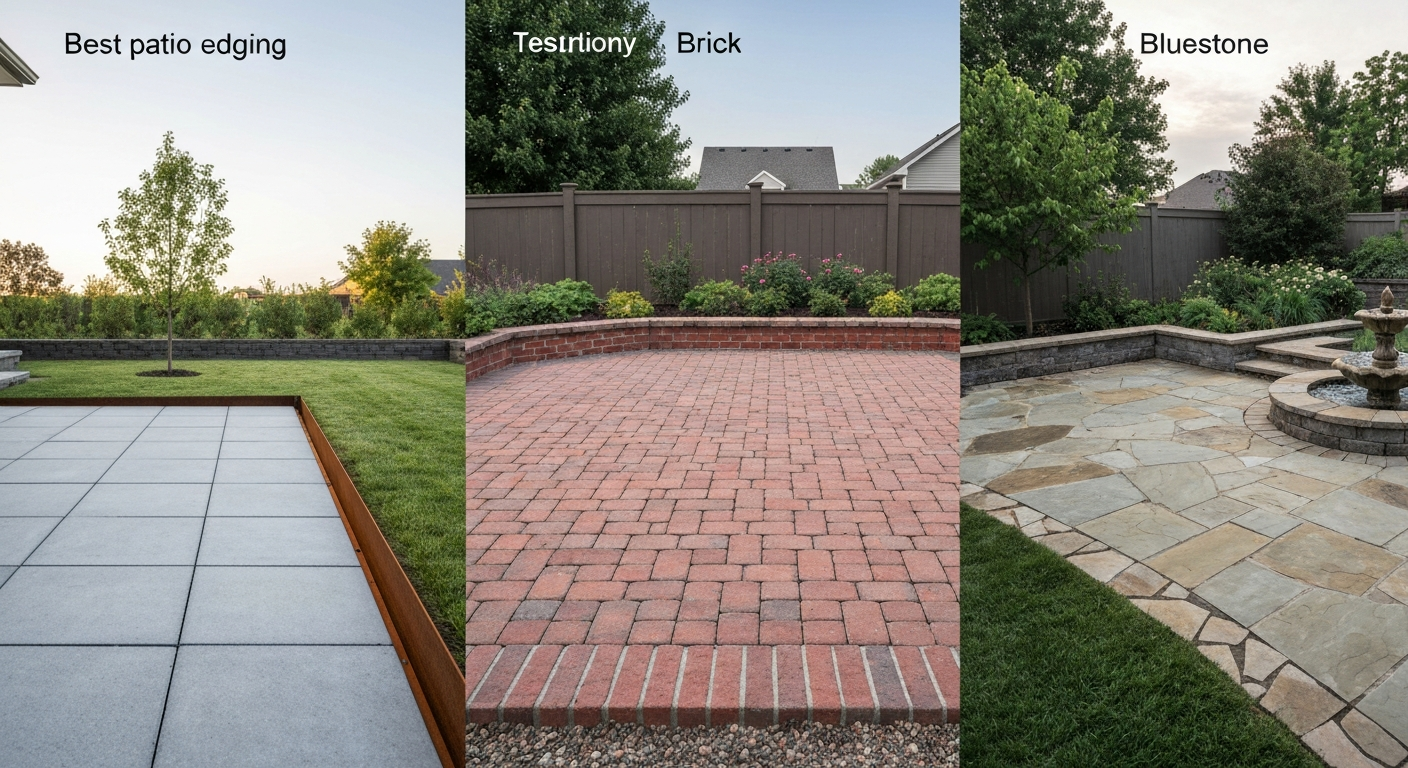
The best patio edging for most homeowners is either steel or brick, depending on budget and style. Steel (galvanized or Corten) gives you a clean, modern line that holds up for decades with minimal maintenance, typically running $5–$12 per linear foot installed. Brick lands in the same rough cost range ($2–$20/lf installed depending on complexity) and suits traditional or cottage-style patios beautifully. If you are on a tight budget and doing it yourself, flexible plastic or composite edging at $0.50–$4/lf is genuinely functional. If you want zero future maintenance and don't mind a higher upfront bill, poured or precast concrete curbing and natural stone are the long-term winners. The right choice really does depend on your climate, your patio's existing materials, and how much of this work you want to tackle yourself.
Best Patio Edging: Complete Guide to Materials, Costs

How to use this guide: DIY vs. hire, budget tiers, and your decision roadmap
Before diving into materials, let's figure out where you sit. This guide is organized so you can jump straight to the material section that fits your shortlist, or read straight through if you are still deciding. Here's a quick framework to orient yourself.
Are you a DIYer or are you hiring?
Plastic, composite, and basic steel edging are genuinely DIY-friendly. You can install 50–100 linear feet (lf) in a weekend with a rubber mallet, a spade, and a level. Brick, precast concrete, and flagstone step up in difficulty: you need to be comfortable with a wet saw, mortar mixing, and basic drainage grading. Poured concrete and large-format natural stone edging almost always warrant a professional, not because the skill ceiling is impossible for a motivated homeowner, but because the equipment cost and concrete timing make it impractical for a one-time project. A good rule of thumb: if the job involves mixing and placing concrete, renting a plate compactor, or cutting stone with a diamond blade, get at least one contractor quote before committing to DIY.
Budget tiers at a glance
- Entry-level DIY (materials only, you install): $25–$150 for a typical 50 lf patio edge using plastic or basic steel roll edging
- Mid-range DIY or simple hired job: $250–$750 for brick, precast concrete, or composite edging on a 50–100 lf project
- Full professional install, quality materials: $500–$2,500+ for most residential patio edges; Angi's 2026 national data puts the median installed landscape curbing project at roughly $1,455 (typically 50–100 lf including materials and labor)
- Premium natural stone or architectural poured concrete: $1,200–$4,000+ for 50–100 lf, driven by material cost and skilled labor
This guide covers each material category in its own section with installed cost ranges, climate guidance, and a short DIY checklist. Near the end you will find maintenance schedules, gap-filler and joint-sand recommendations, and tips for pairing edging with patio water features and fountains. If those are on your radar, the joint-and-gap section is especially relevant because water elements increase moisture stress on edging and joints.
Why patio edging actually matters (beyond just looks)
I have seen too many beautiful brick-paver patios slowly disintegrate at the edges because the original installer skipped or cheaped out on proper edging. Edge restraints and decorative edging are not the same thing, but the best solutions do both jobs. Here is what good patio edging actually does:
- Containment: Holds pavers, gravel, or base material from migrating outward. Without it, paver edges lift and shift within a few freeze-thaw cycles or heavy rain events.
- Drainage control: A properly graded edge channels surface water away from your home's foundation. Industry standard is a minimum slope of 1/4 inch per foot (about 2%) sloping away from the structure for the first 10 feet, which is also a Building America / DOE best practice for reducing foundation runoff risk.
- Weed suppression: A solid edge border reduces the gap between your lawn and patio surface where grass and weeds love to colonize.
- Aesthetics: A crisp, defined border makes the patio look intentional. The difference between edged and un-edged is enormous in photos and in person.
- Transition management: Edging bridges the material change between patio surface and lawn, mulch, or planting beds without creating trip hazards.
Planning considerations before you buy anything
Measure your patio perimeter and add 10% for waste. Note whether your edge runs in straight lines, gentle curves, or tight curves (this affects material choice significantly). Check your climate: freeze-thaw cycles are brutal on mortar joints and some stone types; coastal salt air accelerates corrosion in bare steel; heavy rain regions need more attention to drainage slope and base compaction. Also think about what the edging borders: lawn requires a clean, durable edge; mulch beds are more forgiving; gravel needs rigid containment. Finally, if you have or are planning a patio fountain or water feature, position your edging to direct any overflow away from the patio base rather than pooling against it. We will revisit this in the water-feature section.
Patio edging types compared: the summary you need before going deeper
Here is a head-to-head snapshot of the main edging types. Deeper dives for each follow in their own sections below.
| Edging Type | Typical Installed Cost (per lf) | DIY Difficulty | Durability | Best Climate Fit | Aesthetic Range |
|---|---|---|---|---|---|
| Plastic / Composite | $0.50–$4 | Easy | 5–20 years (UV dependent) | All climates; avoid extreme heat for cheap PVC | Functional, mostly hidden |
| Metal (steel, aluminum, Corten) | $2–$12 | Easy–Moderate | 20–50+ years | All except bare steel in coastal salt zones | Modern, minimalist, clean lines |
| Brick | $2–$20 | Moderate | 30–50+ years | All; avoid soft brick in severe freeze-thaw | Traditional, cottage, formal |
| Precast / Poured Concrete | $2–$18 (precast); $5–$50+ (poured architectural) | Moderate–Hard | 30–50+ years | All; seal in freeze-thaw climates | Versatile; plain to stamped/colored |
| Natural Stone (flagstone, granite, bluestone) | $12–$40+ | Hard | 50–100+ years | All; some stone types crack in severe freeze-thaw | Premium, natural, high-end |
A quick recommendation before the details: if you have a modern or minimalist patio, go steel. If you have a traditional brick or tumbled-paver patio, match it with brick edging or natural stone. If budget is the primary constraint, start with quality composite or galvanized steel and upgrade later. If you are in Minnesota, Colorado, or any heavy freeze-thaw zone, prioritize materials with flexible or tight mortar joints over rigid poured concrete without expansion joints.
Concrete edging: poured, cast, and precast curbs
Concrete edging covers a wide spectrum, from the inexpensive precast concrete garden border you pick up at Home Depot for under $1 per linear foot in materials to architectural poured-in-place curbing with integral color and stamped texture that can run $20–$50+ per linear foot installed. Understanding which type you actually need prevents a lot of overspending (or underbuilding).
Precast concrete curbs and borders
Precast concrete borders are the most accessible concrete option. They come in 6–12 inch sections at any home improvement store, stack or interlock easily, and you can install them yourself in a few hours. They work well as a decorative border around simple rectangular patios. The downside is that the joints between sections can shift in freeze-thaw conditions, and they rarely look as polished as custom work. Installed cost including materials and basic labor runs roughly $2–$10 per linear foot for standard profiles.
Poured-in-place concrete curbing
Poured concrete edging is what you see on upscale landscape projects: a continuous curb shaped with custom forms, often colored or stamped to match the patio surface. A landscape curbing machine (the kind contractors tow behind a truck) extrudes a continuous concrete bead, which looks great and eliminates joint gaps. This is almost always a contractor job. Installed costs typically land at $5–$15 per lf for plain formed concrete edging and jump to $20–$50+ per lf for architectural colored, stamped, or heavily custom work, consistent with RSMeans cost data for sitework curbing assemblies. RSMeans Site Work & Landscape cost data (table of contents) lists sitework curbing assemblies and is commonly used by contractors to price labor and equipment for formed and architectural concrete curbs, supporting the installed cost ranges cited.
Pros, cons, and climate notes for concrete
- Pros: Extremely durable when properly installed, low ongoing maintenance, compatible with virtually any patio style, customizable with color and texture
- Cons: Poured work requires professional equipment; precast sections can heave in freeze-thaw; cracks if expansion joints are omitted or base is poorly compacted
- Freeze-thaw climates (Minnesota, Colorado, New England): Seal concrete edging annually or biennially with a penetrating concrete sealer; ensure proper expansion joints every 8–10 feet for poured work; avoid thin precast borders in extreme zones
- Hot, dry climates (Texas, Arizona): Concrete performs excellently; UV and heat are not significant concerns; watch for base movement in expansive clay soils
- Coastal climates: Use low-water-cement-ratio mixes or sealed concrete; salt air can accelerate surface deterioration on unsealed work
DIY checklist for precast concrete edging
- Measure and mark the edge line with spray paint or a garden hose laid flat
- Excavate a trench 4–6 inches deep and slightly wider than your border pieces
- Add 2–3 inches of compacted gravel base for drainage
- Set border pieces in a thin bed of mortar or construction adhesive for stability
- Backfill inside and outside edges with soil; tamp firmly
- Check for consistent grade sloping away from the structure at roughly 1/4 inch per foot
- Allow mortar to cure 24–48 hours before backfilling with mulch or soil against the outer face
Tools needed: spade or edger, rubber mallet, level, tape measure, trowel, safety glasses. Budget roughly 1–2 hours per 25 linear feet for a first-time installer.
Natural stone edging: flagstone, bluestone, and granite
Natural stone edging is the premium end of the market, and honestly, it earns its price point. A well-set flagstone or bluestone border looks stunning against a paver or stone patio surface and, if installed correctly, will outlast everything else on your property. The challenge is that natural stone is heavy, irregular, and requires more skill to set properly than any other edging type.
What each stone type does best
- Flagstone (sandstone, limestone, slate): Works well as a flat, informal border; varies in thickness which makes leveling tricky; generally the most affordable natural stone option
- Bluestone: Dense, consistently thick, and refined-looking; excellent for formal patios and borders; holds a crisp edge well
- Granite: The hardest and most durable option; resists weathering, freeze-thaw, and salt spray better than softer stones; heavier and more expensive to cut and set
Cost, time, and installation realities
Installed natural stone edging typically runs $12–$40+ per linear foot. At the low end, that's irregular flagstone set loosely in a sand or gravel base. At the high end, that's custom-cut bluestone or granite set in mortar with tight, consistent joints, which requires a skilled mason. Material costs alone can run $4–$15 per lf or more depending on stone type and regional sourcing. For a 60 lf patio edge, budget $720–$2,400+ installed. This is almost always a hire-a-pro job unless you have mason-level skills and access to a wet saw or angle grinder with a diamond blade.
Pros, cons, and climate notes for natural stone
- Pros: Exceptional longevity (50–100+ years when properly set), high-end aesthetics, increases property value, pairs beautifully with water features and fountains
- Cons: High material and labor cost, heavy and awkward to work with DIY, soft stones like some sandstones and limestones can spall in severe freeze-thaw climates
- Freeze-thaw climates: Choose dense, low-absorption stones (granite, bluestone, hard slate); avoid porous limestone or soft flagstone in zones that see frequent freeze-thaw cycling; seal joints with a compatible mortar and sealer
- Coastal climates: Granite and dense bluestone perform well; avoid painted or coated stones near saltwater since coatings delaminate; granite is essentially impervious to salt air
- Drainage: Slope mortar-set stone borders to maintain the 1/4-inch-per-foot drainage grade; dry-set stone allows water infiltration naturally, which works well in well-draining soils
Gap-filling for stone edging
Natural stone edging almost always has joints. For joints between 1/2 inch and 2 inches wide, cementitious mortar or a flexible sanded grout is the standard choice. For narrower joints (1/8 to 1/2 inch), polymeric sand (more on this below) works well and allows slight movement without cracking. For wide flagstone joints bordering a patio that also has a water feature nearby, consider a flexible polyurethane sealant at the transition joint between the stone edging and the patio surface to prevent moisture intrusion under the base during heavy rain events.
Brick edging: classic, versatile, and more DIY-friendly than it looks
Brick edging might be the most versatile option on this list. It suits everything from a formal colonial-style patio to a casual cottage garden, it is available nearly everywhere, and a motivated DIYer with moderate skill can set a clean brick border in a weekend. The key is choosing the right brick for your climate and setting method.
Setting methods: mortared vs. dry-set
Dry-set brick edging (bricks set in compacted sand or gravel base, no mortar) is the easiest approach and allows slight ground movement without cracking. It works well in mild climates. Mortared brick edging looks sharper, stays put better, and is preferred in high-traffic areas or where a more permanent installation is needed, but it requires more preparation and skill to execute without gaps or uneven joints. In freeze-thaw climates, mortared brick is more vulnerable to cracking than dry-set unless you use a flexible Type S mortar and seal the joints annually.
Budget vs. premium brick options
Standard modular paver bricks from a big-box store run about $0.50–$1.50 per brick in materials. Reclaimed or tumbled bricks, hand-molded brick, or specialty thin-set pavers run $2–$6+ per unit. For a standard 4-inch-wide dry-set brick border at 50 lf, you need roughly 150–200 bricks, so material costs are manageable. Installed costs including labor range from $2–$20 per linear foot depending on brick type and setting method. HomeGuide's 2026 consumer data puts material-only brick edging at $1.50–$5.50 per lf with labor adding another $1.50–$10 per lf for complex work.
Pros, cons, and climate notes for brick
- Pros: Widely available, excellent aesthetic range, repairable (individual bricks can be replaced), matches most brick or paver patio surfaces naturally
- Cons: Mortar joints require periodic maintenance; soft or recycled bricks can spall in freeze-thaw; weeds can colonize un-mortared joints if not addressed
- Freeze-thaw climates: Use SW (severe weathering) grade brick rated for freeze-thaw; avoid MW (moderate weathering) or reclaimed bricks of unknown origin in zones with regular hard freezes; use polymeric sand in dry-set joints to reduce weed and ant intrusion
- Coastal salt zones: Brick performs well in coastal climates; avoid painted or glazed brick near salt air since coatings peel; unglazed clay brick is the right choice
- Hot climates: Excellent performance; no significant concerns beyond standard maintenance
DIY checklist for dry-set brick edging
- Mark the edge line and excavate a trench 5–7 inches deep (3–4 inches for base, 1–2 inches for sand setting bed, plus brick thickness)
- Add 3–4 inches of compacted crushed gravel; tamp with a hand tamper or plate compactor
- Add 1 inch of coarse sand and screed it level
- Set bricks in your chosen pattern (soldier course flat, on-edge, diagonal) and tap level with a rubber mallet
- Backfill both sides with soil and tamp; this holds the bricks from tilting outward
- Sweep polymeric sand into joints; mist with water to activate and allow to cure per manufacturer instructions (typically 24 hours, no rain)
- Check grade (1/4 inch per foot slope away from structure) and adjust if needed before backfilling
Tools: spade, hand tamper, rubber mallet, level, tape measure, screed board, broom, safety glasses. Allow 2–3 hours per 25 lf for a first-time installer. A wet saw for brick cuts at curves adds complexity but is rentable for about $60–$100 per day.
Metal edging: steel, Corten, and aluminum
Metal edging has had a serious popularity surge over the past decade, and for good reason. A 3/16-inch or 1/4-inch steel strip creates a razor-thin, visually clean separation between your patio and the lawn that no other material can quite replicate. It is especially popular with modern, minimalist, and contemporary patio designs, and it is one of the easier materials to install DIY for straight runs.
Steel vs. Corten vs. aluminum: which metal is right for you
Galvanized steel is the workhorse option: widely available at big-box stores in 8–25 foot coil or flat sections, relatively affordable ($3–$15 per 8–25 ft section at retail, roughly $0.50–$3 per lf for materials), and corrosion-resistant in most inland climates. Corten (weathering steel, ASTM A588/A606 family) develops a rusty-orange patina that acts as a self-protecting barrier against further corrosion. This patina looks fantastic with warm-toned pavers and natural stone. However, ASTM and industry guidance is clear: Corten is not appropriate in marine or coastal spray zones near saltwater, where the wet-dry cycles needed for proper patina formation do not occur reliably. Aluminum edging is lightweight, will not rust in any climate, and is the right pick for coastal environments or anywhere with persistent moisture. It is slightly less rigid than steel but more than adequate for residential edging.
Cost, installation, and corrosion guidance
Installed metal edging runs $2–$12 per linear foot depending on gauge, finish, and whether you are hiring out. Thin-gauge galvanized and aluminum fall at the lower end; thicker-gauge (3/16 or 1/4 inch) steel, powder-coated steel, or custom-fabricated Corten sections can reach $12+ per lf installed. In coastal areas, the American Galvanizers Association recommends hot-dip galvanizing with a duplex (galvanize plus powder coat) system for maximum service life, rather than bare galvanized alone, which sees accelerated corrosion in salt air. For inland climates, standard hot-dip galvanized or plain Corten is perfectly appropriate and genuinely long-lasting.
Pros, cons, and climate notes for metal
- Pros: Extremely durable (20–50+ year lifespan), creates the cleanest visual edge of any material, works for straight runs and gentle curves, relatively easy to DIY with stakes and a rubber mallet
- Cons: Tight curves require flexible thin-gauge sections or professional bending; Corten leaches orange runoff on concrete or light-colored pavers during initial patina formation (can stain); bare steel will rust quickly if the galvanizing is scratched without touch-up
- Freeze-thaw climates: Metal edging handles freeze-thaw very well; stakes can heave slightly in repeated freeze-thaw but can be re-driven; no joint material to fail
- Coastal climates: Use aluminum or powder-coated duplex galvanized steel; avoid bare Corten near saltwater; avoid plain (non-duplex) galvanized where persistent salt spray is present
- Contact with pressure-treated timber: If your edging touches PT lumber (like a timber-framed patio), use stainless-steel or hot-dip galvanized fasteners only, as ACQ and copper-based preservatives used in modern PT wood are highly corrosive to plain steel hardware
DIY checklist for steel or aluminum edging
- Mark your edge line with a garden hose or spray paint; check that you have your 1/4-inch-per-foot drainage slope built into the grade
- Excavate a shallow trench 4–6 inches deep along the edge line
- Set the edging strip vertically in the trench with the top flush with your desired finished patio surface height
- Drive steel or aluminum stakes through the edging holes every 24–36 inches; use a rubber mallet
- For curves, make relief cuts in the top flange every 4–6 inches with metal snips, or use pre-made flexible edging sections
- Backfill the outer side with soil and tamp; leave the inner paver side to be filled with base material
- Seal any cut or exposed steel edges with a cold galvanizing compound or rust-inhibiting paint to prevent edge corrosion
Tools: spade, rubber mallet, metal snips, level, tape measure, safety gloves, eye protection. A 50 lf installation takes roughly 2–3 hours for a confident DIYer.
Plastic and composite edging: the budget-friendly workhorse
I will be honest with you: basic black plastic edging has a reputation problem. The thin-walled rolls you find in bargain bins do pop up, shift, and look ragged within a season or two, especially in hot climates where cheap PVC gets brittle from UV exposure. But modern flexible composite edging and higher-grade recycled plastic products are genuinely different animals. Done right, this category can last 15–20 years and costs a fraction of anything else on this list.
What to look for in plastic and composite edging
Thickness matters more than almost anything else. Look for edging at least 1/8-inch thick (ideally 3/16 inch) with UV stabilizers specified by the manufacturer. Recycled composite edging (often made from recycled polyethylene and wood fiber, similar to composite decking) is stiffer, heavier, and more UV-resistant than plain PVC. It holds curves better and does not become brittle in cold weather the way some cheaper PVC products do. Composite also looks more finished at the surface than black plastic roll edging.
Budget vs. premium options and realistic longevity
Material costs for plastic edging run $0.50–$3 per linear foot, while premium composite sections can reach $3–$4 per lf. Installed costs including basic labor are $0.50–$4 per lf total, making this the most affordable option on a per-foot basis. Cheap PVC roll edging in full sun and heat (think Phoenix or Houston) may last only 3–5 years before becoming brittle. UV-stabilized composite in the same conditions can easily last 15–20 years. Warranty terms from reputable manufacturers are a useful guide: products with 10+ year warranties are meaningfully better than no-warranty roll edging.
Pros, cons, and longevity notes for plastic and composite
- Pros: Lowest material cost of any edging type, lightest and easiest to install, handles tight curves very well (especially thin flexible rolls), widely available at any home improvement store, no corrosion risk
- Cons: Less aesthetically impressive than metal or stone; cheap PVC degrades rapidly in UV and extreme heat; thin-walled products can shift or buckle if not well-staked; not suitable as the sole structural restraint for heavy paver installations without supplemental edge stakes
- Hot, sunny climates: Only buy UV-stabilized or composite products; avoid thin black PVC rolls without UV-resistance specs
- Freeze-thaw climates: Higher-grade composite handles freeze-thaw better than thin PVC, which can become brittle and crack in extreme cold; re-drive any heaved stakes in spring
- Heavy rain and drainage: Plastic and composite edging allow base material to be set at the correct drainage slope without interference; they do not absorb water or swell; suitable for permeable paver installations
DIY checklist for plastic or composite edging
- Lay out your edge line with a hose or string line and spray-mark it
- Excavate a trench 4–5 inches deep along the line
- Set the edging in the trench with the top at your desired finished surface height
- Drive included stakes (or separately purchased landscape stakes) through stake holes every 18–24 inches
- For inside curves, warm the edging slightly with a heat gun for easier bending (PVC products); composite sections may require relief cuts on the back side
- Backfill outside edge with soil and tamp firmly; the soil pressure on both sides is what really holds this material in place
- Inspect annually and re-drive any heaved stakes; check for UV degradation on cheaper products after year 3–5
Joints, gaps, and fillers: don't skip this step
Whatever edging material you choose, the joints between your patio pavers or at the transition between edging and patio surface need attention. For specific product recommendations, see our guide to the best patio gap filler for pavers and stone. This is where most patios fail over time: weeds push through, ants tunnel, water infiltrates under the base, and pavers shift. Getting this right matters, and it is also directly relevant if you have or are planning a patio water feature or fountain, since any added moisture load puts more stress on joints.
Polymeric sand: the right choice for most paver joints
For paver or brick joints between 1/8 inch and 1/2 inch wide, polymeric jointing sand (brands like Techniseal EZSAND) is the industry standard. For product recommendations and comparisons, see our guide to the best patio filler. It is a sand-and-binder mix that hardens when activated with water, resisting joint washout, weeds, and ant intrusion. The application process is important: sweep it into dry joints, blow off excess from the paver surface, then mist lightly with water to activate. Techniseal and other manufacturers are explicit that the activation step must happen in dry weather with no rain for 24 hours after application. Excess polymer haze on paver surfaces is difficult to remove, so be precise with your sweep-and-blow step. For high-moisture zones or where a water feature adds runoff to the patio, polymeric sand is particularly valuable because it dramatically reduces joint washout compared with loose sand.
Mortar and sealants: when to step up
For flagstone or natural stone edging with joints 1/2 inch to 2 inches wide, cementitious mortar or a sanded grout is the correct choice. A flexible Type S mortar is preferred in freeze-thaw climates because it accommodates slight movement without cracking as readily as rigid Type M. For structural expansion joints and the transition line where poured concrete edging meets a patio slab or where two materials change, elastomeric sealants (polyurethane or polyurea products from manufacturers like Sika or SureBond) are specified per ASTM standards in professional construction documents. These sealants handle movement and are far more durable than caulk from a tube. For patios with fountains or water features, consider running a bead of polyurethane sealant at the joint between the water feature base and the adjacent patio edging to prevent water from migrating under the base material.
Permeable base and edge restraint for permeable paver systems
If you are building a permeable paver patio (open-graded base, wide joints, designed to let rainwater infiltrate rather than run off), your edge restraint strategy changes slightly. Standard mortar and sand are not appropriate; you need an edge restraint that works with an open-graded base. Products like Perma Paver Edging (a cementitious resin system) are specifically designed for this: one 5-gallon bucket covers roughly 25–30 lf and locks the open-graded base in place at the edges without sealing off the drainage path. The EPA's green infrastructure guidance supports permeable pavement designs for small residential projects as an effective stormwater management tool. If your municipality has stormwater regulations, a permeable patio may reduce or eliminate permit impacts; worth checking with your local building department.
Pairing edging with patio water features and fountains
If you are planning patio fountains or other water features alongside your edging project, there are a few practical intersections worth addressing now rather than after the install. Natural stone edging pairs especially well with water features aesthetically: the same flagstone or granite you use as a patio border can frame a fountain base or water bowl for a cohesive, high-end look. For inspiration and product recommendations, see our guide to the best patio water features. For ideas on specific water features that pair well with different edging styles, see our guide to the best patio fountains. For the functional side, position your drainage slope so that any fountain overflow or splash runs toward a drain or turf area rather than pooling against patio edging or the base material. This is especially important for mortar-set stone or brick edging where persistent moisture in joints accelerates weathering. If you are adding a recirculating fountain, route the electrical conduit and water supply lines before setting any permanent edging, since retrofitting those lines after the edge is mortared in is genuinely painful. For recommendations on selecting a fountain that suits your patio size and drainage, see our guide to the best water fountain for patio.
Maintenance schedules and troubleshooting
No edging is completely maintenance-free, but some come close. Here is a practical schedule by material type.
| Edging Type | Annual Tasks | Every 3–5 Years | When to Call a Pro |
|---|---|---|---|
| Plastic / Composite | Re-drive heaved stakes; inspect for UV cracking | Replace sections that have become brittle or shifted | If base has moved significantly under paver field |
| Metal (steel / Corten / aluminum) | Check for exposed cut edges; apply touch-up galvanizing compound where rust appears | Inspect stake connections; re-drive or replace bent stakes | If metal has buckled or if Corten is in an inappropriate coastal zone |
| Brick (dry-set) | Re-sweep polymeric sand into joints; remove weeds; reset any heaved bricks | Re-apply polymeric sand after full joint inspection | If frost heave has disrupted more than 10% of the border |
| Brick (mortared) | Inspect mortar joints; patch cracks with flexible Type S mortar | Full joint repointing if widespread cracking | Structural shifts or foundation-adjacent damage |
| Concrete (precast) | Check joint gaps between sections; re-mortar open joints | Seal surface with penetrating concrete sealer | Significant heave or cracking in poured sections |
| Natural Stone | Inspect mortar joints; remove moss or algae with a stone-safe cleaner | Re-point wide joints; re-seal with stone sealer if specified | Stone displacement, settlement, or drainage failure |
Common problems and fixes
- Edging shifting outward over time: Almost always a base compaction problem; remove the edging, add and compact more gravel base, then re-set
- Weeds growing in joints: Polymeric sand application or re-application is the most effective long-term solution; manual removal plus a polymeric sand top-dress is the short-term fix
- Water pooling against the house: Your patio surface is not draining at the required 1/4-inch-per-foot slope; may require re-grading the patio surface or adding a channel drain at the low point
- Brick or stone frost heave: Individual units can usually be re-set after spring thaw; address the underlying drainage issue (waterlogged base) to prevent recurrence
- Rust staining on pavers from steel edging: Use an oxalic acid-based masonry cleaner; prevent recurrence by applying a touch-up galvanizing compound to all cut or scratched metal edges
Where to buy materials and how to find vetted contractors
For plastic, composite, and basic steel edging, Home Depot and Lowe's carry a reasonable selection. For thicker-gauge steel, Corten strips, or custom metal edging, look for local steel service centers or landscape supply companies that sell to contractors; they can typically cut to length and have significantly better quality than big-box retail. Natural stone and brick edging materials are best sourced from a local stone yard or masonry supply company, where you can see the material in person and compare colors. Purchasing sight-unseen online for stone is risky because color and texture vary widely by quarry and lot.
For hiring a pro, Angi (formerly Angie's List) and HomeGuide are two platforms where you can request quotes from local landscape contractors and masons with verified reviews. For complex or high-budget projects (natural stone, poured concrete curbing, full patio builds), it is worth getting three separate quotes and asking each contractor specifically how they plan to handle base preparation and drainage slope. That question alone will tell you a lot about their experience level. If you are in a region with specific climate challenges (heavy freeze-thaw, coastal, expansive clay soils), prioritize contractors who work in your area regularly over those who drive in from a distance.
FAQ
Which patio edging materials offer the best overall balance of durability, aesthetics, cost, and drainage performance?
Short list and quick guidance: - Steel/metal (galvanized or Corten): Excellent durability and crisp modern look; low profile for pavers; performs very well for edge restraint and water shedding. Cost: mid to premium. Not ideal in unprotected marine spray without coatings. - Concrete (precast or poured): Durable, highly configurable (profiles, color, stamping) and excellent for structural edging and drainage control. Good in freeze‑thaw when detailed with control joints and proper base. Cost: low to high depending on finish. - Natural stone: Premium aesthetic, very durable when installed on proper base; heavy and requires professional install for best long‑term performance. Expensive. - Brick: Classic look, good durability, affordable mid-range; mortar joints provide strong restraint but can crack in severe freeze‑thaw without proper base/drainage. - Timber (pressure‑treated, composite): Low initial cost and easy DIY install; shorter lifespan in wet climates unless rot‑resistant species/composites used. Use stainless/galvanized fasteners. - Plastic/EDPM/low‑density plastic: Cheapest, easiest DIY, resists rot; limited structural strength (can deform under heavy loads) and less attractive. - Gravel/rock (stone ribbon or boulder edging): Permeable and inexpensive; works well with permeable systems but requires periodic maintenance to keep shape. Choose material by priority: for structure + aesthetics in all climates pick steel or concrete; for premium natural looks pick stone or brick; for budget DIY pick plastic or timber with drainage attention.
How do material costs break down (materials only and installed)?
Typical national ranges (materials + labor where noted): - Plastic/retail landscape edging: material ≈ $0.50–$3/lf; installed $0.50–$4/lf. - Steel/metal edging (retail galvanized rolls to heavy gauge Corten): material ≈ $0.50–$3/lf for thin retail roll; installed commonly $5–$12/lf for quality galvanized or thicker steel; premium Corten or custom fabrication $12+/lf. - Brick: material ≈ $1.50–$5.50/lf; installed $2–$20/lf depending on pattern and mortar. - Precast/poured concrete small curbs: material/installed commonly $5–$18/lf; architectural stamped/colored concrete up to $20–$50+/lf. - Natural stone: material and installed frequently $12–$40+/lf depending on stone, cutting and labor complexity. Project totals: typical 50–100 lf patio-edge jobs commonly run about $500–$2,500 for basic options and substantially higher for premium stone or architectural concrete. Expect local labor rates to shift those numbers.
Which edging choices are best for specific climates (freeze‑thaw, heavy rain, coastal/salt)?
Climate guidance: - Freeze‑thaw: Choose edging with stable bedding and limited water absorption—concrete, steel, or properly installed natural stone perform best. Use proper base (compacted aggregate), control joints on poured concrete, and avoid soft mortars in frost‑susceptible soils. - Heavy rain / poor drainage: Use non‑impervious edging with an integrated drainage plan. Steel or concrete with a drained base, or permeable stone/gravel edges with underdrains for high runoff. Maintain slope (≈1/4" per ft away from structures) to avoid pooling. - Coastal / salt exposure: Avoid bare carbon steel and untreated fasteners. Prefer stainless steel, hot‑dip galvanized, or duplex (galvanize + powder coat) finishes; Corten is generally not advised in salt spray zones. Use corrosion‑resistant connectors for timber (stainless or hot‑dip galvanized).
When should I DIY edging versus hire a professional?
Decision rules: DIY if: - Edging is straightforward (plastic, timber, retail roll steel, gravel) and you have basic tools and ability to dig, compact, and level. - Project is small (≤50 lf) and aesthetics/precision tolerance are moderate. - You want lower cost and accept possible shorter service life. Hire a pro if: - You're installing heavy stone, poured/stamped concrete, structural curbing, Corten fabrication, or complex profiles. - Site has drainage, grade, or slope challenges (near foundations, large falloffs, or need for underdrains). - Work integrates with utilities, irrigation, electrical for lighting/water features, or requires permits. - You want a long‑term warranty and precision finish. Pro labor can add $1.50–$10+/lf depending on complexity.
What are the high‑level DIY installation steps and a concise checklist for common edging types (steel, brick, concrete paver edge, timber)?
High‑level step checklist (common to most types): 1) Plan & measure: mark edge line; calculate materials + stakes. 2) Excavate trench: typical trench depth = thickness of edging + 3–4" of compacted base; width ~4–6" for steel/timber, larger for concrete/brick. 3) Prepare base: compact subgrade, add 2–4" crushed stone (#57) and compact. 4) Set edging: - Steel: unroll/align, stake with manufacturer stakes; ensure top of edge height relative to pavers/grass. - Brick: bed on 3/4" mortar or compacted sand; set units, check grade, mortar joints. - Concrete paver edge (Perma/edge resin): form edge and pour/pack product per instructions, tool to finish. - Timber: set timbers on compacted stone; fasten with galvanized spikes or stainless screws. 5) Backfill & compact against edge to lock base. 6) Finish surface (install pavers, refill joints with sand/polymeric sand or mortar). Tools & materials: shovel, trenching tool or mini‑excavator (for long runs), plate compactor, level/straightedge, rubber mallet, masonry trowel and mortar tools (if needed), stakes, galvanized or stainless fasteners, edging material, jointing sand or mortar. Time expectations: small DIY job (≤50 lf) 2–8 hours depending on material; professional installs often complete in a day for similar scope but require site prep and curing time for mortar or concrete.
Which joint- and gap‑fillers should I use for pavers and flagstone, and when is polymeric sand enough versus mortar or sealants?
Selection rules: - Polymeric sand: Best for narrow joints (1/8"–1/2"), permeable paver systems (if manufacturer allows), and low‑washout locations. Pros: resists weeds and insect intrusion; easier DIY. Cons: requires a dry weather window and careful cleaning to avoid haze. - Mortar/cementitious grout: Use for flagstone with wide joints (1/2"–2") or vertical/lifted joints needing structural strength and in high‑washout areas (near fountains, slopes). Mortar provides rigid restraint but is less permeable and can crack if base shifts. - Elastomeric/polyurethane sealants and epoxy grouts: Use at control/expansion joints, between hard surfaces and fixed elements, or where movement is expected. Good for sealing near water features to prevent leakage. Tip: For patios with heavy splash or continuous water features, prefer mortar or polymer‑modified grout combined with proper slope and underdrain, and choose products rated for exposure to water.