
The best patio gap filler depends almost entirely on your joint width, surface material, and climate. For standard interlocking paver joints between 1/8" and 1/2", a quality polymeric sand like Techniseal EZSAND or QUIKRETE HardScapes Polymeric Jointing Sand is the right call. For wider gaps up to 2", QUIKRETE's wider-joint-rated polymeric sand or a cementitious mortar works better. For wood decks, skip the sand entirely and use a flexible exterior sealant like Sashco Big Stretch with a backer rod behind it. For natural stone with ultra-thin seams under 1/8", a polymer-modified cement grout such as MAPEI Ultracolor Plus FA is your most reliable option. The sections below break down every scenario so you can match the right product to your exact situation. For a concise comparison of options, see our guide to the best patio filler.
Best Patio Gap Filler Guide: Picks, Installation & Care

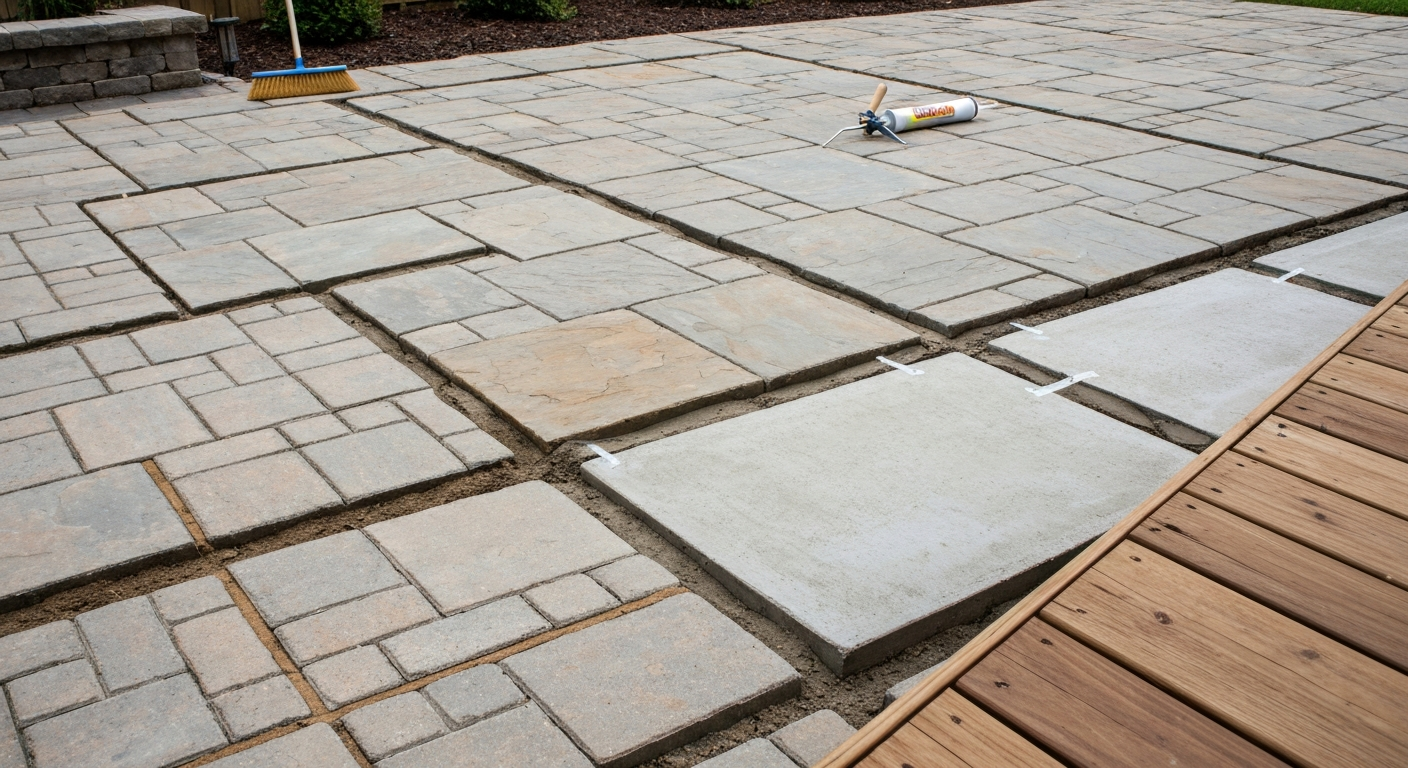
Who this guide is for and what it covers
If you have gaps in your patio that collect weeds, swallow water in the wrong direction, or simply look ragged after a few seasons, you are in the right place. This guide is written for DIY homeowners who want to fix or future-proof their patio joints themselves, and for those hiring a contractor who want to understand what the pro should be doing. I have worked through installs on clay-heavy soil in the Midwest, sandy coastal bases in the Southeast, and freeze-thaw environments in the Mountain West, so the advice here is grounded in what actually holds up rather than what looks good on a spec sheet.
The article covers every major filler material, a joint-size decision matrix, step-by-step install notes for common scenarios, climate-specific guidance, safety considerations for households with kids and pets, a comparison table, cost ranges, and a maintenance section. If you are also thinking about patio edging or a water feature near your patio, those topics connect naturally to joint planning and are worth reading alongside this guide.
How to choose: joint-size decision matrix
Before you buy anything, measure your gaps. Joint width is the single most important factor in material selection, and choosing a product outside its rated range is the number-one reason DIY patio repairs fail within one season. Use the matrix below as your starting point, then layer in surface type and climate from the sections that follow.
| Joint Width | Surface Type | Recommended Material | Notes |
|---|---|---|---|
| Under 1/8" (< 3 mm) | Natural stone, tile, concrete | Polymer-modified cement grout (e.g., MAPEI Ultracolor Plus FA) | Polymeric sand won't fill ultra-thin joints properly |
| 1/8" – 1/2" (3–13 mm) | Interlocking pavers, brick | Polymeric jointing sand (Techniseal EZSAND, QUIKRETE HardScapes) | Ideal range for most polymeric sand products |
| 1/2" – 2" (13–50 mm) | Pavers, flagstone, concrete slabs | Wide-joint polymeric sand or cementitious mortar | Verify product TDS; QUIKRETE rated to 2" |
| Over 2" (> 50 mm) | Flagstone, loose-lay, gravel paths | Mortar, resin/rubber joint system, or crushed gravel infill | Wide gaps need rigid or gravel fill |
| Any depth, wood deck | Timber decking | Flexible exterior sealant + backer rod | Never use cement-based products on wood |
| Perimeter/control joints on concrete | Concrete slabs | Backer rod + polyurethane sealant (Sikaflex-1A or equal) | Must accommodate movement; ASTM C920 rated |
A quick flowchart to speed your decision: Start by asking whether the surface is wood. If yes, go straight to flexible sealant with backer rod. If no, measure the joint. Under 1/8"? Use cementitious grout. Between 1/8" and 2"? Use polymeric sand, matching the specific product to width. Over 2" or in a loose-laid natural stone patio? Use mortar or gravel. Is the joint a structural control joint or expansion joint on a concrete slab? Use backer rod plus an ASTM C920-rated sealant regardless of width.
Every material option, explained honestly
Polymeric sand
Polymeric sand is a blend of graded sand and a polymer binder that activates when misted with water. Once cured, it locks joints firmly, resists weed germination, and handles normal foot traffic. Techniseal's EZSAND and QUIKRETE HardScapes are the two most widely available options in North America. Both target joints in the 1/8" to roughly 1/2" range, though QUIKRETE's formula is rated up to 2". Installation is a sweep-compact-mist sequence that most DIYers can handle in a single afternoon. The catch: surfaces must be dry when you sweep, and you cannot install during or immediately before heavy rain or you will activate the polymer prematurely on the surface rather than inside the joint. Cure time before foot traffic is typically 24 hours; avoid pressure washing for several days.
Standard jointing sand (non-polymeric)
Plain jointing sand is cheap, widely available, and easy to sweep in. The problem is that it offers no weed resistance and washes out in heavy rain or after pressure washing. On a budget patio in a dry climate it can hold for a season, but anywhere with consistent rainfall or freeze-thaw movement it will need annual topping up. I use it only as a temporary placeholder or as a base layer under polymeric sand when joints are unusually deep.
Mortar and cement grout
Cementitious mortar or grout is rigid, durable, and appropriate for joints on a firm, non-moving substrate. MAPEI Ultracolor Plus FA is a polymer-modified option rated for exterior use with joints from 1/16" to 3/4", which makes it excellent for natural stone and tile installations where sand won't fill the seam. The limitation is movement: mortar cracks when a slab shifts or when freeze-thaw cycles stress the joint. Use it only where the substrate is stable and you have no significant thermal movement. For flagstone set in mortar beds, a mortar joint is the correct match. For sand-set pavers, it is generally the wrong choice because those systems are designed to flex slightly.
Flexible caulk, urethane, and silicone sealants
One-component polyurethane sealants like Sikaflex-1A are the workhorses of structural joint sealing. They conform to ASTM C920, which classifies elastomeric sealants by movement capability, type, grade, class, and use. That matters because expansion and contraction in an outdoor slab can easily exceed what a cheap silicone tube from a hardware store can handle. Polyurethane sealants bond well to concrete and masonry, are paintable, and can accommodate meaningful movement. Silicone is excellent for glass and some metals but bonds poorly to concrete without primer. For patio work, polyurethane or MS-polymer sealants are almost always the better choice over standard silicone unless you are sealing around a glass panel or window adjacent to the patio.
Backer rod plus sealant
Backer rod is closed-cell polyethylene foam rope that you press into a joint before applying sealant. Closed‑cell polyethylene backer rod is standard industry practice to control sealant depth, create the proper 'hourglass' shape, and prevent three‑sided adhesion; major sealant manufacturers and accessory suppliers publish installation guides on selecting a backer‑rod size ~25% larger than the joint so it compresses into place Sika® Backer Rod (product/accessory page). Its job is to control sealant depth, create the correct hourglass (concave) shape that allows movement, and prevent what installers call three-sided adhesion, which prevents the sealant from flexing properly. The standard rule is to buy backer rod about 25% wider than the joint so it compresses snugly. For any joint deeper than about 1/2", backer rod is not optional if you want the sealant to perform as rated. Skip it and you end up with too much sealant, a flat profile, and a joint that cracks early because it can not accommodate movement.
Rubber and foam infill
Pre-formed rubber or foam strips are sold for deck boards and some paver systems. They are easy to install, completely flexible, and work well in moderate climates. They are not especially durable under heavy furniture loads or in harsh UV environments, so they work best as a solution for wood or composite decks in mild climates and for pet-safe or child-safe installs where you want zero chemical exposure during cure.
Crushed gravel
Crushed gravel or decomposed granite is an informal filler for wide, loose-set flagstone joints and gravel-path transitions. It drains freely, which is excellent, but it migrates underfoot and needs occasional topping up. It works well where a naturalistic look is the goal and the joint is wide enough (usually 1" or more) that it stays in place reasonably well. Pair it with a stabilizer spray if you want it to last longer.
Polymeric foam (one-part injectable)
Injectable polymeric foam products, sold under several brand names, are applied with a caulk gun and expand slightly to fill irregular gaps. They cure firm but with some flexibility, which makes them a reasonable choice for joints that do not fit the sand or mortar category cleanly. They cost more than sand and require a bit more care in application to avoid overflow, but they can be a time-saver on small-scale repairs.
Weed-preventing mixes
Several polymeric sand products now incorporate pre-emergent properties, and some specialty joint fillers are blended specifically to deter weed growth. These are worth the modest price premium if weeds have been a persistent problem. Note that no filler permanently prevents weeds if the joint erodes or if seeds blow in on top of the cured material. These products reduce the problem significantly but do not eliminate it entirely.
Best patio gap filler by use case
Small joints in interlocking pavers (1/8" to 1/2")
This is the classic polymeric sand scenario and the most common patio repair job. Use Techniseal EZSAND or QUIKRETE HardScapes Polymeric Jointing Sand. Clean joints thoroughly with a leaf blower or stiff brush, let the surface dry completely, sweep sand across the surface and into joints, make two passes with a plate compactor using a rubber pad to protect the paver surface, blow off all surface residue, then mist with a gentle spray in three to four controlled passes until the joints stop absorbing water. Techniseal, Install with Confidence / HP NextGel how‑to and product resources include step‑by‑step install recommendations that match this sweep‑compact‑mist sequence (clean joints, dry surface, compact, remove residue, and mist in controlled passes until joints no longer absorb water) Techniseal — Install with Confidence / HP NextGel how‑to and product resources. Wait the manufacturer-specified cure time before traffic. The ICPI Tech Spec 5 standard is the industry baseline for this process.
Wide gaps in flagstone or large-format pavers (1/2" to 2")
Check your product's technical data sheet before using standard polymeric sand here. QUIKRETE's polymeric sand is rated to 2", which makes it one of the few sand products appropriate for this range. For anything approaching the 2" mark, cementitious mortar is generally more stable long-term, especially in a mortar-set system. In a sand-set system, a wide-joint polymeric product or a resin-based joint material is a better match than rigid mortar.
Natural stone and flagstone seams
Natural stone is high-maintenance territory. Polymeric sand haze can permanently stain certain stones if it is not removed before activation, and not all polymeric products are compatible with every stone type. Unilock and Techniseal both issue compatibility advisories for natural stone. When the joints are tight (under 1/8"), MAPEI Ultracolor Plus FA or a similar polymer-modified cementitious grout is the safest choice. For larger joints in a mortared flagstone installation, a matching mortar or grout is correct. Always test a small inconspicuous area first and confirm compatibility with the stone supplier before you commit to a full install.
Concrete slabs and control joints
Concrete slabs move. The saw-cut or formed control joints in a concrete patio are there specifically to direct cracking, and they need a flexible sealant that moves with the slab, not a rigid filler that will pop out. Use backer rod sized 25% wider than the joint, press it in to achieve the proper depth, then apply a polyurethane sealant (Sikaflex-1A or a comparable ASTM C920-rated product). Tool it to a concave profile and let it cure fully. Do not use polymeric sand in a concrete control joint.
Wood and composite decks
Deck boards need a completely different approach. Cement-based or sand products will trap moisture against the wood and accelerate rot. For a wood deck, use a flexible exterior-grade sealant or a dedicated deck gap filler like Sashco Big Stretch. For deeper gaps, install backer rod first to control depth and prevent sealant waste. These sealants are paintable, move with the wood through seasonal expansion and contraction, and do not crack the way rigid materials do.
Joints around fountains, planters, and water features
Joints near water features, planters, or patio fountains need to handle constant moisture and possible freeze-thaw stress. In these zones I always choose an ASTM C920-rated flexible sealant over polymeric sand, especially where the joint is adjacent to a water source. A polymeric sand joint next to a fountain basin that overflows in winter will wash out and heave. Use backer rod plus a high-movement polyurethane or MS-polymer sealant for any joint within two to three feet of a water feature. This is also where proper drainage design matters: the joint should not be acting as the only path for water to escape the area. If you are also selecting a decorative feature, consult our guide to the best water fountain for patio to match materials and drainage requirements. If you’re adding a decorative water feature, see our guide to the best patio fountains for compatible fountain types and placement tips.
Compatibility with common patio surfaces
| Surface | Compatible Materials | Avoid | Special Notes |
|---|---|---|---|
| Interlocking concrete pavers | Polymeric sand, wide-joint polymeric sand, mortar (in mortar-set systems) | Rigid mortar in sand-set systems | Follow ICPI Tech Spec 5; dry surface required for polymeric sand |
| Flagstone / natural stone | Polymer-modified cement grout (tight joints), compatible polymeric sand (check TDS), mortar | Polymeric sand without confirming stone compatibility | Test for staining; haze removal is critical |
| Concrete slabs | Backer rod + ASTM C920 polyurethane sealant | Polymeric sand, rigid mortar in control joints | Control joints must remain flexible |
| Brick | Polymeric sand (within rated width), cementitious mortar, polyurethane sealant | Plain jointing sand (washes out) | Match mortar color for aesthetics |
| Timber / composite decking | Flexible exterior sealant, backer rod + polyurethane or MS-polymer sealant, rubber/foam strips | Any cement-based or sand product | Moisture trapping = rot risk; always use flexible products |
Drainage, expansion, and designing for movement
One of the most common mistakes I see homeowners make is treating every patio joint as a cosmetic problem when many of them are actually functional drainage and movement joints. A paver patio on a well-compacted, permeable base relies on the joints to allow some water to permeate downward and some to shed to the sides. If you fill every joint with a rigid, impermeable mortar, you push all that surface water to the edges and potentially toward your foundation.
Concrete slabs expand and contract significantly with temperature changes, and a slab in a climate that sees both 95°F summers and 15°F winters is moving quite a lot over the course of a year. ASTM C920-rated sealants are classified by their movement capability for exactly this reason. When you choose a sealant or filler for a concrete joint, match the product's rated movement class to the expected thermal movement of your slab. Undersizing here is what causes the familiar cracked-out sealant look you see on most residential driveways after a few winters.
For freeze-thaw climates specifically, every joint in a patio that will see water infiltration needs to drain or flex. A joint filled with a rigid material that traps water will experience hydraulic pressure as that water freezes and expands. This is the number one reason rigid mortar joints fail in Minnesota, Wisconsin, and the high-altitude West. Use polymeric sand (which is still somewhat permeable and flexible after cure) or a proper flexible sealant in these zones.
Climate and site guidance: matching your filler to your weather
Hot and dry climates (Southwest, West Texas)
Extreme heat causes UV degradation in sealants faster than in moderate climates. Choose UV-stable polyurethane or MS-polymer sealants with documented UV resistance. Polymeric sand in dry climates performs well because there is less washout pressure, but joints still need to accommodate the significant thermal expansion that comes with 110°F days followed by cool nights. Do not skip the compaction step; sand that is not compacted properly will settle more noticeably in desert heat cycles.
Humid climates (Southeast, Gulf Coast)
High humidity and frequent rainfall make weed-preventing polymeric sands a strong preference over plain sand. The wetter the climate, the faster plain sand washes out. Drainage is critical: joints in a high-rainfall zone should not impede water movement. Mold and algae growth in joints is also more common in humid areas; some polymeric sand products include biocide additives that slow biological growth. Confirm this on the product label if it is a concern.
Freeze-thaw climates (Midwest, Mountain West, Northeast)
As discussed in the drainage section, flexibility and drainage are non-negotiable in freeze-thaw zones. Use polymeric sand that is rated for freeze-thaw conditions (check the product TDS for this explicitly), and use backer rod plus ASTM C920-rated sealant for any expansion or control joints. Do not install polymeric sand when temperatures are below approximately 35°F (about 2°C), as Quikrete's product guidance specifies. Plan installation for late spring through early fall so you have a full cure before the first hard freeze.
Coastal and salt-air environments
Salt air accelerates deterioration in both sealants and cementitious products. In coastal areas, prioritize sealants with documented salt-spray resistance and avoid bare cementitious grout in high-exposure joints. Polymeric sand holds up reasonably well if the base is properly draining and the joints are not subject to direct wave or tide action. Inspect and spot-repair these joints at least once a year because salt accelerates the breakdown timeline noticeably compared to inland installations.
High-rainfall regions (Pacific Northwest)
Constant moisture means anything that can wash out will wash out over time. Polymeric sand is strongly preferred over plain sand. In patio areas with heavy tree cover, organic debris accumulates in joints and accelerates biological growth; more frequent cleaning and periodic re-application of polymeric sand is part of the maintenance routine here rather than an exception.
Pet-safe and child-safe choices
This is a section I wish more product guides covered honestly. Polymeric sands, including Techniseal EZSAND and QUIKRETE HardScapes, list crystalline silica as a hazardous component on their Safety Data Sheets. Respirable crystalline silica is a carcinogen classification, and the SDSs require dust control and respirator use during installation. For a professional doing this daily, that is table-stakes PPE. For a homeowner sweeping sand around while kids play nearby, it is worth taking seriously.
The risk is largely during installation, specifically the dry-sweeping step when dust is airborne. Once the sand is cured and wetted into the joints, the silica exposure risk drops dramatically. But until it is fully cured, keep children and pets off the patio. Here is a practical safety checklist:
- Wear an N95 or P100 respirator during all dry sweeping and compaction steps with any sand-based product
- Keep children and pets indoors or at a distance until all surface residue is removed and the joints are fully misted and cured
- Review the Safety Data Sheet (SDS) for any product before use; keep it accessible during the job
- Wash hands and change clothes before contact with children or pets after working with polymeric or jointing sand
- For households wanting zero chemical exposure during cure, consider rubber or foam gap strips for decks, or crushed gravel for wide flagstone joints, as these require no curing period
- Flexible exterior sealants (polyurethane, MS-polymer) are generally low-toxicity once cured; avoid skin contact during application and ensure ventilation, then keep the area clear until fully cured per the manufacturer's timeline
- Avoid sealants or caulks with strong solvent-based carriers in enclosed or partially enclosed patio areas; choose water-cleanup products where possible for better indoor air quality during application
- After installation is complete and cured, patio joint fillers do not pose ongoing toxicity risks from normal patio use
Tools and prep you actually need
Getting the tools right saves you from redoing the job. For a polymeric sand install on a standard paver patio, you need: a leaf blower or stiff push broom to clean joints, a plate compactor with a rubber pad attachment (rental is fine for one-time use), a garden hose with a gentle misting nozzle, a push broom, and an N95 respirator. For sealant joints on concrete, you need: a wire brush or angle grinder with a crack-chasing wheel to clean old material, backer rod sized to your joint, a caulk gun, a quality ASTM C920-rated sealant, a joint tool or plastic spoon for tooling the concave profile, and mineral spirits for cleanup on polyurethane products. For grout work on natural stone, you need: mixing buckets, margin trowel, rubber grout float, sponges, and grout haze remover.
Step-by-step install: polymeric sand on interlocking pavers
- Clear the patio surface and blow out all joint debris with a leaf blower; use a stiff brush to loosen compacted material
- Confirm the surface is completely dry; check the forecast and do not proceed if rain is expected within 24 hours
- Pour polymeric sand across the patio in sections and sweep it into the joints with a push broom, working in multiple directions to fill evenly
- Make two slow passes with a plate compactor fitted with a rubber pad to seat the sand and re-settle the pavers
- Sweep additional sand into any joints that compacted below the recommended fill level (typically just below the chamfer or about 1/8" below the paver surface)
- Blow or sweep all residual sand completely off the paver surface; this step is critical — any sand left on the surface will haze
- Mist the entire surface with a gentle, wide-fan spray in three to four slow passes; do not drench, just wet until the joints stop absorbing water
- Allow to cure per the manufacturer's instructions — typically 24 hours before foot traffic and several days before pressure washing or heavy furniture placement
Step-by-step install: backer rod and sealant in concrete control joints
- Remove all old sealant, debris, and loose material from the joint using a wire brush, chisel, or angle grinder with a crack-chasing blade
- Clean the joint with compressed air or a leaf blower; surfaces must be clean and dry for sealant adhesion
- Select closed-cell backer rod approximately 25% wider than the joint width; press it into the joint to the correct depth so the sealant will be between 1/4" and 1/2" deep
- Apply primer if required by the sealant manufacturer (check the TDS for concrete substrates)
- Load the caulk gun and apply the sealant in a continuous bead, slightly overfilling the joint
- Tool the sealant to a concave (slightly depressed) profile using a joint tool, plastic spoon, or wet finger; this shape allows the joint to flex without cracking
- Remove masking tape if used before the sealant skins over
- Allow to cure fully per the manufacturer's timetable before traffic or water exposure
Cost ranges and buying tips
| Material | Typical DIY Cost | Coverage | Durability (years) | Best For |
|---|---|---|---|---|
| Standard jointing sand | $5–$10 per 50 lb bag | ~35–50 sq ft of joints | 1–2 (needs topping up) | Temporary fills, dry climates |
| Polymeric sand (Techniseal EZSAND, QUIKRETE HardScapes) | $25–$45 per 50 lb bag | ~35–75 sq ft depending on joint size | 5–10+ with proper install | Interlocking pavers, brick |
| Polymer-modified cement grout (MAPEI Ultracolor Plus FA) | $20–$35 per 10 lb bag | Varies by joint size | 10–15+ | Natural stone, tile, tight seams |
| Polyurethane sealant + backer rod (Sikaflex-1A type) | $12–$20 per 10 oz tube + $5–$15 for backer rod roll | ~20–30 linear ft per tube at standard depth | 5–10+ depending on movement | Concrete control joints, expansion joints |
| Flexible exterior sealant (Sashco Big Stretch type) | $10–$18 per 10 oz tube | ~25 linear ft | 5–8 | Wood and composite decks |
| Crushed gravel / decomposed granite | $5–$15 per 50 lb bag | Varies widely | 1–3 (migrates, needs topping) | Wide flagstone joints, informal paths |
| Polymeric foam (injectable) | $20–$35 per cartridge | ~20 linear ft at 1/2" depth | 3–7 | Irregular gaps, small-scale repairs |
A few buying tips from experience: buy about 10 to 15 percent more material than your calculation suggests because joints are rarely uniform in depth or width. For polymeric sand, stick with name-brand products that publish full technical data sheets; off-brand bags rarely provide the cure time, temperature requirements, or compatibility information you need to do the job right. For sealants, buy from a building supply or masonry specialty store rather than a general hardware store if you need ASTM C920-rated products, as not all general retail products carry that certification.
Maintenance, repair, and winterizing
Polymeric sand joints typically need re-evaluation every three to five years, sooner in high-traffic areas or climates with heavy freeze-thaw cycling. Look for signs of erosion (joints that have dropped below the chamfer line), crumbling, or weed penetration. Spot repairs are straightforward: clean the affected joints, dry the area, and sweep in fresh polymeric sand following the original install process. You do not need to redo the entire patio for a few eroded sections.
For sealant joints in concrete, plan to inspect and re-seal every five to seven years as a baseline, sooner in extreme climates. Failed sealant shows up as cracked, peeling, or missing material in the joint. The repair sequence is the same as the original install: clean out the old material, install fresh backer rod if needed, and re-apply sealant.
Winterizing your patio joints in a freeze-thaw climate means doing a late-fall inspection to identify any open joints, cracks, or eroded sections before the first hard freeze. Water that enters an open joint and freezes will expand the damage significantly over winter. A quick spot repair in October is far cheaper than a section rebuild in May.
Troubleshooting common problems
Weeds coming back
If weeds return within one season of a polymeric sand install, the most likely cause is incomplete joint filling or premature washout from overwatering during activation. Seeds can also blow in and germinate on top of cured sand. Improve the fill depth on eroded joints, use a weed-preventing polymeric product, and consider a polymeric sand sealer on top of the cured surface in heavy-weed areas.
Sand washing out after rain
Washout usually means either the activation misting was too aggressive (heavy stream instead of gentle mist) or the sand was installed just before rain before the polymers had cured. Techniseal's FAQ specifically cautions against installing polymeric sand immediately before heavy rain. If washout happens, let everything dry, re-fill the eroded joints, and re-activate carefully.
Haze on pavers or stone
Polymeric sand haze is caused by residual sand on the surface that got wet and activated. It appears as a white or cloudy film. On concrete pavers it typically cleans up with a mild acid wash or a purpose-made polymeric haze remover. On natural stone, the options are more limited and some staining may be permanent, which is why compatibility testing before installation matters so much. Prevention is much easier than cure: sweep every last grain of surface sand off before misting.
Settling and joint sinking
If joints are sinking or pavers are becoming uneven, the problem is usually base failure below the surface, not the joint filler. Re-filling joints on a settling base is a temporary fix. If you see significant and widespread settling, it is worth having a contractor assess the base before you invest in new joint material.
Integration with patio edging and water features
Patio edging and joint filling work together more than most homeowners realize. Edge restraints keep polymeric sand from migrating out of perimeter joints, and a properly installed edge detail prevents the leading rows of pavers from spreading under load. If your perimeter joints keep eroding, check whether your edging is secure before re-filling. Similarly, any water feature on or adjacent to your patio, whether a fountain, planter, or pond, creates a moisture zone that changes which filler is appropriate. The joints nearest to a fountain basin or planter that holds water need the same flexible, high-movement sealant treatment described in the control joint section, not standard polymeric sand. If you’re planning a water feature, see our guide to the best outdoor patio fountains for compatible designs and placement considerations.
When to hire a contractor (and how to vet one)
Most polymeric sand installs on a standard paver patio are genuinely DIY-friendly. Where I recommend calling a professional: any patio with a sinking or unstable base that needs re-leveling, any concrete flatwork with control joints that require saw-cutting or significant surface prep, mortar or grout work on expensive natural stone where a mistake means replacing stone, and any drainage problem that is causing water to pool toward the house rather than away from it. A joint filler can not fix a grading problem.
When hiring, ask specifically for a contractor who installs and maintains interlocking paver or hardscape systems and ask whether they follow ICPI guidelines. Request references from jobs at least two years old so you can ask how the joints are holding up, not just how the install looked on day one. Get a written scope that specifies the joint material by product name and brand so you know exactly what is being used and can verify it is rated for your application.
FAQ
What are the best patio gap fillers by use-case (small joints, wide gaps, pavers, natural stone, wood decks, around fountains/planters)?
Recommended fillers by use-case: - Small joints (≤1/8" / ≈3 mm): fine cementitious grout or high‑performance tile/stone grout (e.g., MAPEI Ultracolor family). - Typical paver joints (1/8"–1/2" / 3–13 mm): polymeric jointing sand (Techniseal EZSand, QUIKRETE HardScapes) — best for interlocking pavers. - Wide paver/stone gaps (>1/2" up to 2"): use mortar/grout or professional resin/rubber joint systems; some polymeric sands are rated to 2" but check TDS. - Natural stone/flagstone: cementitious grout or mortar, or stone‑compatible polymeric joint products (check manufacturer compatibility to avoid staining). - Wood decking gaps: flexible exterior sealant (polyurethane/MS‑polymer like Sikaflex/Sashco Big Stretch) with backer rod for deep joints — do not use cement/polymeric sand. - Around fountains/planters or wet areas: flexible, waterproof sealant or backer‑rod + elastomeric sealant (ASTM C920 compliant polyurethane/MS‑polymer). - For drainage/gravel joints or rustic patios: crushed gravel or compacted crushed rock; consider weed‑prevention fabric and edge restraints.
How do I decide what material is right for my joint size and surface (joint‑size decision matrix)?
Decision matrix (quick): - <1/8" (~3 mm): cementitious grout. - 1/8"–1/2" (3–13 mm): polymeric jointing sand for pavers; use finer mixes for narrow joints. - 1/2"–2": mortar/grout or resin/rubber joint systems; some polymeric products specify up to 2" — always confirm TDS. - >2": backer rod + elastomeric sealant or full mortar infill depending on movement needs. For surface compatibility: - Interlocking concrete pavers: polymeric sand, grout, or mortar per joint width. - Natural stone/flagstone: cementitious grout or manufacturer‑approved products (avoid polymeric haze/staining). - Brick/concrete slabs: polymeric sand or mortar. - Wood decks: flexible sealants with backer rod.
What are the pros and cons of common patio gap‑filler materials (polymeric sand, jointing sand, cement grout, sealants, backer‑rod + sealant, rubber/foam infill, crushed gravel)?
Summary of pros/cons: - Polymeric jointing sand: pros—good weed/ant insect resistance, locks joints, easy DIY for pavers; cons—requires dry clean joints, sensitive to rain during cure, silica dust hazards, limited in very wide or very narrow joints and some natural stone. - Jointing sand (plain sand): pros—cheap, easy to replace; cons—washout, weeds, less stable. - Cementitious grout/mortar: pros—durable, good for narrow/wide joints and stone; cons—rigid (can crack with movement), needs proper mixing/curing. - Elastomeric sealants (polyurethane/MS‑polymer/silicone): pros—flexible for movement, waterproof, ideal around water features and wood; cons—visible bead, careful prep needed, more expensive. - Backer rod + sealant: pros—controls depth/shape for sealant, prevents three‑sided adhesion; cons—requires correct size and installation. - Rubber/foam infill (prefab strips): pros—flexible, easy install for large linear gaps; cons—limited color/aesthetics, variable durability. - Crushed gravel: pros—good drainage, low cost; cons—weeds, not firm underfoot, migrates without edging.
What tools and prep do I need before installing common gap fillers?
Basic tools & supplies checklist: - Personal protective equipment: N95/respirator for silica dust, safety glasses, gloves. - Surface prep: stiff broom, shop vacuum, pressure washer (for heavy deposits), wire brush, chisel/flat screwdriver for stubborn debris. - Installation: broom for sweeping sand, rubber‑pad plate compactor (for larger areas), hand tamper, margin trowel, pointing tool, grout float, beaters for mixing, garden hose with fine mist or pump sprayer for polymeric sand, caulk gun, backer rod. - Materials: chosen filler product, manufacturer‑recommended primer/adhesive for sealants (if needed), joint cleaner, garden hose, plastic sheeting for weather protection. - Misc: level, tape measure, chalk line, edge restraint supplies. Prep steps (common to most): remove debris/weeds, ensure base drainage and subgrade stability, dry joints for polymeric sand, size backer rod ~25% larger than joint for compression.
Step‑by‑step install: How to install polymeric jointing sand for pavers (typical DIY workflow)?
Polymeric sand install (summary of manufacturer best practice): 1) Clean joints thoroughly: remove existing sand, weeds, and dust; use a vacuum or pressure washer and allow surface to dry. 2) Ensure base drains and pavers are stable. 3) Pour sand and broom into joints until filled to manufacturer‑specified depth (usually just below surface). 4) Compact surface (rubber‑pad plate compactor recommended) to seat sand. 5) Remove surface residue with stiff broom and blower; repeat until surface is clean. 6) Mist joints lightly in controlled passes per product TDS to activate polymers—avoid over‑wetting or heavy rain within cure window. 7) Allow cure per product instructions before traffic or power‑washing. Follow SDS/PPE guidance for dust control.
Step‑by‑step install: How to grout or mortar wide joints between stone or large pavers?
Mortar/grout install (general steps): 1) Remove old joint material and clean joints; wet but avoid standing water. 2) Mix mortar/grout per manufacturer ratios; use polymer‑modified grout for exterior durability where recommended. 3) Dampen joints, then press mortar into joints with pointing tool or grout bag to fully fill. 4) Tool joints to compact and shape; clean excess promptly with sponge and clean water. 5) Cure per product instructions (avoid traffic/rain during initial cure). For very wide/deep joints, build in backs‑up (leaning mortar bays) or use gravel base then mortar cap as specified.