
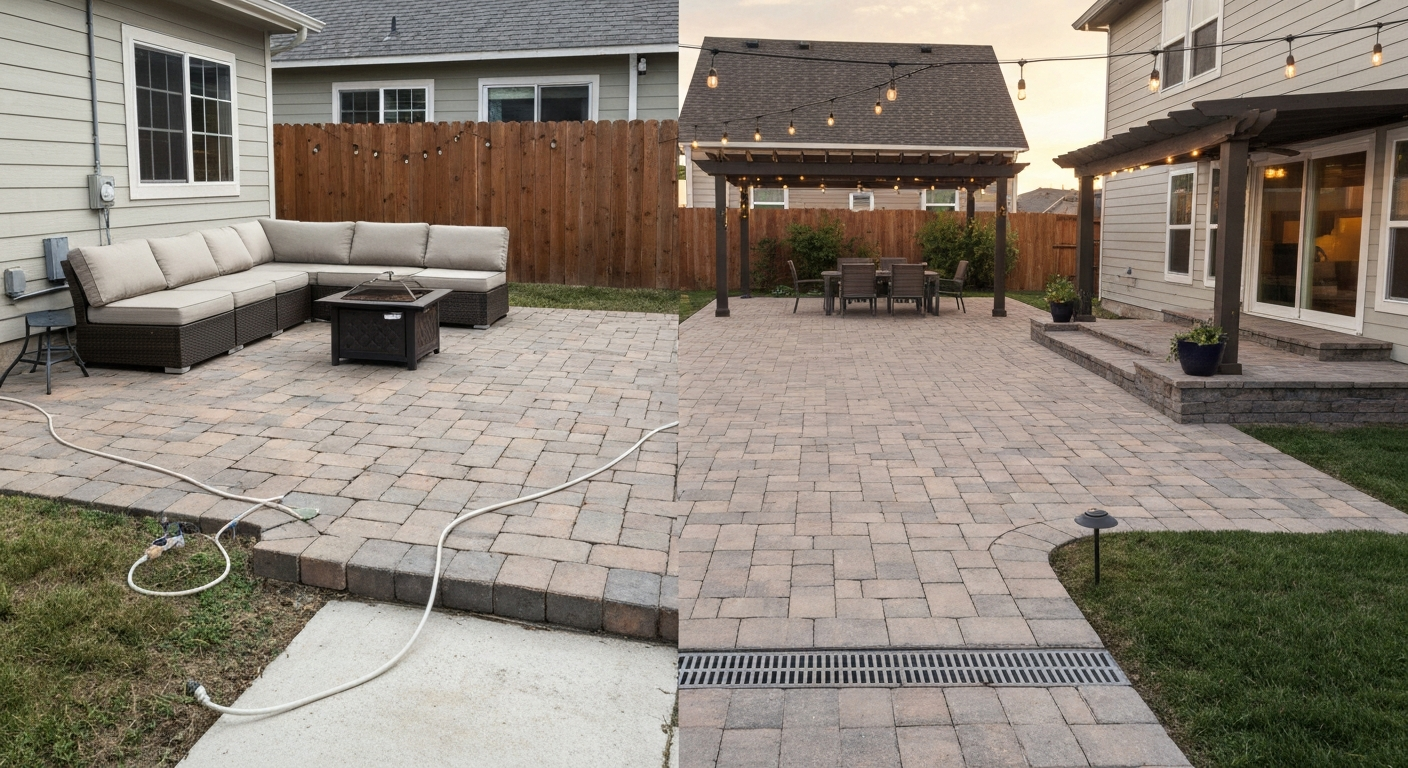
The worst patio decorating mistakes are not always the obvious ones. Yes, picking ugly furniture matters, but the errors that cost real money and real regret are the ones hiding underneath: bad drainage that heaves your pavers after one winter, undersized furniture that makes a 400-square-foot patio feel like a hallway, wiring that fails an inspection, or a fire pit placed 6 feet from a wood fence. This guide covers all of it, from the cosmetic slip-ups to the structural and safety oversights that can get expensive fast.
Worst Patio Decorating Mistakes and Fixes: Complete Guide

Elise Prescott
8 Aug 2026
Who this guide is for
Whether you are planning a patio from scratch, renovating one that never quite worked, or hiring a contractor and want to know the right questions to ask, this article is for you. I have talked with landscape contractors, pulled permits, tested patio products myself, and lived through a few of these mistakes personally. The goal here is to give you a clear, complete picture of every category of patio mistake so you spend money once and get it right.
The top 10 worst patio mistakes at a glance
Before we get into the detail, here is a fast-reference list you can scan. Each one is covered in full below. For a short, focused list specifically on décor missteps, see the 5 worst patio decorating mistakes for quick shopping and styling tips.
- Skipping proper grading and drainage planning before you pour or lay anything
- Designing without a traffic-flow or zone plan, making the space feel cramped and confusing
- Choosing furniture that is the wrong scale for the space or the wrong material for your climate
- Using a sub-par base layer under pavers or concrete, causing early settlement and cracking
- Picking non-exterior-rated fabrics, finishes, and hardware that degrade within one or two seasons
- Ignoring climate-control systems (patio covers, fans, misting, heaters) until after the patio is built
- Under-specifying outdoor lighting or treating it as an afterthought rather than a layered system
- Using indoor-rated electrical devices outdoors and skipping GFCI protection
- Pulling no permits for built-in kitchens, gas lines, fire features, or structural covers
- Under-budgeting site work and grading, then running out of money before the fun stuff
Layout and traffic-flow mistakes
The most common layout mistake I see is designing a patio as if it were a single undivided room. People buy a dining set, push it to one side, add a sofa conversation group to the other, and suddenly nobody can walk from the door to the grill without squeezing through chair backs. Good patio design works exactly like indoor room planning: define zones first, then place furniture. A dining zone, a lounge zone, and a transition path to the house are three distinct areas, each needing its own square footage.
Circulation is the part homeowners almost always underestimate. You need at least 36 inches of clear walkway between furniture groupings, and 48 inches is far more comfortable when people are moving around with plates and drinks. If your patio is 12 feet by 16 feet, that is 192 square feet, which sounds reasonable until you block 30 square feet of it with a dining table and 20 square feet with chairs people scoot out. Plan the flow on paper or use painter's tape on your existing surface before you buy a single piece of furniture.
The indoor-outdoor connection is the other big layout failure. Homeowners commonly design patios without planning indoor–outdoor flow, usable zones, or circulation space, leading to patios that feel too small or disconnected from the house. Patios that sit disconnected from the main interior door, or that require a step down that breaks the visual flow, feel like an afterthought. If you are building new or rebuilding, align your patio with the main living area or kitchen door and match your interior floor height as closely as the drainage slope allows. That single decision transforms how often the space actually gets used.
Quick fixes for layout problems
- Draw your zones on paper with actual furniture dimensions before you buy anything
- Allow a minimum 36-inch traffic lane; 48 inches near the grill or main door
- Use an outdoor rug to anchor each zone visually and keep groupings from drifting together
- If the patio feels too small, add a pergola or defined edge to create perceived enclosure rather than expanding the slab
Wrong furniture choices: scale, materials, and comfort
Scale errors go both ways. Oversized sectionals swallow small patios whole. Undersized bistro chairs placed around a large dining table look off and seat fewer people than the table can hold. Measure your patio, subtract your traffic lanes, and use those remaining dimensions to set a maximum furniture footprint. A good rule: your seating group should occupy no more than about 60 percent of your total usable area.
Material choice matters enormously and is highly regional. Aluminum frames are lightweight, rust-proof, and work almost everywhere. Wrought iron is heavy and durable but needs annual touch-up painting in humid or coastal climates because it rusts at cut edges and welds. Teak is beautiful and naturally weather-resistant, but in a hot, dry climate like Arizona or New Mexico, the wood will check and split without regular oiling. Near the coast, avoid any steel fasteners or frames that are not stainless or marine-grade, since salt air attacks standard hardware quickly. I have seen brand-new patio sets with corroded bolts after a single Florida summer because the manufacturer used zinc-plated hardware instead of stainless.
Cushion fabric is where most people make the biggest materials mistake. Standard polyester cushions fade and mildew within a season or two in direct sun or humid climates. Solution-dyed acrylic fabrics, made by brands like Sunbrella, are engineered specifically for UV resistance, mildew resistance, and color retention. They cost more upfront but the difference is a cushion that looks good after five years versus one you are replacing every 18 months. That math almost always favors the quality fabric.
Furniture material comparison
| Material | Best Climate | Maintenance Level | Durability | Rough Cost Range |
|---|---|---|---|---|
| Powder-coated aluminum | All climates, coastal-safe with marine fasteners | Low (occasional wash) | Excellent (no rust) | Mid-range |
| Wrought iron | Dry, low-humidity inland climates | Moderate (annual paint touch-up) | Good if maintained | Mid to premium |
| Teak | Moderate climates; requires oiling in dry/hot climates | Moderate (oil 1-2x/year) | Excellent if maintained | Premium |
| Resin wicker over aluminum | All climates, avoid extreme UV deserts long-term | Low (rinse, store cushions) | Good (5-10 years) | Mid-range |
| Recycled HDPE/poly lumber | All climates including coastal and freeze-thaw | Very low (no stain/seal) | Excellent (many 20+ yr warranties) | Mid to premium |
Material and finish mistakes that shorten your patio's lifespan
The surface you build on is the longest-lasting and most expensive element of your patio, and it is where material mistakes have the biggest consequences. Poured concrete is one of the most budget-friendly options, often installed in a range of roughly $10 to $16 per square foot depending on your region and finish, but plain concrete in freeze-thaw climates without proper air entrainment and a sound sub-base will crack and spall within a few years. In Minnesota, Wisconsin, or Colorado, make sure your concrete mix is specified for your freeze-thaw exposure class.
Paver patios run higher, typically in the mid-teens to mid-$20s per square foot installed, and that extra cost should buy you better performance. But pavers are only as good as what is underneath them. A compacted aggregate base of the correct depth (typically 4 to 6 inches for pedestrian-only patios, more in cold climates), proper edge restraints, and compacted bedding sand are non-negotiable. Skipping any of these leads to paver settlement, sand loss, and a re-leveling job that often costs as much as the original installation. Paver manufacturers and municipal specifications consistently cite compacted aggregate base and edge restraint as essential for long-term performance.
For freeze-thaw climates specifically, look for pavers tested per ASTM C1262 for freeze-thaw durability. This is the standard test manufacturers and specifiers use, and a paver that passes it will survive northern winters far better than one that was never tested for those conditions. If a supplier cannot tell you whether their pavers have been tested per this standard, that is a red flag.
Composite and PVC decking boards are worth considering if you are building a raised deck rather than a ground-level patio, or using decking boards as a patio surface. The major composite brands offer fade and structural warranties ranging from 25 to 50 years and require no staining or sealing, just periodic cleaning. That dramatically lowers your long-term maintenance burden compared with pressure-treated wood, which needs sealing or staining every one to three years to avoid checking and rot. If you are in a coastal environment, check the manufacturer's coastal installation instructions because some composites require marine-grade or stainless fasteners and have specific ventilation requirements under the boards.
One material option worth considering in any climate is permeable pavers. Standard concrete or solid pavers shed water to whatever is around them, contributing to runoff and requiring you to route drainage deliberately. Permeable pavers, permeable concrete, or systems with infiltration beds allow water to filter through, reducing runoff and making drainage management easier. The EPA recognizes permeable pavement as a best management practice for stormwater control. They do require a suitable sub-soil and occasional maintenance to prevent sediment clogging, but in the right situation they solve drainage problems proactively rather than reactively.
Climate-control and systems mistakes
This is the category where I see the most expensive regrets, because people treat climate control as optional and then discover that a patio in Phoenix, Houston, or central Florida is essentially unusable from May through September without it. Covers, fans, misting systems, and heaters are not luxury add-ons. They are the difference between a patio you use 30 days a year and one you use 180 days a year. The mistake is not choosing the wrong product, it is waiting until the patio is finished and then trying to retrofit systems that should have been designed in from the beginning.
Patio covers
A proper patio cover does three things: blocks direct sun, reduces radiant heat, and gives you a structure to mount fans, lights, and speakers. Solid roof covers (aluminum patio covers, insulated panel systems, or attached pergolas with roofing) block the most heat but require a building permit in virtually every jurisdiction because they attach to or sit near the house structure. Lattice pergolas filter light but do not stop radiant heat effectively in extreme-sun climates. Shade sails are inexpensive and effective for UV blocking but do not stop rain and need to be tensioned and anchored correctly to avoid damage in wind. Match your cover type to your actual climate: if summer temperatures regularly exceed 95 degrees, you need a solid roof cover, not a lattice pergola.
Fans and misting systems
Ceiling or pergola-mounted fans must be rated for damp or wet locations depending on their exposure. Dry-rated indoor fans used outdoors will corrode and fail, sometimes creating electrical hazards. Look for the UL wet-location or damp-location rating on the label. Sizing matters too: a 52-inch fan covers roughly 300 square feet adequately; larger covered patios benefit from two fans over one undersized unit.
Misting systems are transformative in hot, dry climates like the Southwest and Texas. A high-pressure misting system (operating at 1,000 PSI or above) produces fine droplets that evaporate before they wet surfaces, dropping ambient temperature by 10 to 20 degrees in low-humidity conditions. In high-humidity climates like the Gulf Coast or Southeast, lower-pressure misters make you feel wetter without meaningful cooling, so they are not the right tool. Know your average summer humidity before investing in misting.
Heaters
For shoulder-season or cool-climate use, patio heaters extend your usable months significantly. Propane and natural gas infrared heaters are the most common, but placement and fuel supply are where mistakes happen. Gas line work for a permanent natural gas heater requires a licensed gas plumber and a mechanical permit in virtually every jurisdiction, per the International Fuel Gas Code (IFGC) and NFPA 54. Running a quick DIY gas line without a permit is a safety violation and a liability problem when you sell the house. If you want a heater now without a gas line, electric infrared heaters plug into a standard GFCI-protected outdoor outlet and perform well in enclosed or semi-enclosed covered patios.
Outdoor speakers
Audio is a systems decision, not a décor decision, and treating it as décor is what leads to Bluetooth speakers on a side table that get rained on and stolen. If you want music on your patio, plan for it during the build: run speaker wire inside the patio cover or through a conduit in the wall, and choose speakers rated for outdoor wet-location use. In-ceiling or in-wall outdoor speakers mounted under a covered patio give far better sound distribution than any portable speaker, and they stay put. This is a good reason to think about all your systems, including speakers, fans, and lights, before the cover goes up, not after.
Lighting, décor, and gadget mistakes
Single-source lighting is the most common patio lighting mistake. One ceiling fixture or one string of café lights over the whole space creates flat, harsh illumination at one level and darkness everywhere else. Good outdoor lighting uses the same layering approach you would use indoors: ambient light overhead (string lights, ceiling fixtures, or recessed lights in a covered patio), task lighting for cooking or dining areas, and accent lighting at low levels for pathways, plants, and architectural features. Three layers always beat one bright fixture.
The weatherproofing mistake with lighting is subtle but important. Many outdoor light fixtures sold at big-box retailers carry a damp-location rating, which means they are safe under a covered patio but not in exposed, rain-hit locations. If your fixture will be hit by rain directly, it needs a wet-location rating. Check the label, not just the product description. The same applies to any smart outdoor switches or plugs: look for an IP44 rating at minimum, IP65 or better if the device will be directly exposed to rain.
Outdoor gadgets and tech deserve their own mention here. Solar-powered pathway lights are a genuinely useful, no-wire option for borders and steps, but cheap ones with small solar panels stop holding a charge after one season. Spend slightly more for ones with larger panels and lithium batteries. Smart outdoor plugs and outdoor-rated smart switches work well when specified correctly; the mistake is buying an indoor smart plug and using it outdoors under a light cover and expecting it to survive. Outdoor-rated smart plugs also need to be plugged into a GFCI-protected outdoor outlet to be compliant and safe.
String lights deserve their own mention because they are one of the most popular patio décor items and one of the most commonly misused. Cheap string lights with non-weatherproof sockets corrode and short out. Look for shatterproof bulb options in G40 or S14 shapes with individual socket seals. Run them on a timer or smart switch to avoid leaving them on all night in rain. Suspend them from lag-bolt hooks in a fence, pergola posts, or purpose-made poles anchored in planters, not draped loosely over branches or unsupported spans where they sag and become a trip hazard if they fall.
Drainage, grading, permitting, and safety oversights
Drainage is the most under-discussed and most consequential category on this list. Patios must slope away from the house structure at a minimum of 1 inch of fall per 8 feet of run, or about 1.5 percent grade. Building America and similar technical guidance is explicit: patios, walks, and drives must maintain positive drainage away from the foundation to prevent water intrusion. Building America guidance (Swales, Drains, and Site Grading for Stormwater Control – Building America Solution Center, PNNL) states patios, walks, and drives should maintain positive drainage away from the foundation to prevent water intrusion Swales, Drains, and Site Grading for Stormwater Control – Building America Solution Center (PNNL). When this is done wrong or skipped, water pools against the house, finds its way through the foundation wall, and creates moisture and structural problems that are orders of magnitude more expensive to fix than getting the grade right in the first place.
Channel drains, pop-up emitters, and French drains are the common solutions when surface grading alone is not enough. If your patio is enclosed on multiple sides by the house, walls, or fences, you likely need a designed drainage solution, not just a slope. This is one of those situations where a quick call to a landscape contractor or civil engineer is worth the cost of a consult. Contractors I have spoken with consistently name drainage and base prep as two of the most expensive recurring mistakes they are called to fix after the fact.
Electrical safety and code compliance
The 2020 and 2023 NEC code cycles significantly expanded GFCI protection requirements for outdoor circuits. Under NEC 210.8(F) and related sections, outdoor receptacles at dwellings must be GFCI-protected. In addition, NEC 406.9 requires outdoor receptacles to use weather-resistant devices and a weatherproof while-in-use cover (the kind with a hinged lid that closes over a plug that is inserted). A standard indoor outlet with a flat cover does not meet this requirement for wet locations. If your patio has any outlets that are not GFCI-protected, do not have a while-in-use cover, or use standard indoor devices, they are not code-compliant and should be updated by a licensed electrician. This is not optional: outdoor electrical failures cause fires and electrocution.
Note that different jurisdictions adopt different NEC editions, so your local adopted code may be the 2017, 2020, or 2023 NEC. Your local building department can tell you which edition applies. When in doubt, upgrading to 2023 NEC standards is always the safer choice.
Fire pits and gas features
Fire pits are one of the most popular patio additions and one of the most frequently installed incorrectly from a safety standpoint. The International Fire Code and NFPA-derived rules used by most municipalities establish a minimum clearance of 10 feet between an open flame and any combustible construction, including wood fences, pergola posts, and wood siding. Many jurisdictions also prohibit open-flame devices on combustible balconies or decks. Before you install a fire pit, check your local fire code and HOA rules. This is not bureaucratic caution, it is a real fire risk.
A built-in gas fire pit or outdoor kitchen with a gas line triggers permits in virtually every jurisdiction: typically a building/structural permit, a gas/mechanical permit, an electrical permit, and sometimes a fire department review. Skipping permits means you have unpermitted work that must be disclosed when you sell, may not be covered by homeowner's insurance in a loss event, and may need to be demolished or rebuilt to comply. Hire a licensed gas plumber for gas line work. It is not a DIY task and the IFGC is explicit about licensed installation requirements.
When to call a pro
- Any gas line work, indoors or outdoors: hire a licensed gas plumber and pull a permit
- GFCI outlet upgrades, new outdoor circuits, or any wiring in a wet or outdoor location: hire a licensed electrician
- Grading and drainage that affects water flow toward the house: consult a landscape contractor or civil engineer
- Structural patio covers attached to the house: pull a building permit and use a licensed contractor familiar with your local code
- Built-in outdoor kitchens or permanent fire features: expect multiple permits and hire appropriately licensed trades for each system
A planning checklist before you start
Use this checklist whether you are DIYing the whole project or hiring a contractor. It covers every category above and gives you a structured way to confirm you have not skipped anything important.
- Confirm existing grade and drainage direction; plan positive slope away from the house before any surface work begins
- Draw your zone plan with actual traffic lanes labeled at 36 to 48 inches minimum
- Set furniture dimensions on paper before buying; confirm scale works in your measured space
- Specify paver or concrete mix for your freeze-thaw exposure class if applicable; confirm base depth and edge restraint requirements
- Identify all climate-control needs (shade, fan, misting, heaters) and plan for mounting points and utilities before the cover goes up
- Plan lighting in three layers: ambient, task, and accent; specify wet- or damp-location ratings for each fixture
- Check NEC edition adopted locally; confirm all outdoor outlets are GFCI-protected with while-in-use covers
- Verify fire pit clearances with local fire code before purchasing or placing any fire feature
- Identify all permit requirements for structural covers, gas work, electrical work, and outdoor kitchens with your local building department
- Choose cushion and fabric materials rated for your climate; confirm marine-grade or stainless fasteners for coastal environments
- Get at least two contractor quotes for any permitted work; ask contractors to confirm they will pull permits themselves
Budget vs. premium: where to spend and where to save
Not every part of a patio needs to be premium. The places where you genuinely should not cut corners are the sub-base and drainage (getting it wrong costs far more to fix than it cost to do right), the electrical work (safety and code compliance are non-negotiable), and the cover system if you are in an extreme climate (this determines how much you actually use the space). The places where you have more flexibility are decorative lighting, accessories, and accent pieces. A $30 solar pathway light that lasts one season is a waste; a $90 one with a quality panel that lasts five seasons is a deal. The same logic applies across the board: spend on structure and systems, save on swappable décor.
For homeowners who want to explore décor upgrades and gift ideas for an already-functional patio, the best patio decorations and best patio gadgets topics on this site are worth a look once your structural and systems foundations are solid. See our roundup of best patio decorations for curated, weatherproof ideas to finish your space. For gift-focused ideas, check our round-up of best patio gifts for mom to find thoughtful, patio-ready presents that complement a finished outdoor space. For ideas on activities to enjoy on your patio, see our roundup of the best patio games for backyard fun. For fun activities and group entertainment ideas, see our roundup of the best outdoor patio games. For gift-specific ideas, see our roundup of the best patio gifts. Getting the bones right first means every décor decision you make on top of them will actually last. For another relevant comparison, see best patio gadgets.
FAQ
What are the single worst patio decorating mistakes homeowners make?
Designing without a plan for indoor–outdoor flow, usable zones, and circulation. Why it matters: a patio that’s disconnected or cluttered feels small, is uncomfortable to use, and wastes money on furniture that doesn’t fit. Practical fix: map entry/exit points, establish zones (dining, lounging, cooking, play), leave 30–36 in (76–91 cm) circulation aisles, and create sightlines from inside. Product/system alternatives: modular furniture that can be rearranged; area rugs to define zones; retractable covers to emphasize entry points. Region notes: in rainy climates prioritize covered transition zones; in hot climates plan shaded walkways. Maintenance/long‑term cost: better layout avoids repeated furniture purchases and costly rework. When to hire: if you can’t resolve flow on paper, hire a landscape architect or designer for a layout plan (hourly consult or small project scope).
How does under-budgeting site work (grading, base prep, utilities) become a costly mistake?
Why it matters: skipping proper grading, drainage, or base compaction leads to settlement, poor drainage, trip hazards and costly repairs. Practical fix: include site work line items in the budget—grading, compacted aggregate base, edge restraints, and utility trenches. Product/system alternatives: engineered aggregate base, geotextile underlayment, permeable pavers with infiltration beds if stormwater management is needed. Region notes: in freeze–thaw areas increase base depth and use frost‑resistant materials per ASTM guidance. Maintenance/long‑term cost: correct site work reduces long‑term repair and re‑leveling expenses. When to hire: hire a contractor or civil/site engineer for sloped sites, poor soils, or complex drainage issues; get written scope and unit prices.
What are common drainage mistakes and how do I fix them?
Common mistake: patio grade sloping toward the house or lacking positive drainage. Why it matters: water intrusion, foundation moisture, frozen puddles, and accelerated material failure. Practical fix: slope patios away from the house (minimum 1/8–1/4 in/ft for paved surfaces or follow local code), install perimeter drains, channel drains, or swales; use permeable pavers with infiltration trenches where appropriate. Product/system alternatives: linear channel drains, French drains, permeable pavers, dry wells. Region notes: in high‑rain or clay soil areas use engineered drainage; in arid regions focus on runoff management to avoid erosion. Maintenance/long‑term cost: proactive drainage reduces foundation repairs and surface replacement costs. When to hire: for any patio adjacent to foundations or with persistent runoff, hire a civil/site expert or licensed landscape contractor.
What furniture/material selection mistakes shorten patio life or look terrible?
Using indoor furniture or non‑exterior‑rated materials, and wrong scale furniture. Why it matters: UV fading, mildew, rust, rot, and discomfort; oversized pieces crowd circulation. Practical fix: choose exterior‑rated furniture and solution‑dyed acrylic fabrics (Sunbrella or equivalents), use stainless‑steel or powder‑coated aluminum metals, and select appropriately scaled furniture (measure before buying). Product/system alternatives: marine‑grade stainless fasteners, composite or PVC decking, commercial‑grade outdoor fabrics. Region notes: in coastal areas require marine‑grade stainless (316) and corrosion‑resistant finishes; in humid climates prioritize mildew‑resistant cushions. Maintenance/long‑term cost: investing in exterior‑rated products reduces replacement and cleaning costs; cheaper items may require yearly replacement. When to hire: use a landscape designer or outdoor furniture specialist for custom setups or built‑in seating.
How do wrong pavement or deck material choices cause failures, and how do I specify correctly?
Mistake: choosing materials unsuited to local climate (freeze–thaw exposure, salt air) or skipping proper base/installation. Why it matters: spalling, cracking, corrosion, or paver settlement. Practical fix: select materials with ASTM freeze–thaw ratings for your climate, use proper aggregate base, compaction, edge restraint, and manufacturer‑approved installation. Product/system alternatives: permeable pavers for stormwater benefits, concrete with control joints and air entrainment in cold climates, composite decking for low maintenance. Region notes: specify freeze‑thaw tested pavers in cold climates and marine‑grade hardware near coasts. Maintenance/long‑term cost: durable materials with correct installation lower lifecycle costs despite higher initial price. When to hire: hire qualified masonry or deck contractors and request references plus proof of relevant product experience.
What lighting mistakes reduce safety and atmosphere — and how do I correct them?
Mistake: relying on a single light source or using wrong color/brightness; poor placement that creates glare or dark zones. Why it matters: safety hazards, reduced usability after dark, and poor ambiance. Practical fix: layer lighting—task (kitchen/cooking), ambient (dining/lounging), accent (plants, steps), and path lighting. Use warm color temperature (2700–3000K) for residential comfort and dimmers or smart controls. Product/system alternatives: low‑voltage LED fixtures, integrated step lights, solar path lights for low‑use areas, and smart lighting systems. Region notes: in wet climates use wet‑location rated fixtures; in hot climates choose fixtures rated for high ambient temperature. Maintenance/long‑term cost: LEDs reduce energy and replacement costs; choose fixtures with replaceable parts. When to hire: for electrical circuits, timers, dimmers, or integrated systems, hire a licensed electrician familiar with outdoor lighting.