Most patio decorating mistakes come down to five repeating patterns: bad layout and scale, furniture that isn't built for outdoor life, ignoring shade and comfort entirely, a lighting plan that either blinds you or leaves you in the dark, and throwing together decor with no cohesive style. The good news is every one of these is fixable, and most fixes don't require starting over from scratch.
5 Worst Patio Decorating Mistakes and How to Fix Them

Elise Prescott
18 Jun 2026
How to spot the 5 worst patio decorating mistakes fast
Walk out to your patio right now and ask yourself a few honest questions. Can you move between the furniture without squeezing past chairs? Does anyone actually sit outside when it's hot or windy? Have you replaced a cushion, rug, or decor piece in the last year because it fell apart? Do you avoid the patio after dark because the lighting is either harsh or barely there? Does the space look like it was decorated in three separate shopping trips with no connecting thread? If you answered yes to two or more of those, you've already spotted your worst offenders.
The fastest diagnostic is a tape measure and a ten-minute walk-through. Measure your patio footprint, note which direction it faces (south-facing patios in Texas or Arizona cook in the afternoon sun), check furniture tags for outdoor ratings, and photograph the space at night. Those four steps will surface almost every mistake covered below before you spend a single dollar on fixes.
Mistake #1: Wrong layout, traffic flow, and furniture scale
This is the mistake that makes a patio feel cramped and chaotic even when the furniture itself is perfectly nice. Best outdoor patio games tend to be the ones you can actually play comfortably, which starts with choosing the right layout patio feel cramped and chaotic. It usually happens one of two ways: people buy furniture before measuring, or they push everything against the walls the same way they'd arrange a living room. Outdoors, both approaches fail.
What it looks like in real life
You've got a 10x12-foot patio with a six-seat dining set that requires at least 3 feet of clearance on every side to pull chairs out comfortably. That means the table alone needs roughly a 9x9-foot footprint just to function. Add a gas grill, a side table, and a planter, and you've got a space where guests have to turn sideways to get to their seat. On the opposite end, people with large patios sometimes buy furniture that's too small, leaving a ring of dead, empty space around a tiny bistro set that looks lost.
How to fix it today
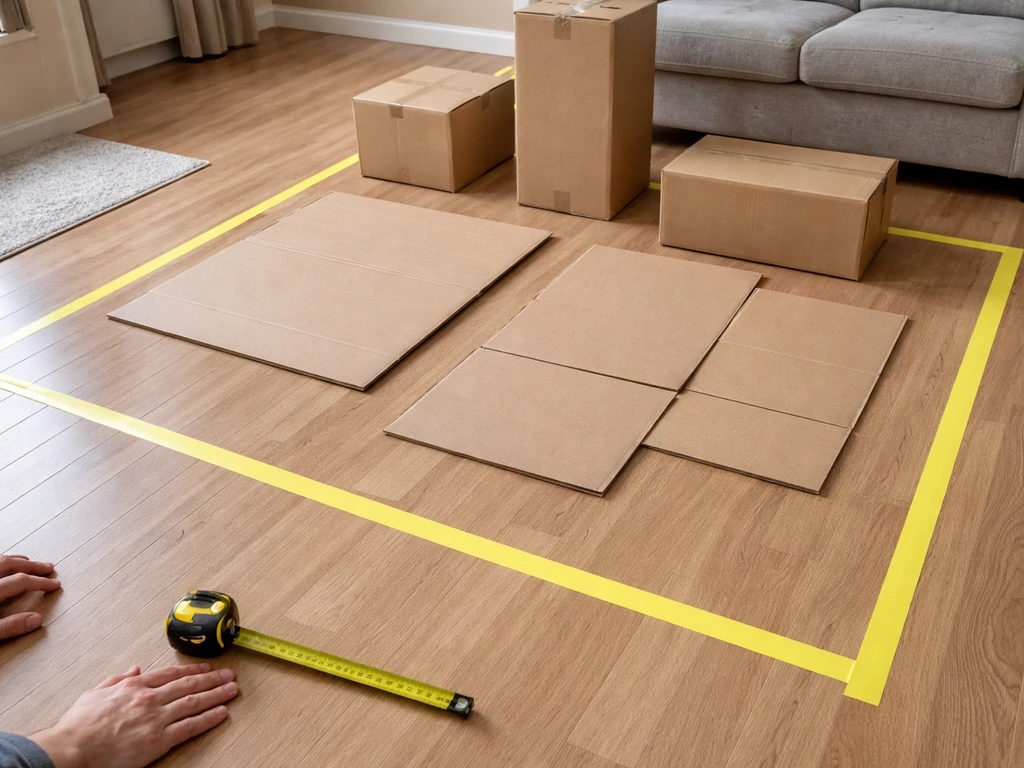
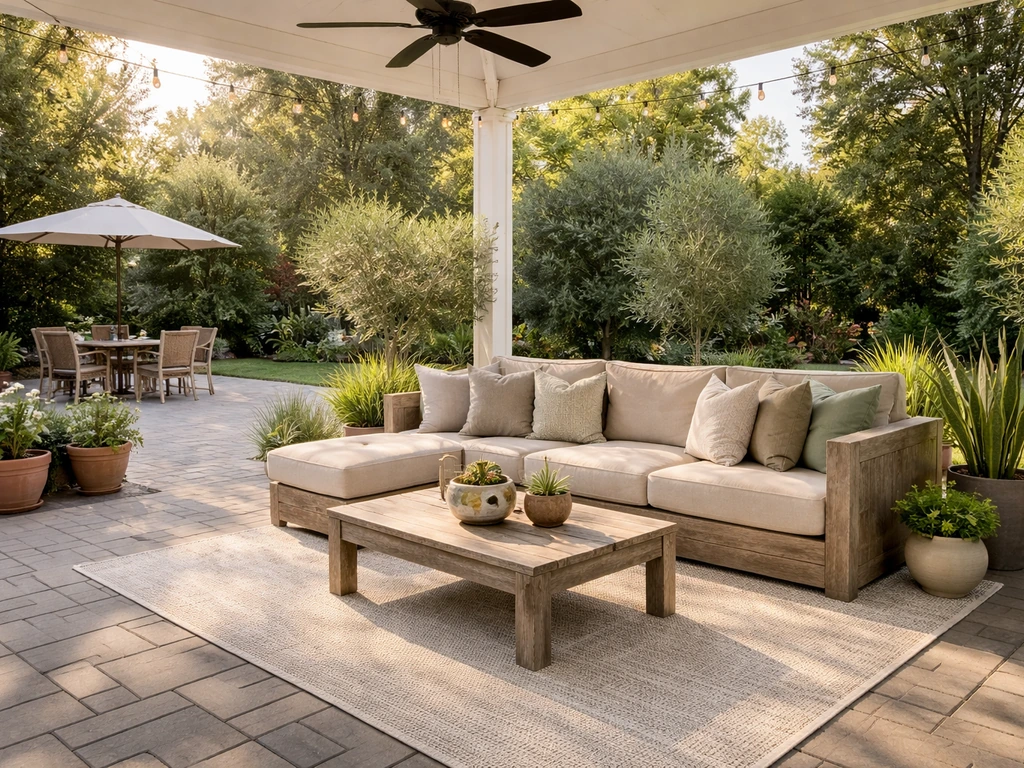
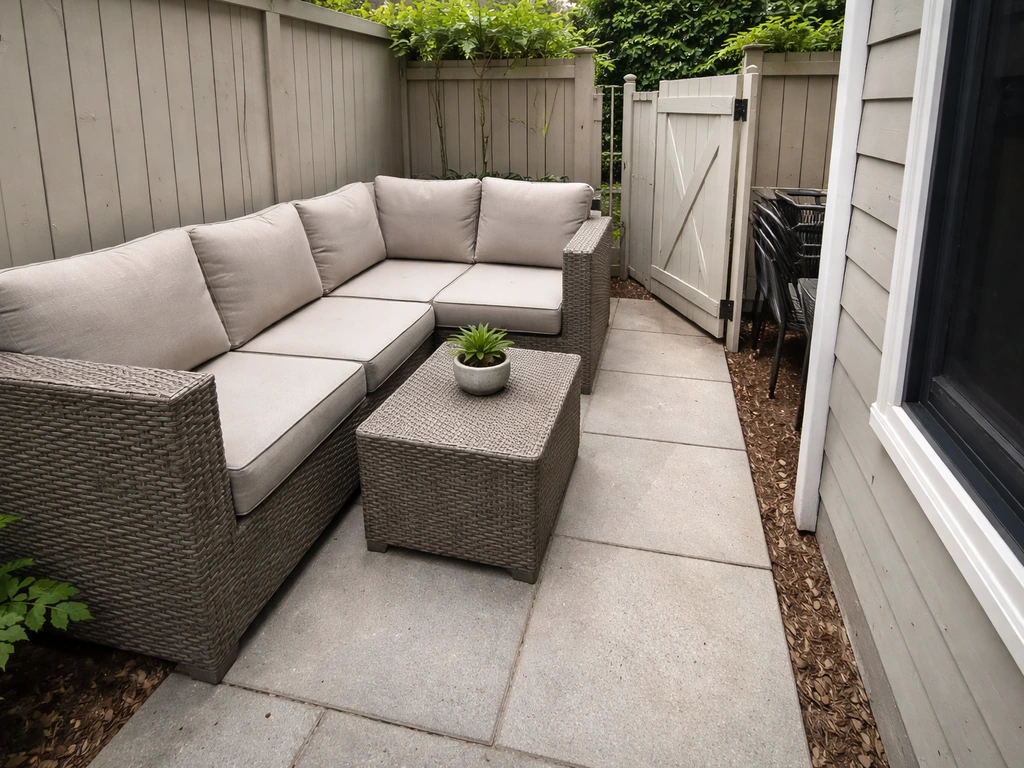
Before buying anything, tape out your patio dimensions on your living room floor and arrange cardboard boxes or masking tape outlines in the furniture sizes you're considering. The target clearance rule is simple: 3 feet of walkway between any furniture and wall, railing, or other large piece; 36 inches minimum from a dining chair to the nearest obstacle when the chair is pulled out. For conversation seating, keep the distance between facing sofas or chairs between 6 and 10 feet so people aren't shouting across the space. If your patio is under 150 square feet, a two- or four-seat conversation set almost always works better than a full dining set.
Also consider traffic flow. Identify where people enter and exit the patio from the house, the yard, and the gate. Keep those paths clear with at least 36 inches of unobstructed walking room. Floating furniture slightly away from the perimeter walls, the way a good interior designer would, actually makes a small patio feel bigger and allows air to circulate around cushions, which extends their life.
Mistake #2: Outdoor furniture and decor that isn't truly weather-rated
This one costs homeowners real money every single year. Cushions that mold, metal frames that rust after one rainy season, rugs that disintegrate, and candles or lanterns that warp in the heat are all symptoms of the same problem: indoor or lightly-rated products being used in a full outdoor environment.
What the labels actually mean
Not all "outdoor" labels are created equal. A piece might be sold in the patio section of a big-box store but still only be rated for covered, shaded use. Check for these specifics when buying outdoor furniture and decor: fabrics should be solution-dyed acrylic (like Sunbrella) or at minimum labeled UV-resistant and mold-resistant; metal frames should be powder-coated aluminum, stainless steel, or teak and not plain steel or cast iron unless you're prepared for annual maintenance; rugs should explicitly say they're made for full sun and rain exposure, not just "indoor/outdoor"; and any plastic should be high-density polyethylene (HDPE) or UV-stabilized polypropylene, not standard polypropylene which cracks and fades.
| Material | Best Use | Weakness | Typical Lifespan Outdoors |
|---|---|---|---|
| Powder-coated aluminum | All climates, full exposure | Can dent, not as sturdy as steel | 15-25 years |
| Teak | All climates, premium look | Requires oiling if you want to keep color; grays naturally | 20-30+ years |
| HDPE (poly lumber) | High humidity, coastal areas | Can look less premium | 15-20 years |
| Solution-dyed acrylic (Sunbrella-type) | Full sun, rain, humid climates | Higher cost upfront | 5-10 years per cushion |
| Standard polyester or cotton blend | Covered, dry climates only | Mold, UV fading, rapid deterioration | 1-2 seasons |
| Plain steel or cast iron | Dry climates with regular maintenance | Rust in humid or rainy climates | 2-5 years without treatment |
The fix here is to audit what you already own before next season. Pull cushion covers off and check for mold on the foam inside. Look at frame welds and joints for rust bubbles. If a piece is borderline, store it under a quality UV-resistant cover during the off-season, or move it to a covered area. If it's already deteriorating, replacing it with properly rated materials now will save money compared to replacing it again in two years.
Mistake #3: Ignoring shade, heat, wind, and comfort needs
A beautifully decorated patio that nobody actually uses because it's a furnace from noon to 7 PM is not a successful patio. This is the mistake I see most often in southern and southwestern states, but it shows up anywhere that gets more than a few hot summer weeks. People spend thousands on furniture and decor and then realize the space is unusable four months out of the year because they didn't address the climate.
Diagnosing your comfort problem
South- and west-facing patios take the hardest afternoon sun hit. If you're in Texas, Arizona, or the Southeast, that means radiant heat that can make even shaded patios uncomfortable without active cooling. East-facing patios catch morning sun and stay more tolerable in the afternoon. North-facing patios are often the most comfortable in summer but can feel dark and damp in wetter climates. Wind is the opposite problem in places like Colorado, Wyoming, or coastal areas, where exposed patios become unpleasant and decor gets destroyed.
Practical shade and cooling fixes
A patio cover, pergola, or shade sail is the most effective first step for sun and heat. A solid patio cover or insulated roof panel blocks radiant heat better than a pergola alone. For patios without permanent structure, large cantilever umbrellas (9-11 feet) can cover a dining or conversation area if they're properly weighted and rated for wind. Once you have shade, add a ceiling fan or misting system to make the temperature feel 10 to 20 degrees cooler.
High-velocity outdoor fans rated for damp or wet locations do double duty as cooling and bug deterrents. Misting systems work exceptionally well in dry climates like the Southwest, where evaporative cooling is efficient. In humid climates like Florida or the Gulf Coast, misting adds humidity you don't need, so a strong fan is the better choice there.
For wind protection, consider privacy screens, lattice panels, or weather-resistant outdoor curtains on the windward side of the patio. These can serve double duty as style elements while cutting wind chill and protecting decor from being knocked over or damaged. Whatever comfort upgrades you choose, treat them as part of the decor plan, not an afterthought. A pergola with a ceiling fan and string lights is a decor decision as much as a functional one.
Mistake #4: A weak lighting plan (too dim, wrong placement, or unsafe)
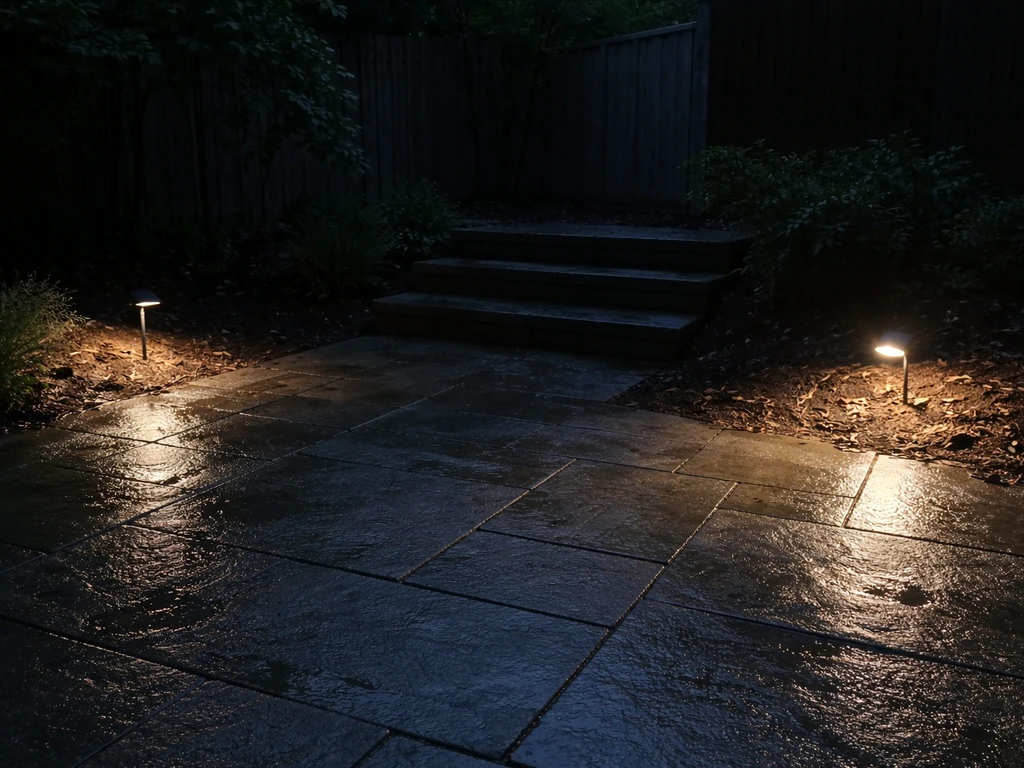
Bad outdoor lighting is either invisible or blinding, and both make the patio unusable after dark. The DarkSky Approved program is a third-party certification that focuses on objective criteria to help minimize glare, reduce light trespass, and reduce light pollution. Once your lighting works for evening use, you can plan activities like the best patio games so your space is fun after dark too. Most people default to one of two failures: a single overhead fixture that casts a flat, harsh pool of light directly below it, or stringing up lights everywhere and wondering why the space still feels dim in the spots that matter.
The wet-rated vs. damp-rated distinction actually matters
This is where safety and aesthetics collide. Covered patios are classified as damp locations under electrical code, meaning fixtures must be rated at minimum for damp environments. Open, unroofed patios exposed to direct rain require wet-rated fixtures. Using a damp-rated fixture in a wet location is a code violation and a fire and shock hazard. The distinction matters when you're shopping because many attractive fixtures are only damp-rated, which is fine under a pergola or covered patio but not for a fully exposed space. Check the label before you buy.
How to actually light a patio well
Good patio lighting uses layers. If you want the best patio gadgets, start by building a layered lighting setup that you can customize for every time of day Good patio lighting uses layers. . Start with ambient light (string lights, overhead pendants, or a ceiling fan with an integrated light kit) for general illumination.
Then add task lighting where you need it most, typically over dining or food prep areas. Finally, use accent lighting like path lights, uplights on plants or architectural features, or low-level deck lights to add depth and make the space feel intentional. Fixtures mounted around 6 to 7 feet high should be aimed downward to avoid eye-level glare and to actually deliver light to surfaces where you need it, not straight into guests' eyes.
One well-placed, properly aimed fixture usually outperforms two fixtures installed at the wrong angle. [Restraint matters too: overlit patios feel commercial and harsh. ](https://www. homesandgardens.
com/interior-design/how-to-plan-outdoor-lighting) The goal is warm, layered light, not a floodlight situation.
Any new wiring or circuit additions should be done by a licensed electrician. This is not a corner to cut. Outdoor electrical work involves GFCI protection requirements and wet-location code compliance, and getting it wrong is genuinely dangerous. Swapping out a fixture for a rated replacement is often a straightforward DIY task; running new circuits or adding outlets is a hire-a-pro job.
Mistake #5: No cohesive style plan (colors, materials, and textures that don't work together)
This is the mistake that's hardest to put your finger on but easy to feel. The patio looks "off" somehow even though every individual piece is fine. Usually it's because the space was decorated in stages without a plan: a teak dining set purchased one year, wrought iron accent chairs the next, a colorful boho rug, a modern sleek planter, and a country farmhouse lantern. Each item might be quality, but together they're visual noise.
Building a style framework before you shop
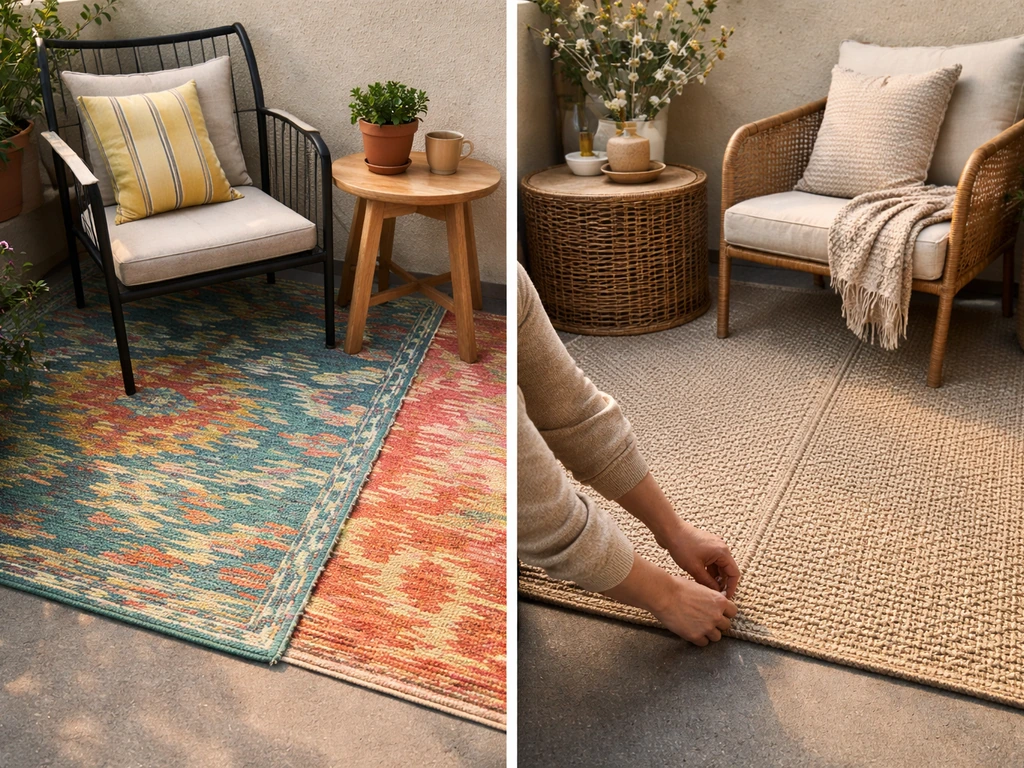
Pick two anchors before you buy anything: a primary material and a primary color palette. The material might be natural wood tones, powder-coated black metal, or woven wicker. The color palette should have a dominant neutral, one accent color, and optionally one pop color. Everything you buy should connect to at least one of those anchors. A natural teak table pairs with warm-toned cushions and ceramic planters, not bright white plastic pots and neon pillows. A black aluminum frame set looks sharp with charcoal, white, and one accent color like terracotta or sage.
Outdoor rugs are often the fastest way to pull a patio together or tear it apart. A great set of best patio gifts can also help you finish the look with items that work outdoors, like a weather-rated rug or stylish planters outdoor rugs. A well-chosen outdoor rug (properly weather-rated, as covered in Mistake #2) defines the seating zone, adds texture, and ties furniture colors together. Choose one that incorporates both your neutral and accent colors. Similarly, planters, throw pillows, and lighting fixtures should repeat the same two or three materials throughout the space rather than introducing a new finish with every purchase.
When decor and function need to match
Functional elements like fans, speakers, misting systems, and patio covers are part of the design, not separate from it. A black powder-coated ceiling fan on a pergola looks intentional and sharp in a modern industrial patio scheme. A rattan-weave fan fits a coastal or bohemian setup. Choosing your functional upgrades in the same finish family as your furniture is one of the easiest ways to make a patio feel designed instead of assembled. The same goes for speakers and lighting fixtures: exposed wires, mismatched finishes, and fixtures bolted on as an afterthought will undercut even great furniture choices.
Quick action checklist and what to upgrade first
Use this checklist to audit your patio today. Work through it in order of impact: layout and comfort fixes first, then materials and durability, then style and lighting polish. If you're looking for the best patio gifts for mom, focus on weather-rated comfort and lighting that makes outdoor time feel effortless style and lighting polish.
- Measure your patio footprint and compare it to current furniture dimensions. Confirm 3-foot clearance on all walkways and 36 inches behind each dining chair when pulled out.
- Check every furniture piece, cushion, rug, and decor item for outdoor ratings. Pull cushion covers off and inspect foam for mold. Look at metal joints for rust.
- Note which direction your patio faces and what time of day it becomes uncomfortable. Decide whether shade, cooling (fan or mist), or wind protection is your highest priority fix.
- Walk the patio after dark. Identify where lighting is missing, where it's glaring, and whether fixtures are properly rated (wet or damp) for their location.
- Look at the space as a whole. Count how many different materials and finish colors are present. If it's more than three or four, identify which pieces to swap, recover, or replace first.
- For any electrical work beyond swapping rated fixtures, contact a licensed electrician. For structural shade solutions like pergolas or patio covers, get quotes from at least two vetted contractors.
- Prioritize fixes by budget: layout adjustments and furniture consolidation cost nothing; adding a quality outdoor rug or replacing worn cushions with solution-dyed fabric is a low-cost upgrade; fans, misting systems, and patio covers are medium investments that dramatically extend usable hours.
DIY vs. hire a pro: a quick guide
| Task | DIY or Pro? | Notes |
|---|---|---|
| Rearranging furniture layout | DIY | Just needs a tape measure and a willing afternoon |
| Replacing cushion covers with rated fabric | DIY | Easy swap; buy Sunbrella-grade fabric inserts or covers |
| Installing a cantilever umbrella | DIY | Follow manufacturer weighting requirements carefully |
| Adding an outdoor rug or planters | DIY | Focus on weatherproof ratings and cohesive finish colors |
| Swapping a light fixture (same box/circuit) | DIY (with care) | Turn off breaker; confirm wet or damp rating matches location |
| Running new outdoor electrical circuits or outlets | Pro (electrician) | Code requires GFCI protection; safety is not optional here |
| Installing a ceiling fan with new wiring | Pro (electrician) | Same as above; also requires proper structural mounting |
| Installing a pergola or patio cover | Pro (contractor) | Structural work often requires permits; get at least two quotes |
| Installing a misting system (hose-connected) | DIY | Low-pressure systems connect to a standard hose bib |
| Installing a high-pressure misting system | Pro | Requires a dedicated pump and line; hire someone familiar with outdoor systems |
The five mistakes above almost always show up together. A patio with a layout problem usually also has a comfort problem, and a patio that was decorated without a plan usually has mismatched lighting too. Fixing one often gives you the momentum and clarity to address the others. Start with the highest-impact item in your specific situation, whether that's clearing a cramped walkway, replacing a rusted frame, or finally adding shade to a patio you've been avoiding since July, and the rest of the upgrades will follow more logically from there.
FAQ
How do I measure my patio layout correctly if it’s not a perfect rectangle (L-shape, odd corners, or steps)?
Use masking tape to outline the actual usable footprint, then measure clearances along the paths people will walk (entry from the house to the dining area, and from the yard/gate to seating). For irregular shapes, the 3-foot rule still applies, but prioritize the narrowest segment in each walking route, not the widest part of the patio.
What if my patio has furniture already, but I still can’t get 3 feet of walkway clearance?
Start by changing the type and orientation, not just shifting items. Swap from deep chairs to slimmer dining chairs (or armless conversation seating), reduce the seating footprint, and consider floating the main seating away from the wall to create one continuous path. If you cannot reach near 36 inches to an outward-pulled chair, a smaller set is the practical fix.
Is “indoor/outdoor” furniture always safe to leave outside year-round?
Not necessarily. “Indoor/outdoor” often means it tolerates occasional exposure, not constant sun, rain, and heat cycling. Look for specific ratings for UV and mold resistance, and confirm whether the cushion fabric and foam are intended for full exposure. If the label is vague, plan on seasonal storage or a weatherproof cover.
How can I tell whether my rug is actually rated for full sun and rain, not just marketing language?
Check the product description for explicit claims tied to sun and moisture, such as UV exposure tolerance and water-resistance or quick-dry behavior. If it only says “indoor/outdoor” or mentions water in a generic way, treat it as a risk item and test by observing how it behaves after a morning rain (drying time and edge fraying are good clues).
Should I choose a patio ceiling fan or a misting system first in a hot climate?
In most scenarios, prioritize shade (cover, pergola, or umbrella) first, then add the fan. If you live in a dry climate, misting can work well after shade is in place. In humid climates, misting often makes the area feel wetter and hotter, so a high-velocity fan usually gives better comfort with less hassle.
Do I really need wet-rated lighting if my patio is under a pergola or partial roof?
Yes, the rating still matters based on exposure. Partial coverage can create direct rain or splash zones, especially near edges and near any areas where water drips. If fixtures are in areas that can get sprayed or splashed, choose wet-rated, and if they are protected from rain that reaches them, damp-rated may be acceptable. When in doubt, verify the placement zones and fixture label before installing.
What’s a safe way to reduce glare from outdoor lights without turning the patio into a dim space?
Use lower-mounted, downward-aimed fixtures (around 6 to 7 feet as a general guideline) and add light where you need it (dining and food prep) instead of blasting everything. Increase warmth with layered sources, then stop once faces and eye level are comfortable, because more brightness can look “commercial” even if it is technically bright.
Can I mix styles if I don’t want to redo everything, or do I have to commit to one look?
You can mix styles, but you need repetition to prevent visual noise. Pick two anchors (one primary material family and a small color palette), then choose items that share those anchors even if the designs differ. For example, you can mix metal and wood forms as long as the metal finish repeats and the rug reflects your main colors.
What if my patio feels disconnected even though everything matches my colors?
Check whether you have enough “zone definition.” A common fix is ensuring there is a clearly defined seating zone using a properly sized outdoor rug and consistent lighting over that zone. If the rug is too small, the colors may match but the seating area will still feel like separate pieces.
What’s the quickest durability win if I’m not ready to replace major furniture yet?
Start with the items that fail first: cushions, frames, and rugs. Swap to UV- and mold-resistant cushion covers (or covers plus storage), add quality weatherproof covers for frames, and replace any rug that shows edge fraying or prolonged wet drying. These steps often extend the life of everything else while you plan bigger upgrades.
When should I hire an electrician versus doing it myself on a patio upgrade?
Hire a pro for anything involving new circuits, new outlets, or modifications that change wiring paths. DIY is usually limited to swapping an existing fixture with one rated for the same location type (damp or wet) and making sure the power is turned off and the fixture matches the outdoor rating requirements.