The best patio gadgets right now are outdoor ceiling fans, misting systems, patio heaters, weatherproof Bluetooth speakers, and smart shade covers. Which ones you actually need depends on your climate, your patio size, and what problem is ruining your outdoor time the most. If you are roasting in Phoenix, a misting fan combo will do more for you than anything else. If you are in Chicago trying to squeeze six more weeks out of fall evenings, a propane or infrared heater is your move. This guide walks through every major category, tells you what to look for, and gives you honest guidance on what to buy first.
Best Patio Gadgets: Comfort, Cooling, Heat, and Audio Picks

Elise Prescott
27 May 2026
Quick Patio Gadget Shortlist by Goal
Before you go deep on specs, it helps to know which gadget category actually matches your goal. Here is the fast version:
| Your Goal | Best Gadget Category | Budget Starting Point | Premium Option |
|---|---|---|---|
| Stay cool in heat | Outdoor ceiling fan or misting system | $80–$150 fan | $300+ misting system |
| Extend season into fall/spring | Patio heater (propane or infrared) | $60 tabletop propane | $500+ hardwired infrared |
| Block sun and glare | Shade sail, pergola cover, or motorized awning | $40 shade sail | $2,000+ motorized cover |
| Add music and ambiance | Weatherproof outdoor speakers | $100 portable Bluetooth | $600+ hardwired stereo pair |
| Add convenience and control | Outdoor smart plugs, GFCI outlets, ceiling fan remote kits | $20–$40 smart plug | $150+ smart hub with app control |
Most patios benefit from at least two of these categories working together. A fan plus a shade cover, for example, drops the perceived temperature far more than either one alone. Think in combinations, not single purchases.
Climate-Control Gadgets: Fans, Misters, and Heaters

Climate control is where most homeowners should spend their first dollar, because discomfort drives people inside faster than anything else. The right gadget here depends heavily on where you live.
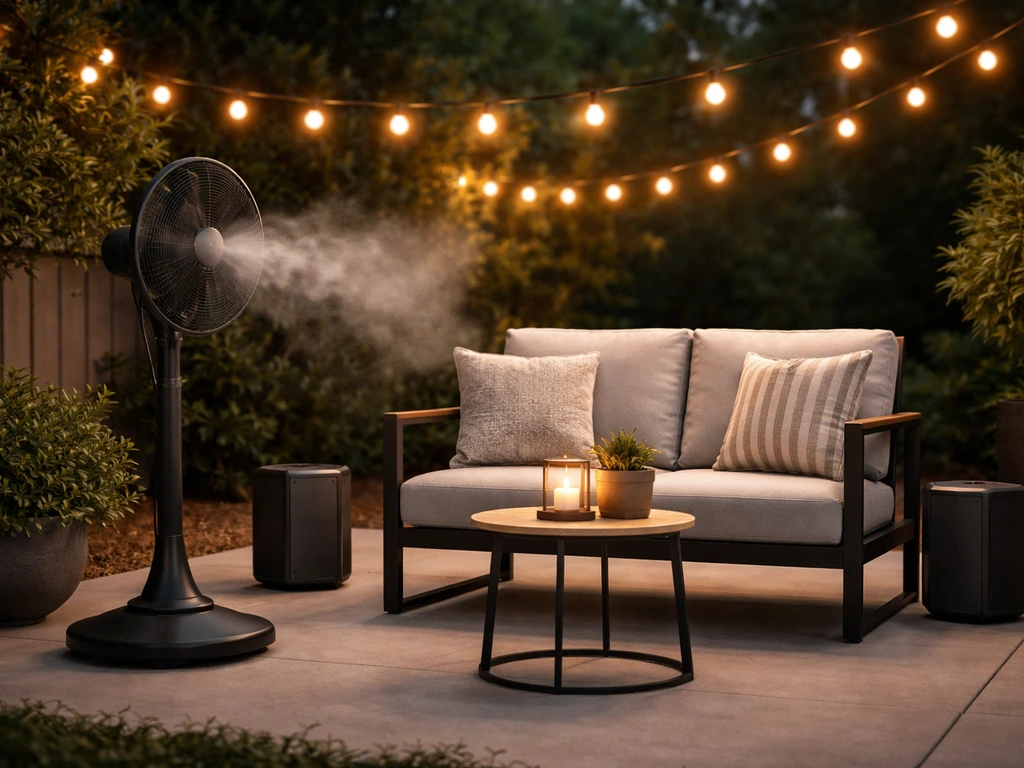
Outdoor Ceiling Fans
A good outdoor ceiling fan is the workhorse of patio comfort in warm climates. The key spec to pay attention to is CFM (cubic feet per minute), which tells you how much air the fan actually moves. For a 200 sq ft covered patio, aim for at least 4,000–5,000 CFM. For larger covered patios in the 300–400 sq ft range, you want 6,000 CFM or more, or you need two fans.
Blade height matters more than most people realize. blank" rel="noopener noreferrer">Lowe's recommends mounting outdoor ceiling fan blades at 7 to 9 feet above the floor for best performance, and a minimum of 7 feet is the standard safety and efficiency floor. Once you go above 9 feet, you start losing effective airflow at ground level, blank" rel="noopener noreferrer">roughly 5 to 8 percent per additional foot according to manufacturer testing data. If you have a vaulted or high covered patio ceiling, use a downrod to bring the fan down into that 8 to 9 foot sweet spot. Also keep blades at least 18 inches from any wall or obstruction.
For rating, always look for a wet-rated or damp-rated label. Wet-rated fans can handle direct rain exposure. Damp-rated fans are fine for covered patios that do not get direct water contact. Do not put a damp-rated fan in an open pergola if your region gets afternoon downpours.
Misting Systems

Misting systems work by forcing water through tiny nozzles under pressure, creating a fine mist that evaporates almost instantly and pulls heat out of the air. In dry climates like Arizona, New Mexico, Nevada, or inland California, they are genuinely transformative and can drop ambient temperature by 15 to 25 degrees Fahrenheit. In humid climates like Florida, Houston, or the Gulf Coast, the math changes fast because water does not evaporate well when the air is already saturated. You end up feeling wet instead of cool. If your summer humidity regularly sits above 60 to 70 percent, a misting system is a harder sell.
Low-pressure systems run off a standard garden hose (around 40 to 60 PSI) and cost $30 to $100 for a basic setup. Mid-pressure and high-pressure systems (250 to 1,500 PSI) require a pump and produce a finer mist that evaporates before it soaks you, but they run $300 to $1,000 or more for a full perimeter system. For most homeowners in dry climates, a mid-pressure system with a dedicated pump hits the best comfort-to-cost ratio.
Patio Heaters
Heaters are the climate-control gadget for Pacific Northwest residents, mountain states, and anyone trying to use their patio in October through April. Propane freestanding heaters are the easiest entry point: no wiring, you just connect a tank and light it. They pump out 40,000 to 48,000 BTUs and can warm a 10-foot radius. The downside is wind kills their efficiency fast, and tanks run out mid-party at the worst possible moment.
Hardwired infrared electric heaters are the premium path. They mount overhead, heat objects and people directly rather than warming the air (which works far better outdoors), and run on 240V circuits. You need a licensed electrician to install them, but the result is genuinely effective heat in open or semi-open patios. Budget $200 to $600 for the unit plus $150 to $400 for the electrical work. Natural gas heaters are another solid option if you already have a gas line near the patio.
Shade and Cover Upgrades That Actually Count as Gadgets
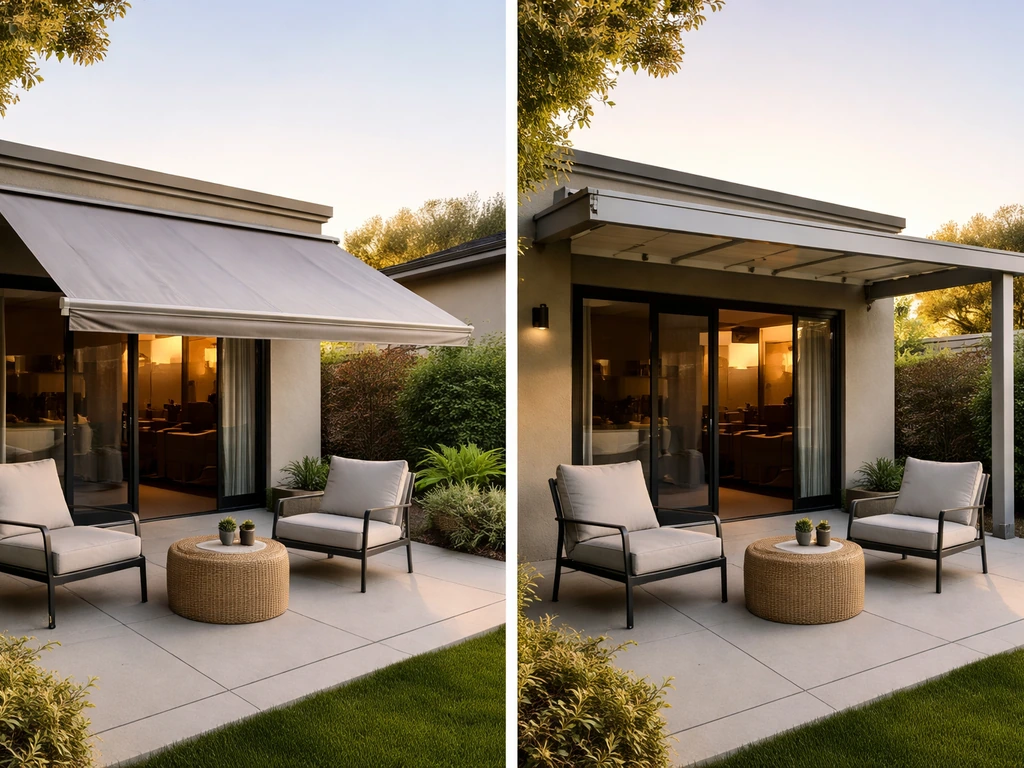
Shade is not just a structural decision, it is a comfort decision, and the line between a patio cover and a patio gadget blurs quickly once you start looking at motorized awnings, adjustable shade sails, and louvered pergola roofs. These systems actively control your environment in the same way a fan or heater does.
A fixed patio cover (solid roof panel, polycarbonate, or attached pergola) reduces direct sun load and can drop surface temperatures by 10 to 20 degrees compared to an uncovered patio. But airflow matters here: fully solid covers can trap heat underneath on still days, which is why pairing a solid cover with a ceiling fan is so effective. Slatted or louvered covers let hot air escape upward while still blocking direct sun.
Motorized retractable awnings are where the gadget label feels most earned. Higher-end models include wind sensors that auto-retract the awning before it gets damaged, sun sensors that deploy it automatically when UV hits a set threshold, and app or remote control. These run $1,500 to $5,000 installed, but they protect your furniture, reduce cooling load on your home, and require almost zero manual operation. If you are upgrading an existing patio and want one structural investment that changes daily usability, a motorized awning or a motorized louvered pergola roof is it.
For budget options, a quality UV-blocking shade sail (look for 90 percent or higher UV blockage rating and HDPE fabric rated for outdoor use) costs $40 to $150 and installs with eye bolts and anchor points. They are not as durable as a permanent structure but work well for renters or homeowners not ready to commit to a permanent build.
Outdoor Audio and Ambiance
Audio has a bigger impact on how a patio feels than most people expect before they install it. A patio that sounds good feels like a real outdoor room. One that does not just feels like a patio.
Choosing the Right Speaker Setup
For a small patio (under 150 sq ft) or casual use, a portable Bluetooth speaker like the JBL Charge or Ultimate Ears Hyperboom does the job for $100 to $200. They are weatherproof, easy to move, and require no installation. The limitation is battery life and sound coverage: in an open outdoor space, sound dissipates quickly, and a single portable speaker starts feeling thin at volumes that work indoors.
For a mid-size patio (150 to 400 sq ft) where you actually entertain, a pair of hardwired outdoor stereo speakers mounted at ear level or slightly above is a substantial upgrade. Brands like Polk Audio Atrium, Klipsch AW series, and Sonance all make durable all-weather speakers rated for outdoor installation. A pair with an outdoor-rated receiver or amplifier runs $300 to $700. These mount to the patio wall or pergola post and wire back to an amplifier in a weatherproof enclosure or inside the home.
For large patios or entertainment-focused spaces, multi-zone outdoor audio with in-ground subwoofers and landscape speakers gives you even sound coverage across the full area. This is a $1,000 and up category and usually calls for a professional AV installer. If you are already planning other structural work like a pergola or patio cover installation, bundling the speaker wiring at the same time saves significant labor cost.
Lighting as an Ambiance Gadget
String lights, low-voltage landscape path lighting, and smart color-changing LED strips for pergola beams or cover edges are among the easiest and highest-impact upgrades on the list. Solar string lights require zero wiring but tend to fade in output after a few hours. Hardwired low-voltage LED string lights plugged into an outdoor outlet with a smart plug (so you can set schedules or control from your phone) give you reliability plus convenience. Smart color-changing strips under a pergola or inside a covered patio roof can shift the whole feel of the space from day to evening use.
Convenience Add-Ons: Power, Controls, and Weatherproofing
The best climate-control and audio gadgets in the world are annoying if your patio does not have adequate power access or if you are constantly fussing with manual switches. Convenience infrastructure is the unsexy part of the patio gadget conversation but it makes everything else work better.
- GFCI outdoor outlets: Any outdoor outlet near water (and all outdoor outlets in general) must be GFCI protected per code. If your patio has fewer than two or three outlets, an electrician can add them for $100 to $200 per outlet. This is almost always worth doing before adding any powered gadgets.
- Outdoor smart plugs: Weatherproof smart plugs (like the TP-Link Kasa Outdoor or Wyze Outdoor Plug) run $20 to $40 and let you schedule, voice-control, or app-control anything plugged into your patio outlets. Perfect for string lights, portable fans, and tabletop heaters.
- Ceiling fan remote kits: If your patio fan did not come with a remote and you do not have a wall switch circuit configured for speed control, an add-in receiver kit ($25 to $50) installs inside the fan canopy and gives you full remote or app control. Much easier than rewiring.
- Outdoor-rated extension cords and power strips: If you must use an extension cord outside, use one rated for outdoor use (look for a W or W-A suffix in the cable rating and a minimum 12-gauge wire for anything powering a heater or high-draw device). Indoor extension cords outside are a fire and shock risk.
- Weatherproof outlet covers and in-use covers: Basic flip covers on your outdoor outlets keep water out when nothing is plugged in. In-use covers (bubble covers) keep water out even when a cord is plugged in and are required by code in many jurisdictions for outdoor outlets.
Smart home integration is worth thinking about if you already use a platform like Google Home, Amazon Alexa, or Apple HomeKit. Most major outdoor fan, speaker, and lighting brands now offer app control, and tying everything to a single platform means one voice command or one schedule can turn on your lights, start your fan, and fire up the speakers for an evening session.
How to Choose and Install: Measurements, Wiring, DIY vs Pro
Getting the right gadget is half the job. Getting it installed correctly is the other half, and this is where most outdoor projects go sideways.
Measure First, Buy Second
Before ordering anything, measure your patio dimensions and ceiling height. For fans, use those measurements to verify the CFM rating matches your square footage and that you can mount at the 7 to 9 foot blade height with the right downrod. For speakers, measure the distance you need to cover to ensure even sound. For shade covers and awnings, measure your projected area in both width and projection depth, and account for wind exposure direction when deciding on mounting points.
Power and Wiring Reality Check
Ceiling fan installation requires a junction box rated for fan support (standard light fixture boxes are not strong enough and can fail under the fan's dynamic load). If you do not already have a ceiling box with wiring in the right spot, you need an electrician. Hardwired infrared heaters require a 240V circuit, which is always an electrician job. Hardwired outdoor speakers require running low-voltage wire from an amplifier location to the speaker mounting points, which is a manageable DIY project if you have some patience and a fish tape. Motorized awnings with wind and sun sensors require both electrical and structural mounting work and are almost always best left to a professional installer.
DIY vs Hiring a Pro
Here is an honest breakdown: smart plugs, portable speakers, shade sails, and tabletop heaters are straightforward DIY. Ceiling fan installation in an existing junction box is DIY for anyone comfortable with basic electrical work (turn off the breaker, verify with a tester, follow the wiring diagram). New outlet installation, 240V heater circuits, hardwired audio systems with in-wall wiring, and any structural patio cover work are all contractor territory unless you have relevant trade experience. Getting this wrong is not just an inconvenience, it is a code violation, a fire risk, or a structural failure risk.
- Permit check: Any new electrical circuit or structural cover installation likely requires a permit. Check with your local building department before starting, especially for attached patio covers or 240V circuits.
- Watch for overloaded circuits: Patio outlets are often on the same circuit as garage or exterior lighting. Adding a heater, fan, and speakers to an already-loaded 15-amp circuit will trip breakers constantly. A dedicated 20-amp outdoor circuit solves this.
- Check manufacturer wet/damp ratings: Mismatching a damp-rated product in a fully exposed location is the single most common gadget failure I see. When in doubt, go wet-rated.
- Avoid 'temporary' installs that become permanent: Extension cords run under rugs, temporary shade sails left up through winter storms, and propane heaters placed under low overhangs are all situations that look fine until they are not.
Budget vs Premium: What to Buy First
If you have a limited budget and need to prioritize, here is the order I would follow for a typical covered patio in a warm to moderate climate:
- Outdoor ceiling fan ($80–$250): The highest comfort-per-dollar item on this list. A wet-rated fan with a remote and a proper downrod makes a covered patio usable for a much longer part of the day.
- Smart outdoor plug and string lights ($50–$80 combined): Low cost, high impact on ambiance, and sets up app or schedule control for your entire outlet situation.
- Portable Bluetooth speaker ($100–$200): Gets you outdoor audio without any installation. Upgrade to hardwired later if you find yourself wanting better coverage.
- Shade sail or patio cover upgrade ($40–$150 for a sail, $500+ for structural): Budget shoppers start with a quality shade sail. Those with more room in the budget should consider this the most impactful comfort upgrade after a fan.
- Misting system (dry climates) or patio heater (cool climates) ($60–$400): Pick based on your dominant problem. Most homeowners need one or the other but rarely both.
On the premium side, the gadgets worth spending real money on are a motorized louvered pergola roof (transforms year-round usability), hardwired overhead infrared heaters (genuinely effective in open spaces), and a multi-zone outdoor speaker system. These are investments in the space itself, not just accessories, and they tend to increase how much you actually use the patio year-round.
One last note: the best patio gadgets are the ones that fit your specific climate, your patio's layout, and the way you actually use the space. If you are shopping for the best patio gifts for mom, start with the climate-control comfort upgrades that match how she uses her patio most. If you want to keep the good times going, choosing the best patio games for your space and climate is the next step the best patio gadgets. If you want even more inspiration, check out the best patio gifts for hosts, homeowners, and anyone upgrading their outdoor space best patio gadgets. A $600 misting system is a great investment in Tucson and a waste of money in Tampa. A premium infrared heater makes a Seattle patio usable through November and would sit unplugged in Miami. Think about your real-world use case before chasing specs, and you will spend far less money correcting mistakes. Avoiding the 5 worst patio decorating mistakes can help you skip the trial-and-error phase and get a space that stays comfortable and functional. Knowing the worst patio decorating mistakes helps you choose gadgets and layout decisions that actually solve the problems that ruin your outdoor time. If you are also thinking about the space from a design perspective, many of these gadget choices intersect closely with your overall patio decoration choices and how you want the space to feel as a whole. Once comfort is handled, you can focus on entertainment, starting with the best outdoor patio games for your space and group size. The best patio decorations work best when they match your climate and the way you use the space.
FAQ
What’s the fastest way to choose between a ceiling fan, misting system, and heater for my patio?
Start by identifying what makes you quit first: sun glare, heat, or cold. If it is oppressive heat in dry weather, prioritize airflow plus misting (if humidity is not high). If it is early-evening cold in shoulder seasons, prioritize an overhead infrared heater. If it is midday heat with direct sun, prioritize shade plus a correctly sized fan, because fans work even when it cannot mist or heat yet.
How do I calculate whether one outdoor ceiling fan is enough for my patio size?
Use the CFM target as a baseline, then adjust for layout. If your patio is long or open on one end, treat the far end as its own zone, which often means two fans. If you have a high or vaulted ceiling, you may need a downrod and additional airflow capacity so the air actually reaches seating level.
Can I run a misting system during windy conditions or near a windy pergola?
You can, but wind changes the outcome. In gusty areas, mist can drift away from seating and increase wetness on furniture. Use a system designed for outdoor wind conditions, place nozzles to minimize overspray, and consider pairing with a fan because better air mixing helps evaporation without turning the patio into a damp zone.
What humidity level should make me rethink buying a misting system?
If your outdoor humidity regularly sits above roughly 60 to 70 percent, plan for reduced cooling and more discomfort from damp air. In that range, shade plus airflow usually beats misting, or you may need to reduce operating time and expect a wetter patio surface.
Do I need a special type of Bluetooth speaker for outdoor patios, or will any weatherproof one work?
Weatherproof rating matters, but so does placement. Even a waterproof speaker sounds best when it is not in a totally enclosed corner where reflections are uneven. For wider coverage, mount higher and aim toward seating, or add a second speaker rather than relying on max volume.
When does a portable outdoor speaker become a bad buy?
If you need consistent volume across a wide entertainment area, a single portable speaker often feels thin at the edges. Portable speakers also run out of battery mid-party, so they are better for small patios or short sessions. For 150 to 400 sq ft entertaining, a hardwired pair plus an outdoor-rated amp is usually a more reliable upgrade.
Are string lights with solar panels enough for evening ambiance?
Solar strings are convenient, but expect shorter runtime and lower brightness, especially after cloudy days. If you want dependable lighting for dinner or hosting, choose hardwired low-voltage LEDs tied to an outdoor outlet with a smart plug so you can schedule timing and avoid dim fade.
What electrical upgrades are commonly required for patio audio and heaters?
Outdoor heaters often need dedicated circuits, and many hardwired infrared models require 240V work. For speakers, you typically need an amplifier location plus safe routing for low-voltage wiring. Before buying, confirm you have an exterior-rated outlet nearby for low-voltage systems or plan the amplifier enclosure location so cables have an efficient path.
Can I install a ceiling fan outdoors on a covered patio if I already have a ceiling light there?
Sometimes, but not automatically. Many existing light fixture junction boxes are not rated for fan loads. You will need a fan-rated junction box and proper wiring, and you should verify wet-rated versus damp-rated compatibility depending on how exposed the fan is to rain.
What’s the most common mistake people make with patio heaters?
Placing the heater too low or too far from seating so it mainly warms empty air. Infrared works best when it targets people and nearby objects, and propane heaters lose performance quickly in wind. If your patio is open, prioritize placement and consider wind protection or a heater model meant for windy conditions.
Do I need to worry about product ratings for shade sails beyond UV blockage?
Yes. A good UV rating is important, but you also want outdoor-rated HDPE fabric and proper anchoring points designed for tension loads. If your location gets strong afternoon wind, check how the sail mounts (eye bolts, anchor spacing, and tensioning) because weak anchoring is a top failure cause.
How should I plan power and control if I want everything on one app or voice command?
Before installation, check whether each device supports the same control platform and whether it needs a hub. Then map which items should be on schedules (lights, shade) versus triggered manually (fan, heater, speakers). Also consider adding surge protection for outdoor electrical runs to reduce electronics damage.
What’s a practical “buy order” if I’m starting from scratch but have a tight budget?
If you only buy one thing first, buy the comfort layer that matches your climate, usually shade plus a properly sized fan in warm regions, or an infrared heater in colder seasons. Next, address reliability, power access, and wiring paths. Audio and decorative lighting should come after comfort is stable, because they are easiest to enjoy once temperature and airflow are fixed.