The best outdoor patio example to copy depends on three things: how you actually use your yard, what your climate demands, and how much you want to spend. If you want the best outdoor patio looks, start by matching the layout to how you actually use your yard, your climate, and your budget.
Outdoor Patio Examples: 12 Layouts, Materials, and Ideas

Elise Prescott
6 Jun 2026
An outdoor patio setup is easiest when you pick a layout first, then match materials, shade, and climate controls to how you actually use the space. A 12x16 ft stamped concrete slab with a pergola and a couple of ceiling fans covers most people well. But if you cook outside often, an L-shaped layout with an outdoor kitchen and at least 42 inches of clear circulation will serve you far better than a simple square.
Below are real layout templates, material choices, shade options, and comfort add-ons you can mix and match to build exactly what fits your situation. For a complete checklist, use this guide to build the best patio setup for how you live, your climate, and your budget.
Patio styles by layout and how you actually use the space
Most patio problems come from picking a shape that looks good in a photo but fights your yard's actual flow. Here are the layouts that consistently work, plus who each one is actually for.
The simple rectangle (the everyday workhorse)
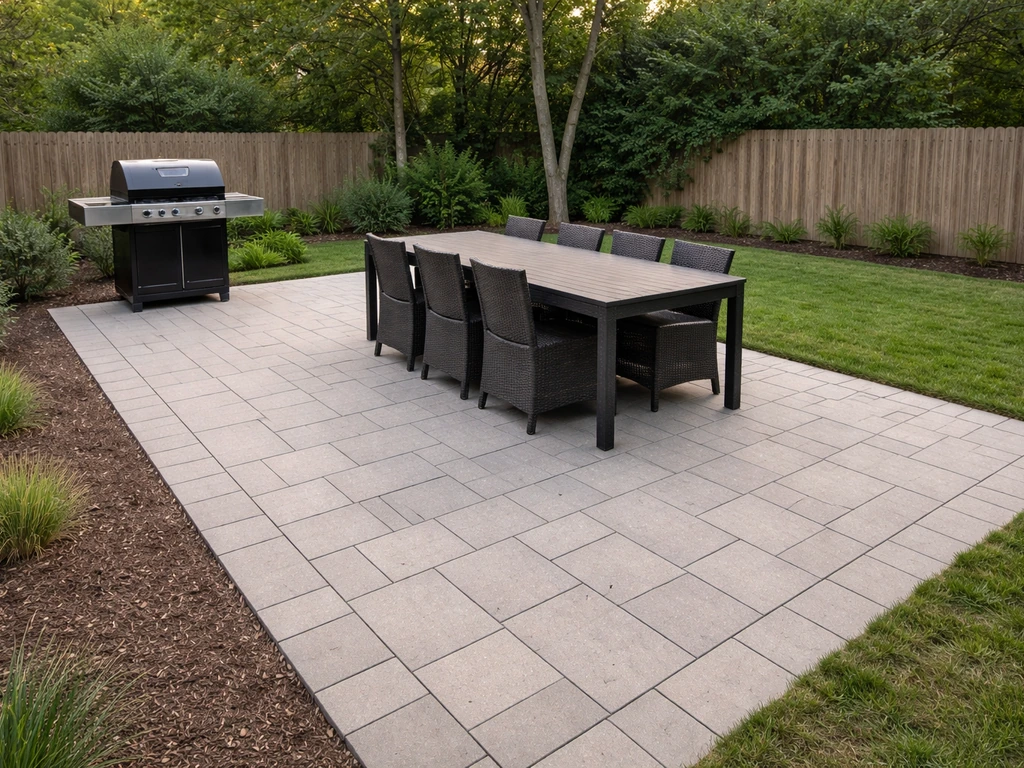
A 12x16 or 14x20 ft rectangle is the most versatile patio you can build. It fits a dining table, a small seating cluster, and a grill station without feeling cramped. This is the layout to default to if you entertain casually a few times a month and want something low-maintenance. It's also the easiest for DIY pavers or a poured concrete slab. If you're comparing patio setups, a clean rectangle with defined zones for dining and lounging is usually what ends up on the best outdoor patio shortlists for a reason.
The L-shape (serious cooks and larger groups)
An L-shaped layout is the right call when you want to separate the grill and prep area from where guests actually sit. The minimum footprint is roughly 12x12 ft, with each leg of the L running around 8 ft. One leg handles the kitchen and grill zone, the other handles seating. The key rule: keep at least 42 inches of clear circulation between the cooking side and any furniture. Add 12 to 18 inches of counter landing space on either side of the grill so you're not balancing plates on a chair arm. This layout also works well against a fence corner or house wall, which naturally defines the two zones.
The wraparound or multi-zone patio (larger yards)
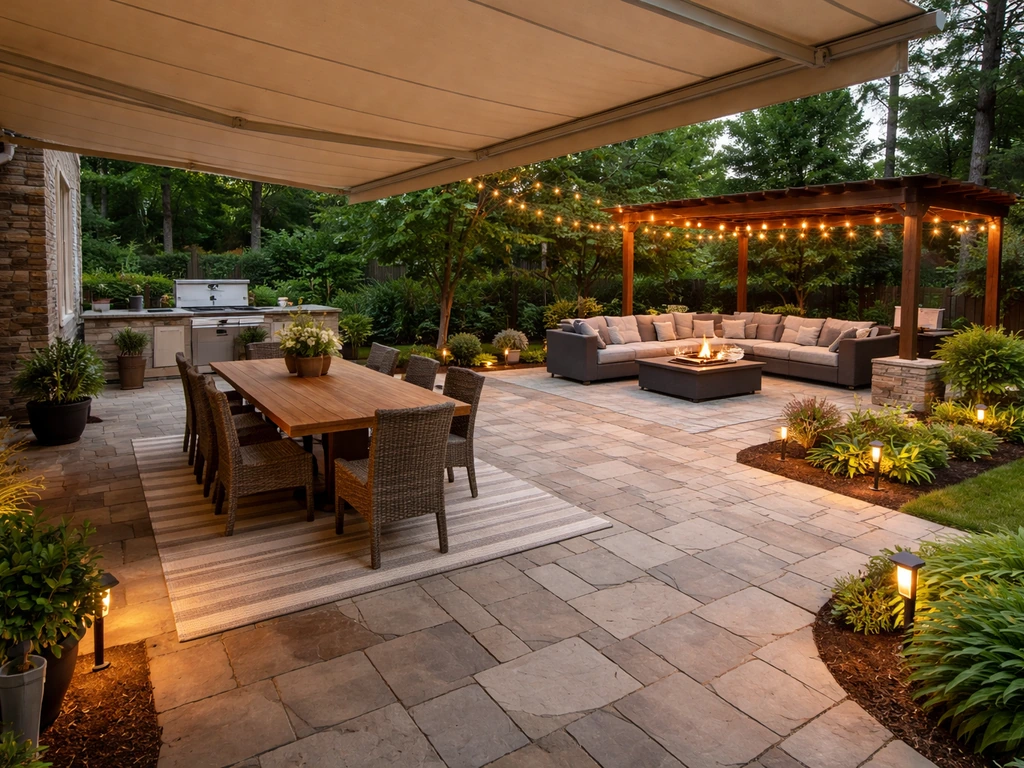
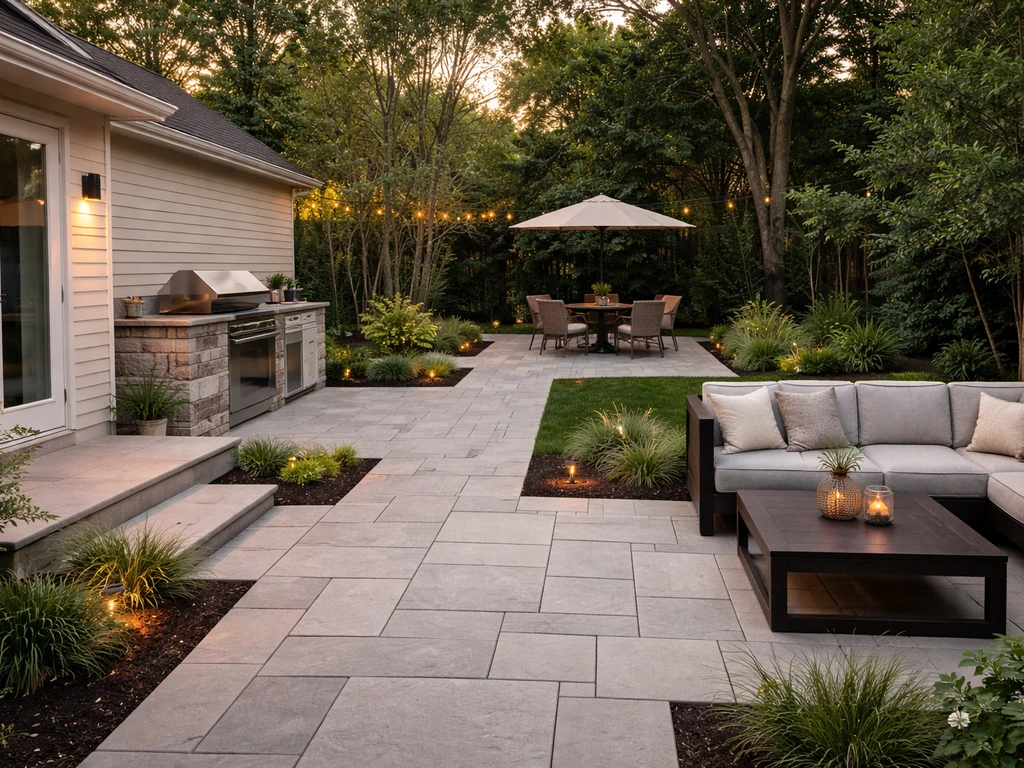
If your yard allows it, a wraparound or multi-level patio that separates a cooking zone, a dining zone, and a lounging zone is worth the investment. Think of it as three connected spaces: an outdoor kitchen area, a dining pad, and a fire pit or conversation pit. Each zone can be covered differently (a solid roof over the kitchen, a pergola over dining, open sky over the fire pit) and the transitions feel intentional rather than cluttered. This one typically requires a contractor for proper grading and drainage between zones.
The small courtyard patio (tight yards and townhomes)
A 10x10 or 10x12 ft courtyard-style patio punches above its weight when you use vertical space. Wall-mounted shade, a small bistro table, a wall fan, and container plants keep the footprint tiny while the space still feels intentional. Tile or small-format pavers look better at this scale than large slabs. This is also the most budget-friendly option to execute since material costs scale directly with square footage.
Beginner-friendly patio templates for small budgets and small yards
If you're starting from scratch and don't want to overcomplicate it, here are two templates you can actually execute this summer without a contractor.
Template 1: The starter paver patio
A 10x12 ft concrete paver patio is the most DIY-friendly build out there. The process: excavate 7 to 8 inches deep, compact 4 to 6 inches of crushed aggregate base, add a 1-inch sand bedding layer, then lay your pavers. That base depth is non-negotiable for pedestrian-grade stability. Skip it and you'll have shifting and settling within two seasons. Use a standard gray or tan paver for budget, upgrade to a tumbled edge for a more finished look. Budget rough estimate: $800 to $2,000 in materials for a 10x12 depending on paver choice and your region.
Template 2: The budget string-light patio
For renters or anyone not ready to commit to a permanent surface, use a mix of interlocking deck tiles over an existing concrete pad, add a freestanding cantilever umbrella, two weather-resistant chairs, and a set of outdoor string lights hung between two shepherd's hook posts. Total cost can stay under $500 if you shop sales. It won't win any design awards, but it transforms a bare concrete slab into an actual usable outdoor room in a weekend. This is a great proof-of-concept before you commit to a bigger build.
Materials and finishes: what each one actually looks and feels like to live with
The material you choose sets the whole tone of the patio and determines how much maintenance you're signing up for. Here's an honest rundown.
| Material | Lifespan | Maintenance | Best For | Watch Out For |
|---|---|---|---|---|
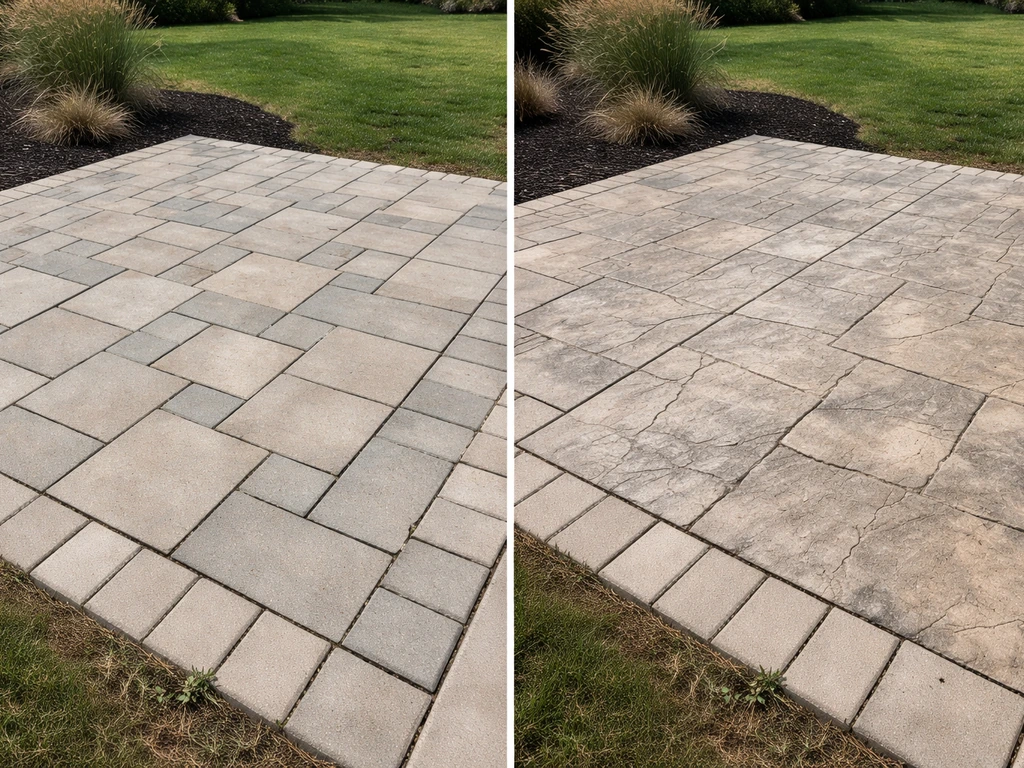
| Concrete pavers | 30–50 years | Low (occasional sealing) | DIY, classic look, easy repairs | Weeds in joints if not polymeric sand |
| Stamped concrete | 25–30+ years | Medium (reseal every 2–4 years) | Seamless look, custom patterns | Cracks over time; sealant fades |
| Poured concrete (broom finish) | 20–30 years | Low | Budget builds, clean/modern look | Can crack; limited visual interest |
| Outdoor tile | 20–30 years | Medium | Hot climates, modern aesthetic | Freeze-thaw risk in cold zones; slip hazard if wrong DCOF |
| Wood decking (natural) | 10–20 years | High (stain/seal annually) | Warm look, elevated builds | Rot, splinters, cost of upkeep |
| Composite decking | 25–30 years | Very low | Low-maintenance premium look | Higher upfront cost; gets hot in sun |
A note on outdoor tile in freeze-thaw climates
If you're in Colorado, Minnesota, or anywhere that sees hard freezes, tile selection is critical. Look specifically for tiles rated for freeze-thaw cycling, which means they've passed ASTM C1026 testing. Porosity is the enemy here: high-porosity tiles absorb water, which expands when it freezes and cracks the tile. For wet areas, you also need a DCOF (dynamic coefficient of friction) of at least 0.42 for general wet walking surfaces, and 0.60 or higher if there's a pool or the surface stays wet constantly. That spec comes from ANSI A326.3 guidance and it's the standard most tile professionals reference. Don't just buy tile because it looks good. Check the spec sheet.
Stamped concrete: the 25-year tradeoff
Stamped concrete can genuinely last 25 to 30 years or more when it's installed correctly and sealed regularly. The problem is that most homeowners let the sealer go too long between applications. Once the sealer breaks down, UV and moisture get into the color layer and the surface starts looking faded and blotchy fast. Budget for resealing every 2 to 4 years depending on sun exposure, and factor that into your total cost comparison against pavers before you decide.
Shade and cover examples that actually change how you use the patio
No cover is the single biggest reason people stop using their patio by July. Here's what each option gives you and what it costs to implement.
Pergola (the most popular choice for a reason)
A freestanding or attached pergola with a shade sail, climbing plants, or a polycarbonate roof panel gives you partial shade and a strong visual anchor for the space. Open-beam pergolas are the most popular choice because they're relatively affordable, look great in photos, and work in almost every climate for three seasons. In hot climates like Texas or Arizona, a bare pergola doesn't actually keep you cool on its own. You need shade cloth, a ceiling fan, or a misting system installed alongside it to make it genuinely usable in summer heat.
Motorized awning (best for small patios and renters)
A retractable motorized awning covers 10 to 20 ft of projection and rolls back when you want open sky. It's the right call for a smaller patio where a pergola would feel too heavy, or when you want flexibility. It won't handle heavy rain or strong wind the way a solid cover does, but it handles sun reliably. If you're in a high-wind region, look for a wind sensor add-on that auto-retracts the awning before it gets damaged.
Solid patio roof (best for rain climates and year-round use)
An attached solid roof (either a patio room addition or an aluminum insulated panel system) is the highest-cost, highest-value option. You get a genuinely weatherproof space you can use in rain and, with the right insulation, in mild cold. Most attached patio covers require a building permit in most jurisdictions. You'll typically need to submit framing plans that include footing details, post sizing, ledger connections, and roof cover specifications. Don't skip the permit process. Insurance companies use it as a reason to deny claims for damage from un-permitted structures.
Louvered pergola (the premium flexible option)
A motorized louvered roof system lets you dial in exactly how much sun or shade you want at any time, and most close fully to shed rain. They're expensive (typically $8,000 to $25,000+ installed depending on size) but they're the closest thing to a four-season outdoor room without building an actual room addition. If your budget allows it and you entertain seriously, this is the upgrade that consistently gets the most use.
Climate control: fans, misting, and wind protection
Shade handles the sun. Climate control handles the heat, humidity, and wind that shade alone can't fix. These add-ons are what separate a patio you use 30 days a year from one you use 150 days a year.
Ceiling fans (the baseline in hot climates)
If your patio has a covered ceiling, a wet-rated outdoor ceiling fan is the single best comfort-per-dollar upgrade you can make. For a covered patio under 200 sq ft, one 52-inch fan is usually enough. Over 200 sq ft, plan on two fans or one large-diameter (60 to 72 inch) fan. The installation requirement that matters: wet-location fans must be on a GFCI-protected circuit per NEC 2020 requirements. If your patio doesn't already have a GFCI outlet or GFCI breaker on the outdoor circuit, that's part of the install cost. The fans are covered in detail in guides focused on the best fans for outdoor patio if you want to go deeper on motor specs and blade pitch.
Misting systems (the game changer in dry heat)
A misting system uses evaporative cooling to drop the perceived temperature by 10 to 30 degrees Fahrenheit in dry climates. Low-pressure systems run off standard household water pressure (around 40 to 100 psi) and are DIY-friendly. Mid- and high-pressure pump systems can run up to 250 psi, produce finer droplets that evaporate before hitting you, and cool more aggressively. In humid climates like Florida or Houston, misting is less effective because there's already too much moisture in the air for rapid evaporation. In Phoenix, Dallas, or Las Vegas, it's a genuine necessity. The nozzle layout matters: space them around the perimeter of the covered area and angle them slightly inward for maximum coverage.
Wind protection: curtains and screens
If you're in a region with consistent afternoon wind, blank" rel="noopener noreferrer">outdoor patio curtains mounted on a galvanized track system can block a surprising amount of wind while still letting the space breathe. Marine-grade side fasteners keep the panels from billowing violently in gusts. For heavier wind exposure, look at windscreen mesh panels, which reduce blank" rel="noopener noreferrer">wind load while still allowing some airflow so the structure doesn't take a beating. These are especially relevant for rooftop patios and exposed hillside locations where a pergola drape would be destroyed in a season.
Entertainment and comfort upgrades worth including from the start
Wiring and speaker placement are dramatically easier to plan before you finish the patio than after. Here's what to spec in while you still have easy access to walls and conduit runs.
Outdoor speakers done right
Outdoor speakers are not indoor speakers with a weather rating slapped on. You need a proper outdoor-rated amplifier matched to the speaker impedance, and you need to decide upfront between an 8-ohm direct-connect system and a 70V/100V distributed system. For a single patio, 8-ohm is simpler. For a multi-zone setup covering a patio, pool area, and yard, a 70V distributed system lets you run multiple speakers off one amp at correct volume levels without impedance mismatches. The critical installation rule: test every connection and verify speaker polarity before you bury the cable or close up any walls. Fixing a wiring mistake after the patio is built is expensive and messy.
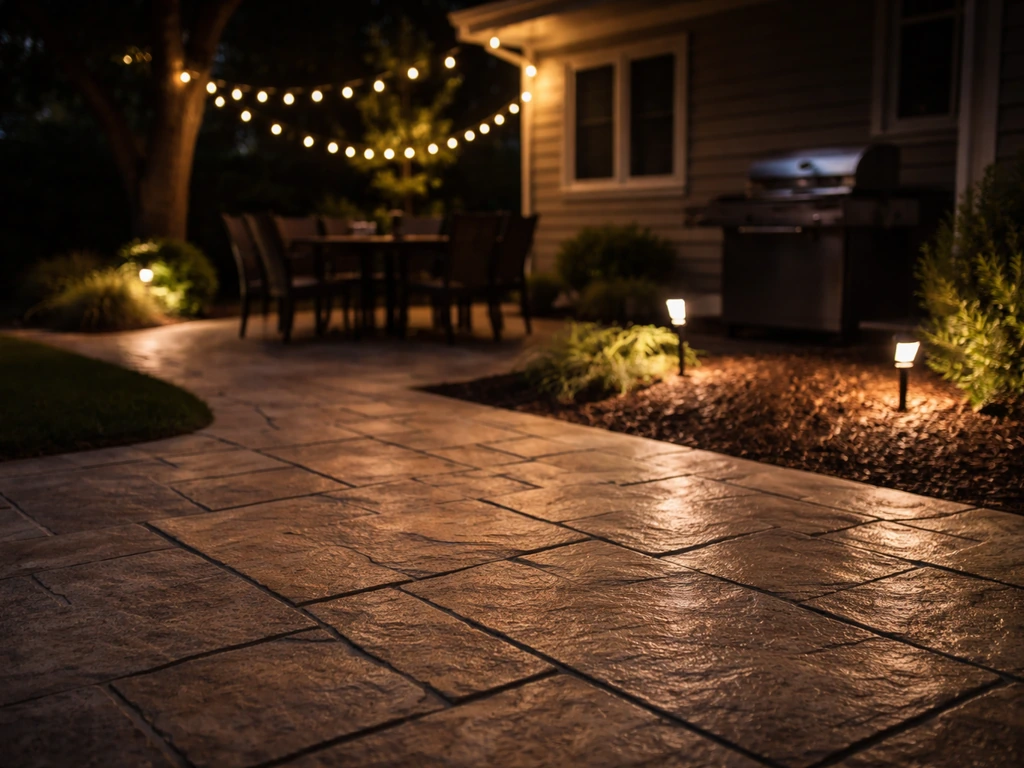
Lighting zones that make the space usable at night
Plan three layers: ambient (string lights or overhead fixtures), task (grill zone and dining table lighting), and accent (path lighting, step lighting, and any architectural up-lights on posts or walls). Put the ambient and task lights on separate circuits or a smart dimmer so you can shift the mood from dinner to late-night without flipping everything off. All outdoor receptacles for lighting must be GFCI-protected under NEC 2020. If you're doing a bigger build, spec in a dedicated outdoor sub-panel so you're not running extension cords to circuits inside the house.
Seating zone planning
The mistake most people make is buying furniture before finalizing the layout. Anchor the seating zone around a defined focal point: a fire table, a TV wall, or a view. For a conversation cluster, 6 to 8 seats around a 36 to 48 inch coffee table work for most groups. Keep a 30 to 36 inch walkway minimum between any seating cluster and the next zone. Sectional sofas work great on large patios but eat up square footage fast on small ones. Scale the furniture to the patio, not the other way around.
How to pick the right example for your region and budget
The patio example that works in Atlanta is not the same one that works in Denver, and the approach that makes sense on a $3,000 budget is completely different from a $25,000 build. If you want the best outdoor patio atlanta design, start by matching your layout to Georgia-style heat, humidity, and the shade cover options that make summer usable. Here's a direct framework to help you land on the right choice.
Match your setup to your climate first
- Hot and dry (Phoenix, Las Vegas, Dallas): Prioritize shade first, then misting. A solid or louvered roof outperforms a pergola. Use concrete pavers or tile with a high DCOF rating. Plan for ceiling fans plus a misting system.
- Hot and humid (Atlanta, Houston, Miami): Ceiling fans are more effective than misting. Focus on shade and airflow. Use composite decking or sealed concrete. Check drainage carefully since rain events are frequent and heavy.
- Mild and temperate (California coast, Pacific Northwest): More flexibility on cover type. Pergola or retractable awning works well. Wood or composite decking is popular. Wind protection may matter more than heat management.
- Cold winters (Colorado, Minnesota, New England): Use freeze-thaw rated tile or concrete pavers with the correct base depth. Avoid wood decking unless you're committed to annual maintenance. Plan the cover for snow load if applicable. Permitting for structural covers is especially important here.
Budget tiers and what they get you
| Budget Range | Realistic Scope | Cover Option | Best Surface | DIY or Pro? |
|---|---|---|---|---|
| Under $3,000 | 10x12 ft simple patio, no cover, basic lighting | Umbrella or shade sail | DIY pavers or broom concrete | DIY-friendly |
| $3,000–$8,000 | 12x16 ft patio, pergola, ceiling fan, string lights | Wood or aluminum pergola | Stamped concrete or pavers | Mix (surface DIY, electric pro) |
| $8,000–$20,000 | 14x20 ft patio, covered, outdoor kitchen rough-in, speakers | Attached aluminum cover or awning | Pavers or tile | Mostly pro |
| $20,000+ | Multi-zone, outdoor kitchen, louvered roof, full A/V, fans, misting | Louvered motorized system | Premium pavers or porcelain tile | Full contractor scope |
DIY vs. hiring a pro: where the line actually is
Surface installation (pavers, simple concrete pads) is genuinely DIY-accessible if you're physically capable and willing to rent a plate compactor. Electrical work, including GFCI circuits for fans, receptacles, and lighting, should go to a licensed electrician in most states because outdoor electrical requires specific weatherproof installations and permitting. Any attached patio cover or structural pergola needs a permit in most jurisdictions, and the structural framing plans need to show footing depth, post sizing, ledger connections, and roof cover details. Trying to skip that process is how you end up with an unpermitted structure that causes problems at resale. For an outdoor kitchen, plumbing and gas line connections always require licensed trades.
Your planning checklist before you start
- Decide on your primary use case (dining, lounging, cooking, or all three) and pick the layout that matches it.
- Measure your available space and confirm the layout fits with proper clearances (42 inches minimum circulation, 30 inches between furniture zones).
- Choose your surface material based on your climate, maintenance tolerance, and budget.
- Decide on your shade and cover type before finalizing the layout, since footings and ledger attachments need to be planned before the slab or pavers go in.
- Map out your electrical needs: ceiling fans, exterior outlets, lighting circuits, and any speaker wire runs. Run conduit during the build even if you're not wiring everything immediately.
- Check your local permit requirements for any attached or structural cover. Pull the permit before you build.
- Get at least three contractor quotes for the portions you're not doing yourself, and ask each contractor specifically about drainage slope (minimum 1/8 inch per foot away from the house) and base prep depth.
FAQ
How do I choose outdoor patio examples if my yard has sloped ground or drainage issues?
Pick the layout last if water movement is unclear. Before choosing an example, confirm where runoff flows during rain, then design grading so water moves away from the house. For multi-level or wraparound layouts, require a plan for drainage and transitions between zones, otherwise you can get pooling that ruins pavers, tile grout, and sealer longevity.
What patio size should I use if I want dining plus conversation but I have a small yard?
Use a rectangle that leaves space for circulation, not just seating. If you plan on a 4-top dining table, you usually need roughly 42 to 48 inches from table edge to obstacles, then add a separate walkway between the dining area and the seating cluster (often 30 to 36 inches). In tight yards, consider a courtyard-style layout with vertical shade instead of a wide pergola.
Do I really need base prep for paver patios, or can I go thinner?
For pedestrian-grade stability, you should not shortcut the base depth. The article calls out a non-negotiable aggregate depth for a 10x12 build, and that principle applies broadly. Going thinner increases the risk of movement within two seasons, especially with freeze-thaw regions or heavy furniture loads.
Which is safer for outdoor dining surfaces, tile or pavers, if I live in a freeze-thaw climate?
If you’re in a hard-freeze area, don’t compare by look alone. For tile, prioritize freeze-thaw rated products and low porosity, and verify the friction spec for wet walking. For pavers or stamped concrete, focus on correct base and sealing or joint stability, since moisture trapped under poorly prepped surfaces can still cause heaving or surface damage.
How can I prevent overheating on patios with pergolas in very hot climates?
Pergolas provide airflow but not true cooling in extreme heat. Add a real shading layer that blocks direct sun, like shade cloth or a roof panel, and pair it with airflow such as ceiling fans. If you want stronger relief, plan a misting system for dry climates and position nozzles around the perimeter with inward angles for coverage.
What’s the best way to handle wind if I want curtains or screens on an exposed patio?
Don’t treat outdoor curtains as purely decorative. Use a galvanized track system with marine-grade fasteners to prevent billowing, and select windscreen mesh panels if gusts are common. For rooftop or hillside exposure, prioritize options that reduce wind load while still allowing some airflow so the structure does not take repeated stress.
Can I run outdoor speakers in a multi-zone setup without overcomplicating wiring?
Yes, but you need the right system type decided upfront. For multiple zones on one or few amps, a 70V/100V distributed setup helps maintain correct levels without impedance mismatches. Also, test polarity and volume during installation before closing walls, since mistakes are expensive once the patio is finished.
How should I plan patio lighting circuits if I want flexible “moods” at night?
Split ambient and task lighting onto separate circuits or use smart dimming so you can change the vibe without turning everything off. Also consider step and path lighting as a safety layer, then keep outdoor lighting receptacles and circuits protected by GFCI as required for outdoor installations.
What’s the most common mistake when laying out furniture, and how do I avoid it?
Buying furniture before final layout is the big one. Start from a focal point like a fire feature, TV wall, or view, then build the conversation cluster around it. Measure circulation between zones early, typically 30 to 36 inches for walkways, and scale furniture to the patio size so you don’t end up with cramped pathways.
Do I need permits for a pergola or patio cover, and what happens if I don’t get them?
In many jurisdictions, structural patio covers and pergolas require permits, and you may need framing and footing details for approval. Skipping the process can create resale problems and can affect insurance coverage if damage occurs. Plan for licensed trades where needed, especially when electrical, plumbing, or gas lines are involved.
Is it worth hiring an electrician for outdoor work even if I’m doing the patio myself?
For outdoor electrical, hiring a licensed electrician is usually the safest move. Outdoor GFCI requirements and weatherproof installations are easy to get wrong, and NEC-aligned protection depends on your existing panel and circuit design. If your patio has fans, receptacles, or hardwired lighting, budget for professional installation.