The best outdoor patio is the one that fits how you actually live outside, not how a showroom imagines you do. If you're searching for the best outdoor patio in Atlanta, make sure your layout, materials, and shade choices match Georgia's heat and humidity best outdoor patio Atlanta. That means thinking through your climate first, then your space, then your materials, then the comfort layers on top. Whether you're starting from bare dirt or upgrading a cracked slab, the process is the same: nail down your priorities before you spend a dollar on materials or labor.
Best Outdoor Patio Guide: Choose Layout, Materials, and Features

Elise Prescott
14 May 2026
What 'best' actually means for your home
There's no universal best patio. A covered concrete pad with ceiling fans is a dream in Houston. That same setup in Minnesota sits empty nine months a year without a fire pit and a windbreak. Start by asking yourself three honest questions: How will you use it most (dining, lounging, entertaining)? What's your climate doing to you most of the year (heat, rain, wind, freeze)? And what's your realistic budget?
Budget tiers worth knowing: a basic DIY gravel or poured concrete patio can run $5 to $10 per square foot in materials alone. Professionally installed pavers run about $12 to $30 per square foot installed (materials plus labor). A full covered patio or pergola structure in most markets starts around $40,000 and can push past $125,000 depending on size, materials, and features. Knowing your tier up front keeps you from falling in love with a design you'll regret at checkout.
Your style preferences matter too, but they come last. Function and climate resilience are the backbone. The aesthetics are the finish coat. A lot of homeowners flip that order, pick a look they love on Pinterest, then discover it's wrong for their weather or their yard. Figure out how you want to use it first, and the design direction usually becomes obvious.
Layout, size, and how to zone your space
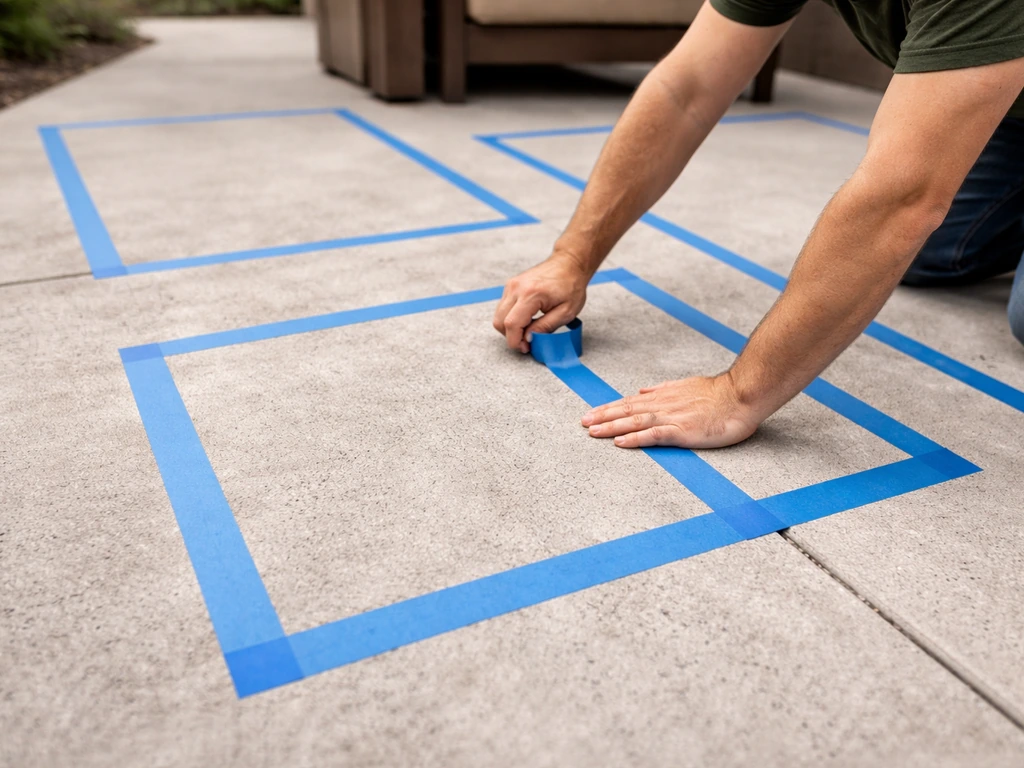
Before you pour anything or order pavers, tape out furniture footprints on your existing surface with painter's tape. It sounds low-tech, but it's the single best way to avoid a patio that's either too cramped or awkwardly oversized. Walk the routes you'd actually use: to the back door, to the grill, to the hose bib, to wherever you store things. Those paths need to stay clear.
The planning guideline that holds up in practice: leave at least 36 inches of clear space around major obstructions and doors. In higher-traffic zones, like the main path from a sliding glass door to the yard, bump that up to 42 to 48 inches. For a dining table specifically, add the table diameter plus front-and-back chair depth plus a 12 to 18 inch buffer on each side to get your minimum patio footprint for that zone alone. A 60-inch round table with chairs needs roughly a 12 by 12 foot zone just to function comfortably.
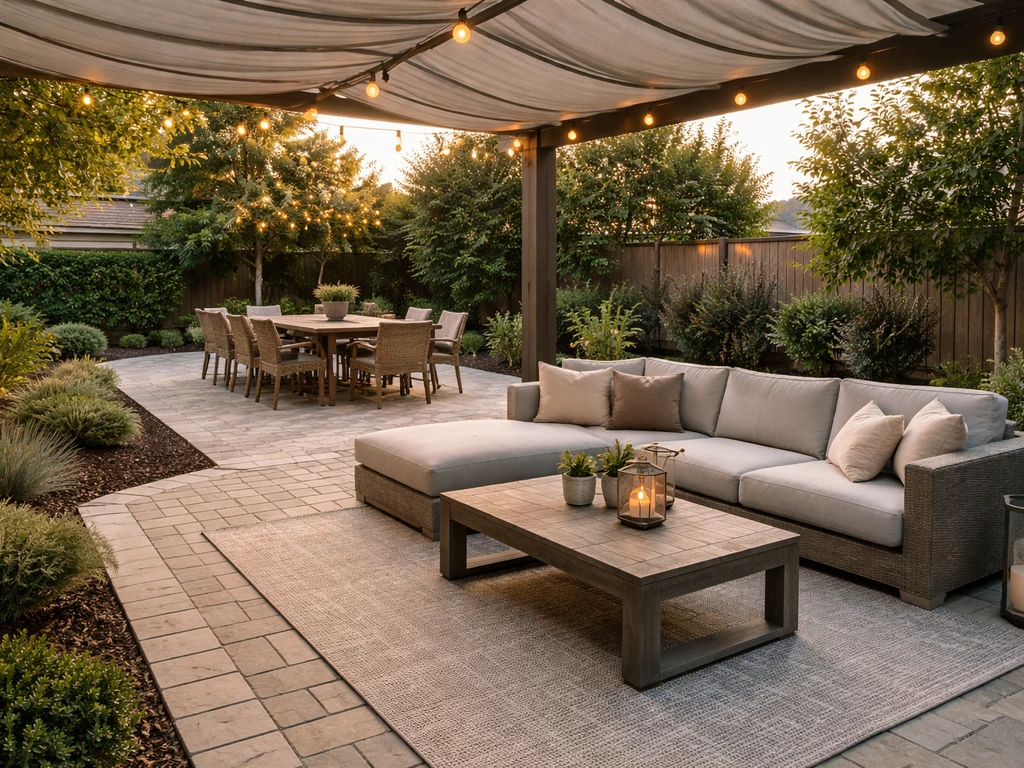
Think about zoning if your space allows it. A dedicated dining zone, a lounging zone, and a cooking or bar zone each feel distinct but connected. Even a modest 400 square foot patio can handle two zones if you're intentional about furniture placement and traffic flow. You can use these zoning ideas to dial in the best patio setup for dining, lounging, and cooking in one cohesive layout. Larger patios with multiple zones are where the design gets fun, and where you'll start connecting the dots to different outdoor patio looks and setup approaches. If you want inspiration fast, browsing outdoor patio examples can help you picture what different layouts and styles look like in real life outdoor patio looks. A thoughtful outdoor patio setup ties those zones together with traffic flow, comfort details, and the right pieces for how you use the space day to day.
Materials: what holds up and what looks good doing it
Material choice drives your long-term costs more than the upfront price tag does. Choose wrong for your climate and you're resurfacing in five years. Here's an honest breakdown of what works where.
| Material | Best Climate Fit | Installed Cost (per sq ft) | Durability | Maintenance |
|---|---|---|---|---|
| Concrete (broom finish) | Most climates | $6–$12 | Good with proper base | Low; seal every few years |
| Concrete Pavers | Most climates; freeze zones need ASTM C1645-rated pavers | $12–$30 | Excellent if base is right | Low; occasional re-sanding |
| Natural Stone (flagstone, travertine) | Warm/dry climates best; some options freeze-tolerant | $18–$40+ | Very good to excellent | Moderate; sealing needed |
| Brick Pavers | Northeast, Midwest with proper drainage | $14–$25 | Good; can crack in hard freezes without correct base | Low to moderate |
| Gravel/Decomposed Granite | Arid/dry climates | $2–$6 | Moderate; replenishment needed | Low cost but ongoing |
Concrete is the most forgiving in terms of upfront cost, but the finish matters more than people realize. A smooth concrete slab is a slip hazard when wet. A broom finish, pulled across the surface while the concrete is still workable, creates texture that dramatically improves traction. That's not optional in wet climates.
Pavers are worth the extra cost if you live somewhere with freeze-thaw cycles. Look for products tested to ASTM C1645 for freeze-thaw and de-icing durability. The reason pavers outperform poured concrete in freeze climates is simple: individual units can flex and be reset, while a slab cracks as a monolith. But they only perform that way if the base prep is done right. Pavestone's own specs call for soil subgrade compacted to at least 98% standard Proctor density per ASTM D698. Cut corners on base prep and even the best pavers will shift and settle.
Natural stone is beautiful and genuinely premium feeling, but travertine in a wet climate turns into a slip risk if it's left unfinished. Flagstone in a hard-freeze zone needs extra care around drainage. If you're in the South or Southwest, natural stone is one of the best looks you can get. If you're in Chicago or Denver, make sure you're sourcing stone that's rated for your conditions.
Shade and patio cover options matched to your climate
Shade is often the first comfort upgrade homeowners think about, and the right choice depends almost entirely on what your weather actually does. There are four main categories, each with real tradeoffs.
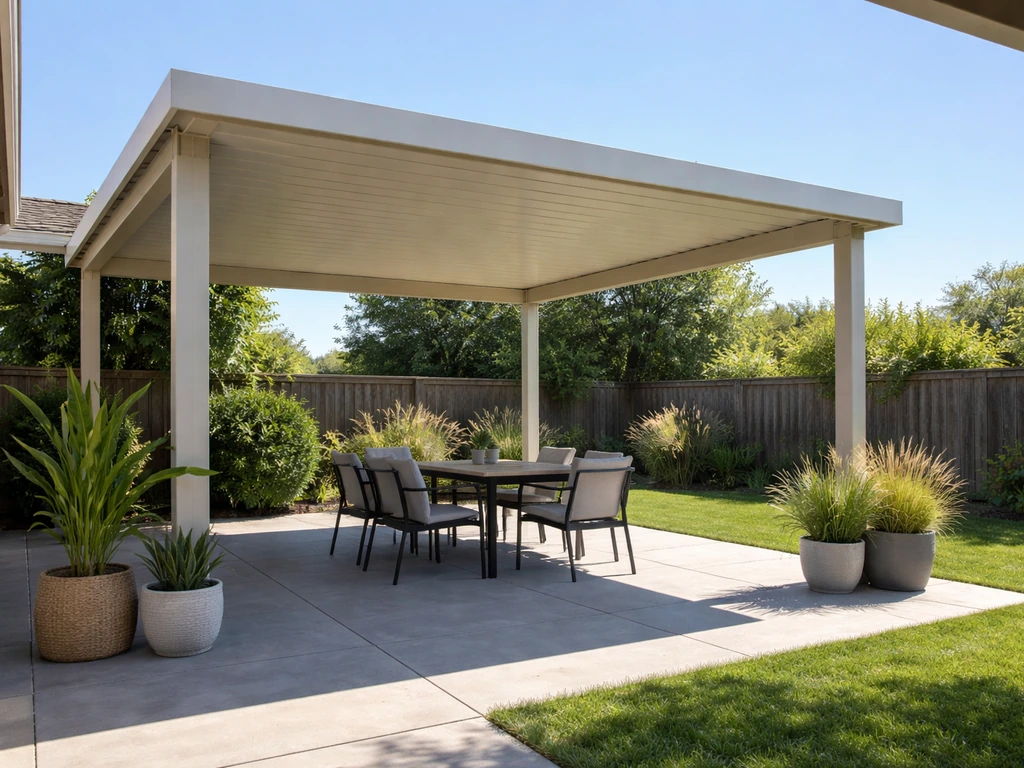
- Solid roof/covered patio addition: Maximum protection from sun and rain. Best for wet climates and full-time outdoor living. Most expensive, requires permits in most jurisdictions, and needs proper drainage integrated into the design.
- Pergola with shade cloth or retractable canopy: Balances light and shade, works in most climates. Fabric pergola canopies are not fully waterproof, and retractable awnings should not be deployed in high winds. Know the wind rating before buying.
- Retractable awning: Great for flexibility. Easy to retract when weather turns. Not a rain management solution, and fabric systems are not designed as waterproof roofs. Best for moderate climates.
- Shade sails: Affordable, good UV reduction, but inherently not waterproof. Works well in arid/sunny climates where sun control matters more than rain protection. Needs proper tensioning hardware to stay taut and last.
If you live somewhere that gets serious afternoon heat in summer (think Texas, Arizona, Southern California), a solid covered patio or a well-designed pergola with ceiling fans is going to change how much you actually use the space. In climates where rain is the bigger issue, a solid roof or at least a waterproof polycarbonate panel roof is worth the extra investment over a fabric option.
Heat, cooling, and comfort: fans, misting, and airflow
Once you have shade sorted, the next layer is airflow and temperature control. This is where a good patio goes from usable to genuinely comfortable in heat. For patios under a solid cover or pergola, ceiling fans designed for outdoor, damp, or wet-rated locations are one of the highest-ROI upgrades you can make. Moving air makes an 85-degree day feel much more manageable.
Misting systems are worth serious consideration in dry, hot climates. A well-set-up high-pressure misting system can drop perceived temperature by up to 25 degrees Fahrenheit. They're less effective in humid climates because the air is already saturated. When choosing or installing a misting system, use one with an inline GFCI where any electrical component is involved near water. Safety codes require outdoor circuits near water to be GFCI-protected, so don't skip that step.
For shoulder-season comfort, electric patio heaters extend your usable outdoor season by months. Infratech and similar infrared heaters are commonly mounted overhead. Follow the clearance requirements to the letter: a typical installation requires at least 18 inches of clearance to combustibles on all sides, and 36 inches directly in front of the heater face. These aren't suggestions; they're fire safety requirements. Proper mounting height and position is worth a conversation with a licensed electrician.
Fans deserve their own detailed look if that's a priority for your space. A good ceiling fan selection for a covered patio can make or break comfort all season long.
Entertainment, ambiance, and making it feel like a real room
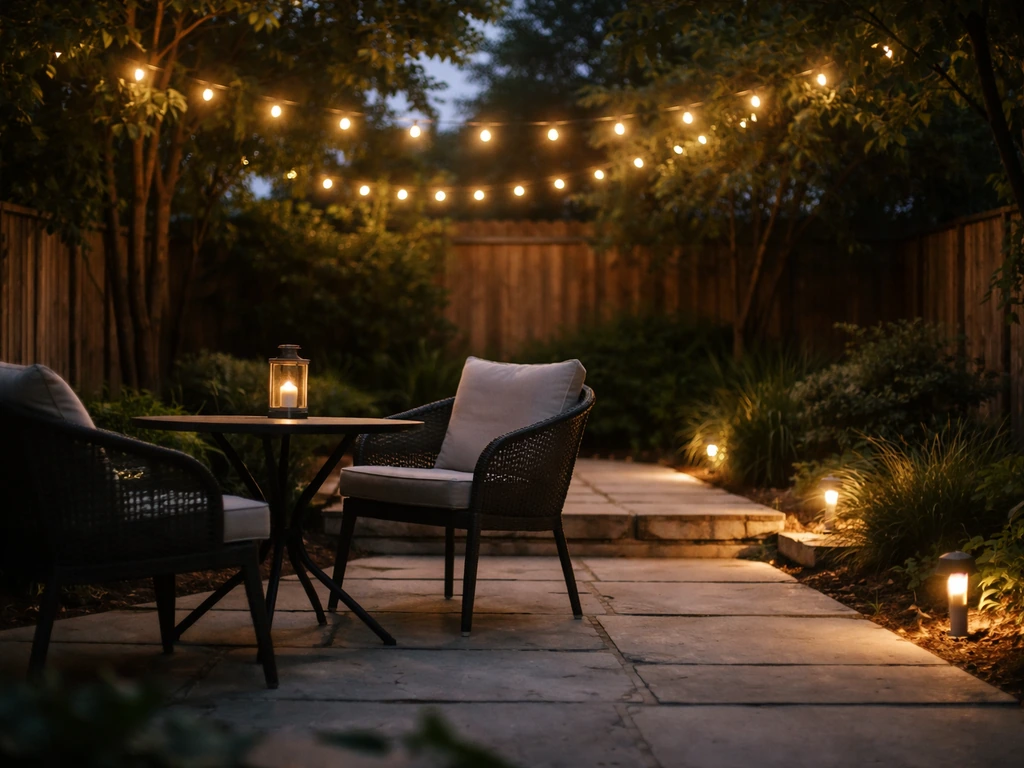
The gap between a functional patio and one that people actually want to hang out on is almost always lighting and sound. Neither has to be expensive, but both make a huge experiential difference.
For lighting, layer your sources. Overhead string lights or a ceiling fixture give ambient illumination. Step lights or path lighting handle safety and wayfinding. Accent lighting aimed at plants, walls, or architectural features adds depth. All outdoor fixtures need to be rated for the moisture exposure level of their location. GFCI protection is required for all outdoor receptacles under current electrical codes.
Outdoor speakers have gotten remarkably good and reasonably priced in the last few years. Rock-style landscape speakers blend into plantings. In-ceiling or under-soffit speakers work well on covered patios. Bluetooth and Wi-Fi enabled systems let you control audio without running back inside. Run speaker wire in conduit during construction if you're doing a new install; retrofitting is far more painful.
Privacy is an underrated comfort factor. A privacy screen, lattice with climbing plants, planted border, or even a strategically placed outdoor curtain can transform how relaxed people feel in the space. If you're in a neighborhood with close neighbors or a busy street view, this is worth budgeting for early rather than adding it as an afterthought.
Installation, drainage, and the DIY vs. hiring pros question
Installation quality matters more than most people give it credit for. A beautifully spec'd paver patio installed on a poorly compacted base will shift, heave, and puddle within two or three winters. The difference between a 10-year patio and a 30-year patio usually comes down to what you can't see: base preparation, drainage slope, and edge restraints.
Drainage first, always
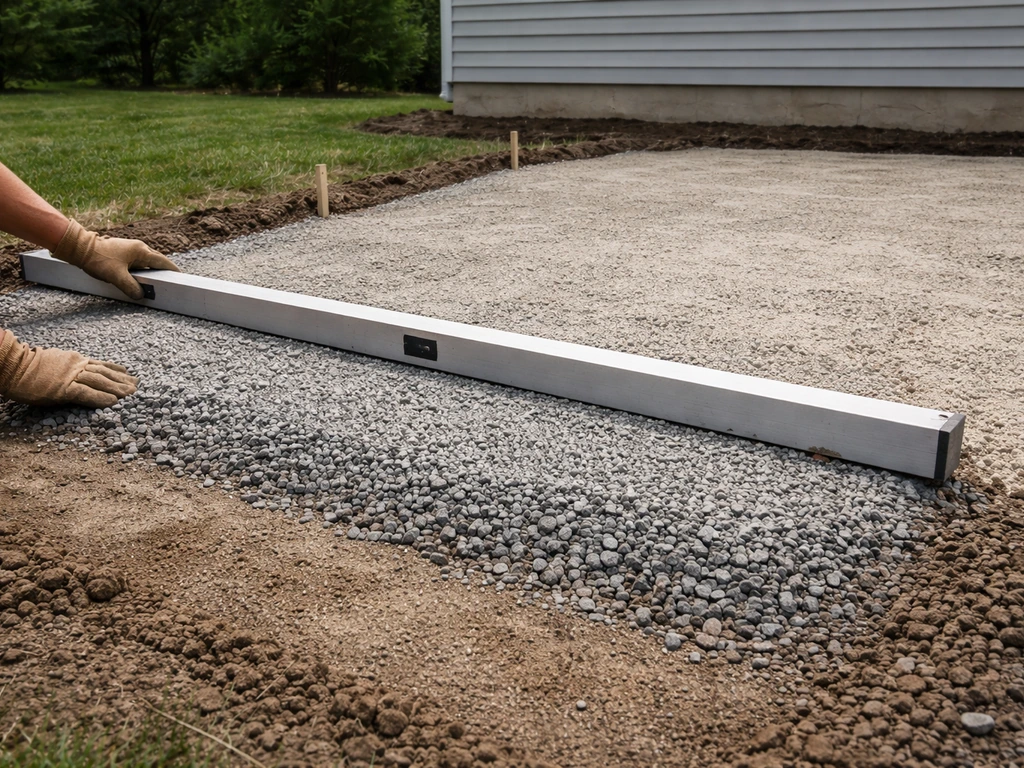
Slope the patio surface away from your house at 1/8 to 1/4 inch per foot. That sounds like a small number, but over a 12-foot patio, that's 1.5 to 3 inches of drop. Without it, water pools against your foundation. If you have a low-lying area or soil that doesn't drain well, a French drain running alongside the patio edge with a slope of at least 1/8 inch per foot will carry water away without sediment buildup clogging the drain.
Base prep and structural requirements
For paver installs, the subgrade needs to be compacted to at least 98% standard Proctor density (ASTM D698). This requires a plate compactor, not just tamping by hand. Layer in your crushed stone base, compact in lifts, add your bedding sand layer, then set pavers. Edge restraints are non-negotiable; without them, pavers migrate outward over time no matter how well the base is done. Geotextile fabric between the soil and base layer keeps fine particles from migrating up and destabilizing the base.
When to DIY and when to hire
Here's an honest take: base prep and drainage are where most DIY patio projects fail. The actual laying of pavers or pouring of concrete is learnable. Getting the grading right, compacting properly, and managing drainage in a complex yard is where experience pays off. Professional paver installers typically charge $50 to $80 per hour, and a 300 square foot patio can take 35 to 40 hours depending on complexity. At those rates, installation labor alone can run $1,750 to $3,200, which is real money, but it's much cheaper than fixing a heaved, pooling mess in three years.
If you're comfortable with grading and have access to a plate compactor rental, a DIY paver patio on relatively flat ground with good native drainage is absolutely doable. If your yard has significant slope, clay soil, or drainage challenges, hire a pro for at least the base work, even if you do the finishing yourself.
For covered structures, always pull permits. A patio cover or pergola attached to your house affects your home's structure and potentially its resale value. Unpermitted work can complicate home sales and insurance claims. A licensed contractor who knows your local codes is worth the coordination for anything structural.
Your next steps, in order
- Define your primary use case (dining, lounging, entertaining, or a mix) and your realistic budget tier before you look at any designs.
- Measure your available space and tape out furniture footprints on the existing surface. Verify 36 to 48 inch clearances to doors and main traffic paths.
- Identify your climate's biggest comfort challenge: heat, rain, wind, freeze, or humidity. That determines your shade and comfort layer choices more than anything else.
- Choose your surface material based on climate requirements and budget. Get quotes for both DIY materials and professional installation to compare true costs.
- Plan drainage slope (1/8 to 1/4 inch per foot away from house) and identify whether your yard needs a French drain before or alongside the patio.
- Layer in comfort upgrades in priority order: shade first, then airflow, then heating for shoulder seasons.
- Add entertainment and ambiance elements during construction where possible (speaker conduit, lighting circuits, outlet placement) rather than retrofitting later.
- If hiring professionals, ask specifically about base compaction standards, drainage plan, edge restraint approach, and whether they pull permits for any structural work.
A great outdoor patio doesn't happen by accident. It's the result of deciding what you actually need from the space before spending money on any of it. Get those fundamentals right, and everything else, from the material finish to the fan you hang overhead, just makes a well-planned space even better.
FAQ
How do I figure out which patio size is right before I start shopping for furniture or materials?
Beyond taping footprints, build a simple zone sketch: measure your dining table footprint (table diameter plus two chair depths plus a buffer), then add a separate clear aisle to the grill or door. If you cannot maintain the 36 to 48 inch circulation space you planned, downsize the table or reduce the number of chairs, because squeezing layout space usually costs more to fix than changing furniture.
What should I do if my yard slopes or drains toward the house instead of away from it?
Treat drainage as the first design decision. If water naturally flows toward the foundation, plan an engineered diversion path such as regrading and a French drain along the patio edge. Without a directed slope away from the house, even expensive materials can develop pooling, efflorescence, and accelerated surface deterioration.
Concrete or pavers, which one is more forgiving if I want to DIY part of the project?
Concrete is simpler to pour but less forgiving once it cures, especially if the slope or finish is off. Pavers are more modular, so you can correct localized issues by resetting a section, but they demand correct base prep, compaction in lifts, and edge restraints. If your DIY comfort is limited to finishing only, consider hiring the base and drainage portion for pavers and doing the remaining work yourself.
Is it a problem if I choose a beautiful stone that is slippery when wet?
Yes, and it is often preventable. If a stone finish is not inherently grippy, use an appropriate non-slip finish or seal system rated for outdoor wet conditions, and confirm traction in the specific expected weather (freeze, rain, sprinklers). For high-traffic zones near doors, prioritize traction first, appearance second.
How do I choose between a pergola and a fully covered roof if my main issue is afternoon sun?
Pergolas typically provide partial shade and airflow, which can work well if you rely on fans and ventilation. A solid covered roof blocks more heat and rain, but it can trap humidity and reduce airflow, so you will likely need stronger circulation planning. If your area has both intense sun and frequent storms, prioritize roof coverage over fabric solutions for consistent usability.
Can I combine multiple comfort features, like heaters plus fans or misting, without wasting money?
Yes, but sequence matters. Fans and shade usually deliver usable comfort year-round by reducing perceived heat. Misting is most effective in dry climates, so add it only if you confirm your humidity level is low. Heaters extend shoulder seasons, but they require safe clearances and proper placement, so avoid adding overhead heaters in tight areas already dedicated to fans or ceiling structures.
What outdoor lighting placement mistakes make patios look worse or feel unsafe?
The common mistake is relying on one overhead light. Use layered lighting and add step or path lighting for the routes you taped out during planning. Also ensure every exterior fixture is rated for moisture exposure at its mounting location, and confirm your outlet and switch plan includes GFCI where required to avoid shock hazards.
Do I need GFCI even if I already have outdoor outlets that look “standard”?
In most modern setups, outdoor receptacles near water require GFCI protection regardless of how they look. Before installation or purchase, confirm your circuit type and whether the upstream breaker or the device itself provides GFCI protection. If you plan misting, heaters, or any near-water wiring, specify inline GFCI for the relevant electrical components during design, not after-the-fact.
What’s the most reliable way to ensure my pavers won’t settle or heave?
Focus on the hidden steps: correct subgrade compaction to the target Proctor density, correct base thickness and lift-by-lift compaction, proper bedding sand depth, and rigid edge restraints. Also verify that the patio has a drainage slope away from the house. If any of those are rushed, you can get shifting or puddling even when the pavers themselves are high quality.
Should I install a French drain even if I’m not sure I have a drainage problem?
If water pools, soil stays damp, or you see recurring wet spots after rain, a drain is often cheaper than correcting later. Use simple checks like observing water behavior after a heavy rain and looking for damp lines along the house. If the yard’s natural grading sends runoff toward the foundation, plan drainage proactively rather than waiting for visible damage.
When are permits required for a patio cover or pergola, and what could it affect?
Any structure attached to the house or involving structural modifications typically requires permits and inspections. Permits can affect timelines and must align with local setbacks, wind-load requirements, and attachment methods. Unpermitted work can complicate resale and insurance claims, so plan the permit step early, before you order materials sized to the final layout.
How can I improve privacy without blocking airflow or creating an enclosed, stuffy feel?
Choose privacy methods that match your ventilation needs. Lattice with climbing plants or strategically placed screens can provide visual separation while still allowing airflow. If you use curtains or solid panels, position them to avoid blocking prevailing breezes, and consider partial-height screens near dining areas so people do not feel trapped while still enjoying reduced sightlines.
Is it worth buying high-end outdoor speakers or can I just use any Bluetooth device outside?
Using consumer devices outdoors is usually a short-term fix, because most are not designed for moisture exposure and sustained temperature changes. If sound quality and longevity matter, choose outdoor-rated landscape speakers or under-soffit/in-ceiling options and plan wiring during construction (conduit helps). For control convenience, confirm the system supports Wi-Fi or Bluetooth and that your patio coverage supports the signal where you will listen.