The best patio floor covering for most homeowners is concrete pavers: they handle freeze-thaw cycles, drain well when properly sloped, last 30+ years with minimal maintenance, and work across a wide range of budgets. But if you're in a hot, dry climate with no frost, large-format outdoor porcelain tile gives you a cleaner look and nearly zero upkeep. If budget is the real constraint, a concrete resurfacing overlay or even quality outdoor rubber tiles can transform an ugly slab for a fraction of the cost. The right answer depends on your climate, how you use the space, and how much work you're willing to do yourself.
Best Patio Floor Covering: Choose and Install the Right One

Elise Prescott
29 Apr 2026
Match your floor covering to your climate and how you use the space
Before you pick a material, think about what your patio actually goes through. A covered back porch in Houston sees brutal humidity and UV but no frost. A Denver patio gets hammered by freeze-thaw cycles every winter. A Florida pool deck gets soaked daily and needs serious slip resistance. These differences matter more than aesthetics, and getting this wrong is the most common and expensive mistake homeowners make.
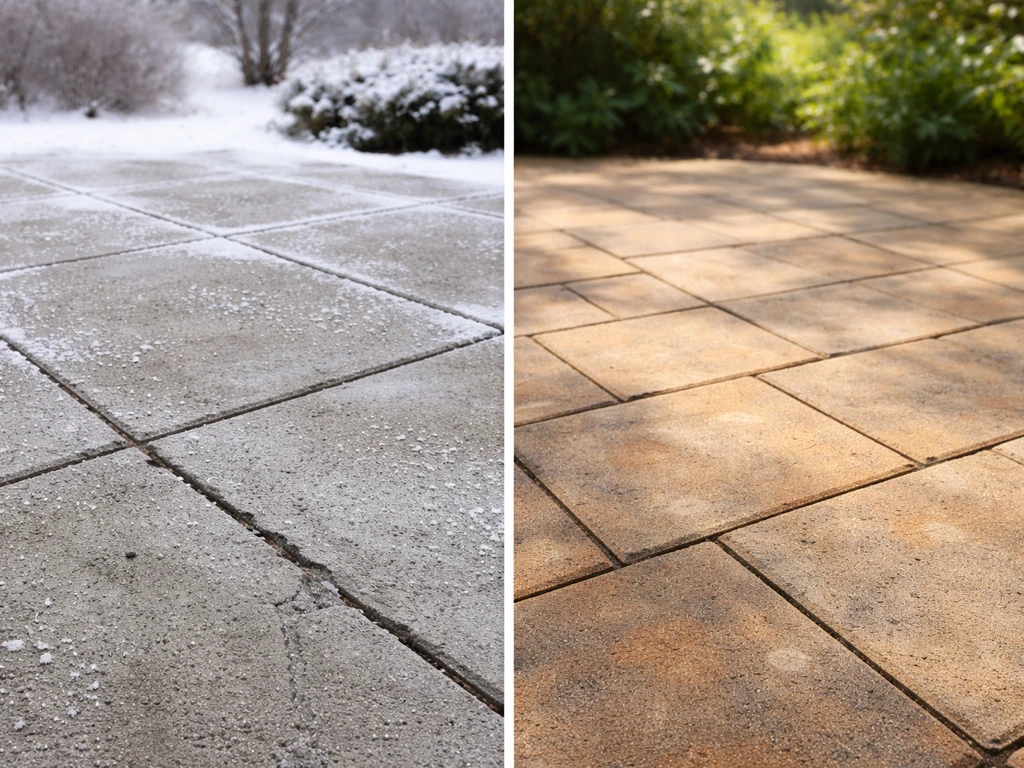
The biggest climate-driven failure is freeze-thaw damage. When water gets into a porous material and freezes, it expands about 9% and cracks things from the inside. ASTM C666 test cycling runs specimens between 4°C and -18°C to simulate this, and the materials that fail this test fail your patio too. Concrete pavers made to ICPI standards, outdoor-rated porcelain tile (water absorption 0.5% or less per ANSI A137.1), and composite decking all survive this cycle. Natural stone, standard concrete slabs, and some gravel-set tiles do not, at least not without sealing and proper installation.
Beyond climate, think honestly about how the space gets used. A patio that hosts kids and a dog every weekend needs something tough, easy to clean, and forgiving when wet. A grilling area needs heat resistance and grease tolerance. A formal outdoor dining area can handle something more delicate if it's covered. Heavy outdoor furniture, especially cast iron or concrete, can chip softer tile surfaces over time. Map your specific situation before pricing anything out.
| Climate Type | Best Choices | Avoid |
|---|---|---|
| Freeze-thaw (Midwest, Northeast, Mountain West) | Concrete pavers, ICPI-spec; outdoor porcelain tile with proper mortar bed; composite decking | Natural stone (unsealed), standard poured concrete slab, vinyl tile |
| Hot and dry (Southwest, Texas, desert) | Porcelain tile (light colors), concrete pavers, flagstone/natural stone | Dark rubber mats (heat absorption), composite decking in full sun (check brand specs) |
| Humid and wet (Southeast, Gulf Coast, Pacific Northwest) | Porcelain tile with DCOF 0.42+, concrete pavers, textured rubber/vinyl tiles | Smooth natural stone, wood decking without proper gaps and sealer |
| Pool deck or wet zone (any region) | Textured/brushed porcelain tile, aggregate concrete, rubber tiles rated for wet areas | Smooth tile, polished natural stone, standard pavers without texture |
Slope matters in every climate. A properly installed patio should drain at roughly 1/8 to 1/4 inch per foot away from the house. The ADA standard caps walking surface slopes at 1:20 (5%), which is also about the maximum that feels comfortable underfoot. If your patio currently pools water, no new surface material will fix that without addressing the underlying grade first.
The main patio floor covering materials, compared honestly
Concrete pavers

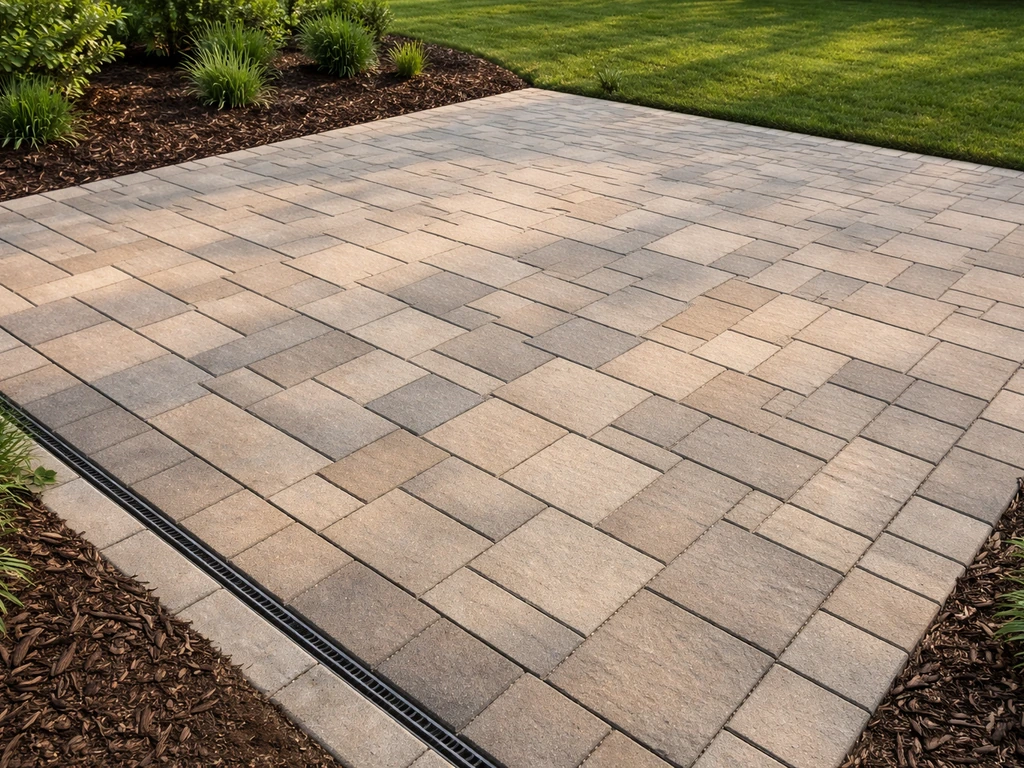
Concrete pavers are the workhorse option. In most climates, concrete pavers are often one of the best surface for outdoor patio choices because they drain well, resist freeze-thaw damage, and are easy to maintain. In most cases, choosing the best outdoor patio flooring comes down to matching the material to your climate and daily use. They're manufactured to tight specs (ICPI guidelines), handle freeze-thaw cycles, and if one cracks or stains, you replace just that unit. A proper install means a 4 to 6 inch compacted gravel base, about 1 inch of bedding sand, and a 1.5% slope for drainage. For segmental concrete paving slabs and planks used in pedestrian applications, CMHA recommends a minimum 1.5% slope for drainage Construction Guidelines for Segmental Concrete Paving Slabs and Planks in Pedestrian Applications. Polymeric sand between joints controls weeds and limits efflorescence. Cost runs roughly $8 to $25 per square foot installed, depending on the paver style and your region. Lifespan: 30 to 50 years with basic maintenance. Good for almost everyone, and genuinely DIY-possible for small to medium patios.
Outdoor porcelain tile
Large-format outdoor porcelain (think 24x24 or 24x48 inch panels) has become a top-tier patio choice. Porcelain at 0.5% or less water absorption per ANSI A137.1 is essentially frost-proof when properly installed. The key words there are 'properly installed': in freeze-thaw climates, you need an improved modified dry-set mortar (per ANSI A108.20) and 95% mortar back-coverage to prevent water intrusion under the tile. Wet DCOF must be 0.42 or higher (AcuTest per ANSI A137.1) for any tile you'll walk on when wet. Cost is $15 to $35+ per square foot installed. This one is best left to a tile contractor in cold climates. Lifespan is 25 to 50+ years when installed correctly.
Stamped or resurfaced concrete
If you have an existing slab in decent shape, a concrete overlay or stamped resurfacing is the fastest and cheapest transformation. Realistic lifespan is 5 to 12 years on average, and up to 15+ years with proper sealing and maintenance, according to industry data. Resurfacing costs roughly $3 to $10 per square foot. The honest catch: overlays will eventually crack, especially in freeze-thaw climates, because they're thin and bonded to a slab that moves. They're a great choice for mild climates and covered patios, and a reasonable short-term fix elsewhere.
Natural stone (flagstone, slate, bluestone, travertine)
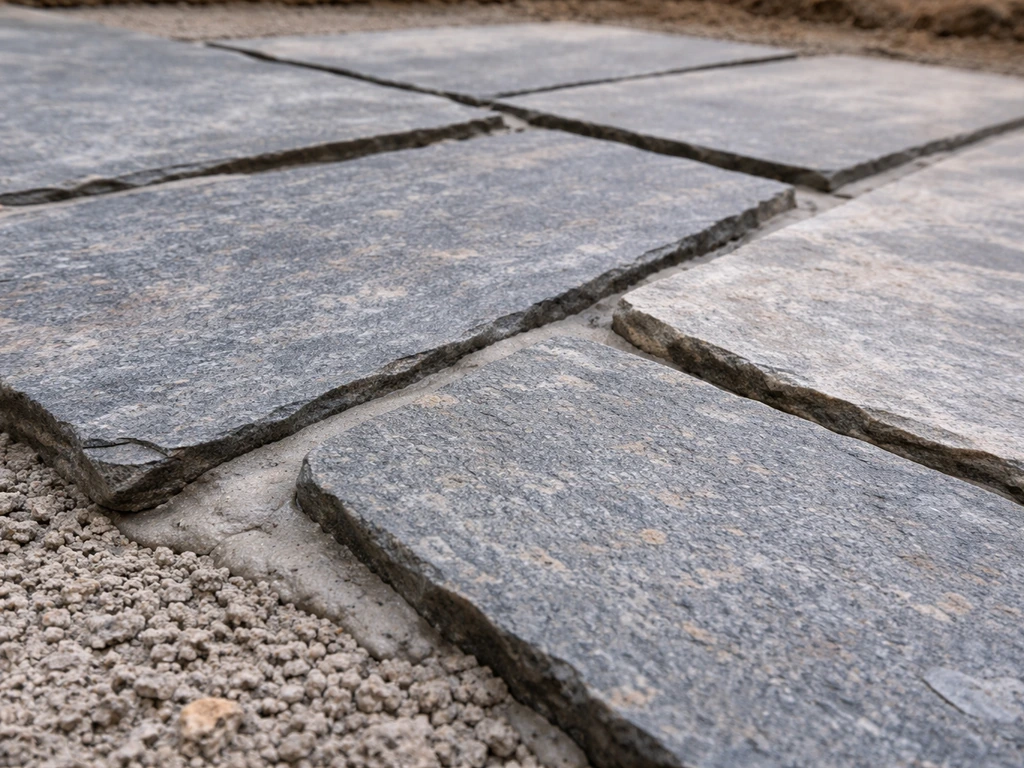
Natural stone has a look that nothing else fully replicates. Flagstone and bluestone set in mortar or on a compacted base can last decades. The problems: cost ($20 to $50+ per square foot installed), inconsistent thickness that complicates installation, and porosity. Most natural stone needs sealing every 1 to 3 years to resist moisture and staining, and travertine specifically absorbs water easily, making it a freeze-thaw risk unless sealed religiously. In dry, warm climates (Arizona, Southern California, Texas), natural stone is excellent. In Minnesota or Colorado, stick with porcelain or pavers.
Composite decking
Composite decking isn't just for raised decks. It works as a patio surface over a frame, and capped composite products from brands like Fiberon (25-year structural warranty) and MoistureShield (50-year structural warranty) genuinely hold up. Boards should be installed with 1/8 to 1/4 inch gaps for drainage and airflow, which also reduces freeze-thaw stress. Average lifespan for capped composite is 25 to 30 years. Installed cost is $15 to $40 per square foot depending on product line. The limitation: composite needs a frame structure underneath, so it's better suited to elevated or grade-level deck situations than a flat patio slab installation.
Rubber and vinyl outdoor tiles
Rubber interlocking tiles (the kind used on playgrounds and gym floors) are the ultimate DIY option. They snap together over almost any surface, absorb impact, provide good slip resistance, and can be pulled up and rearranged. Vinyl composite outdoor tiles are similar. Neither material is a permanent solution: expect 5 to 15 years depending on UV exposure and traffic. Cost is $2 to $8 per square foot for materials. They're especially good for covered patios, kids' play zones, or as a temporary fix while you save for something permanent.
Gravel and pea stone
Gravel is the most drainage-friendly and lowest-cost option ($1 to $4 per square foot with edging). It's great for low-traffic side patios, garden pathways, or informal outdoor spaces. The downsides are real: it shifts underfoot, it's uncomfortable for barefoot walking, furniture legs sink into it, and it scatters onto lawns. For a main patio where you're entertaining or setting up dining furniture, gravel is more frustration than it's worth unless it's used as a filler between stepping stones.
Outdoor rugs and mats as a layered solution
Outdoor rugs aren't a flooring material on their own, but they're a legitimate upgrade layer over an existing patio. A good polypropylene outdoor rug adds comfort, defines zones, and can hide a tired-looking slab. The trap is moisture: rugs that sit directly on concrete can trap water underneath and grow mold within weeks. Elevate them on a slatted rug pad or pull them up after rain. Think of outdoor rugs as a design tool, not a floor covering solution.
Best options by budget: what you can realistically do yourself vs. what to hire out
| Budget Range (per sq ft, installed) | Best Material Choice | DIY or Pro? | Notes |
|---|---|---|---|
| $1–$5 | Gravel with edging, rubber/vinyl interlocking tiles | DIY | Low commitment, low permanence. Good temporary fix or secondary zone. |
| $3–$10 | Concrete overlay/resurfacing | Pro recommended | Needs surface prep and sealing skill. DIY kits exist but results vary. |
| $8–$20 | Concrete pavers (standard) | DIY or Pro | Doable DIY for smaller patios with proper base prep. Pro for large areas. |
| $15–$30 | Outdoor porcelain tile | Pro strongly recommended | Mortar coverage and slope are critical. In freeze-thaw climates, errors are costly. |
| $20–$50+ | Natural stone, premium pavers, high-end composite | Pro | Installation complexity and material cost justify professional labor. |
If your budget is tight and you're willing to do the work, concrete pavers are the sweet spot. A 200-square-foot patio in standard 12x12 or 16x16 concrete pavers with a proper compacted gravel base is an achievable weekend project for someone comfortable with physical labor and following ICPI installation guidelines. The base work, getting the grade right and the gravel properly compacted, is where most DIY installs fail. Rent a plate compactor; don't skip it.
For porcelain tile or natural stone in freeze-thaw climates, hire a tile contractor with exterior experience. The difference between a 5-year install and a 25-year install is almost entirely in the mortar selection and the prep work, things that are hard to get right without experience. Ask specifically about their mortar spec and back-coverage practices before signing anything.
Slip resistance, drainage, and moisture basics that most people overlook
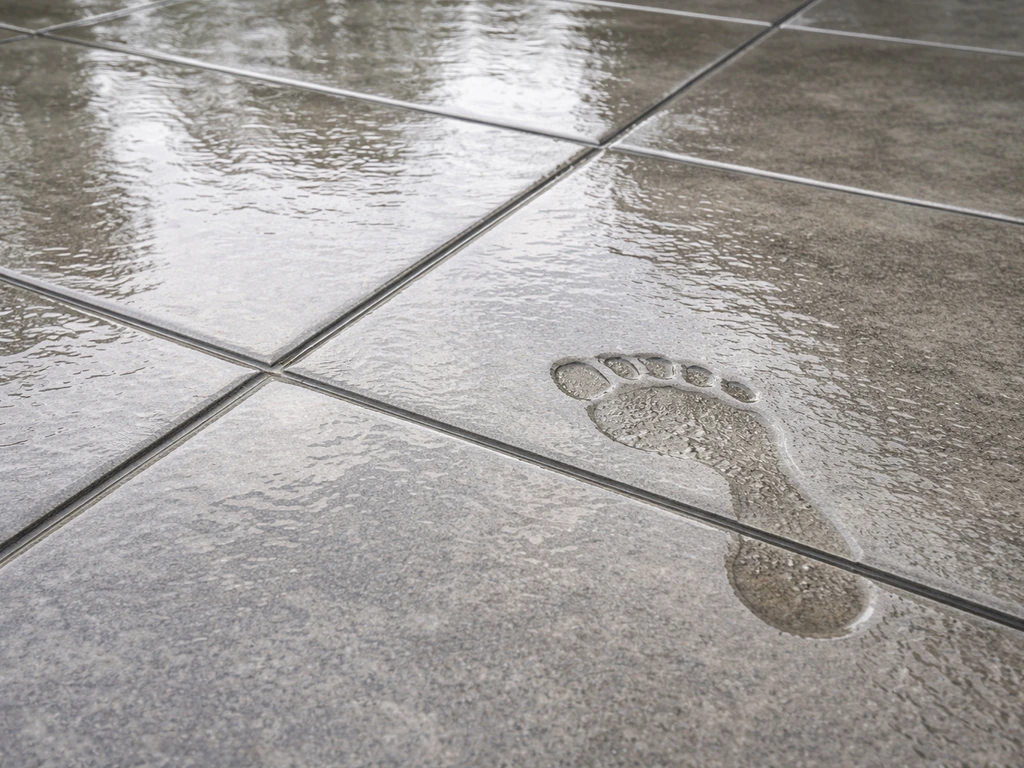
Slip resistance is measured by Dynamic Coefficient of Friction (DCOF). ANSI A137.1 requires a wet DCOF of 0.42 or greater for tile used in wet areas. For a pool deck or any patio that gets rained on, you want to be at or above that threshold. For a pool deck or any patio that gets rained on, you want to be at or above that threshold, which is also why many homeowners compare best pool patio surfaces for slip resistance first. Be aware that improper cleaning products can degrade a tile's surface and lower its DCOF over time, so what your tile starts with and what it has after two years of cleaning with the wrong products can be different numbers. Stick to the tile manufacturer's recommended cleaners.
Drainage design starts before you pick a material. The slope must be built into the base, not added as an afterthought with the surface material. A slope of 1/8 to 1/4 inch per foot (roughly 1 to 1.5%) away from the house is the standard target. For pavers and tile both, the base needs to be sloped, not just the surface. If you're adding a new patio to an existing yard, figure out where the water goes when it leaves the patio and make sure it doesn't pool against your foundation or fence.
Moisture resistance isn't the same across materials. Porcelain tile at 0.5% water absorption is essentially waterproof. Natural stone, standard concrete, and some grout types absorb water readily and need sealing. Polymeric sand in paver joints resists weed growth and water infiltration better than standard jointing sand. If your patio is in a shaded, humid environment, choose materials with low absorption ratings and plan for annual inspection of sealer condition.
Maintenance, cleaning, repairs, and the real long-term cost
Every material has a maintenance rhythm. Knowing it upfront helps you avoid the scenario where your beautiful new patio looks terrible five years in because you skipped the annual sealer.
- Concrete pavers: Sweep polymeric sand back into joints every 1 to 3 years, reseal every 2 to 4 years depending on your climate and sun exposure. Watch for efflorescence (white mineral deposits) and address it early with a diluted muriatic acid wash. Repair is easy: pull the damaged paver, rebed with fresh sand, reset.
- Porcelain tile: Very low maintenance. Sweep, mop with pH-neutral cleaner, and inspect grout annually. Avoid acidic cleaners that degrade grout and tile surface. Cracked tiles require professional removal and replacement to maintain mortar coverage integrity.
- Concrete overlay/resurfacing: Seal every 1 to 2 years to extend life. Surface cracks should be filled as soon as they appear to prevent water infiltration. Budget for full resurfacing again in 8 to 12 years.
- Natural stone: Seal every 1 to 2 years, or more frequently in wet climates. Clean with stone-safe, pH-neutral products only. Acidic cleaners (vinegar, citrus) etch most natural stone surfaces permanently.
- Composite decking: Rinse with a garden hose and scrub with soap and water seasonally. Inspect board gaps for debris and clear them to maintain drainage. No sealing or staining required.
- Rubber/vinyl tiles: Sweep and rinse. Replace individual tiles as they crack or fade. UV degradation is the main long-term issue, especially in full-sun locations.
Long-term cost is more than the install price. Concrete pavers at $12 per square foot installed look expensive next to a $5 per square foot overlay, but if the overlay needs redoing every 8 years and the pavers last 40, the math flips completely. Factor in annual maintenance costs, expected resealing or replacement cycles, and whether failures are patchable (pavers, composite, rubber tiles) or require full removal (cracked slab overlays, failed tile installations).
Design and comfort upgrades that make a real difference
Once you've picked your material, the details determine whether the finished patio feels like a professionally designed space or just a functional slab. Layout pattern is the easiest win. Running pavers or tile in a herringbone or 45-degree diagonal pattern costs the same as a grid layout but looks dramatically better and actually adds structural stability to the surface. Running bond patterns in pavers distribute load more evenly across joints.
Edge details matter more than most people expect. A clean soldier-course border around pavers, or a contrasting tile border, defines the space and contains the material properly. For pavers, edge restraints are structural: without them, the outer pavers migrate outward over time and the whole surface loosens. Use plastic or aluminum edge restraint spiked into the base, not just sand.
Color and finish affect heat and safety. Dark surfaces absorb significantly more heat than light ones, which is a serious comfort issue in full-sun patios in hot climates. Lighter pavers and tile can be 20 to 30 degrees cooler underfoot on a summer afternoon. Matte or textured finishes provide better slip resistance than polished or glossy surfaces, which become dangerously slick when wet. For any exposed patio in a rainy climate, avoid polished stone and high-gloss tile.
Leveling and transitions deserve attention at installation time. If the patio transitions to a lawn, sidewalk, or interior threshold, a smooth transition edge prevents tripping and looks intentional. For DIY paver projects, check level frequently during installation and shim individual units with bedding sand before the surface is locked in. Trying to level things after the fact is far harder than getting it right the first time.
Comfort underfoot is something you can address after the fact with layered solutions. Outdoor rugs, foam-backed vinyl mats in dining areas, and rubber anti-fatigue tiles near grilling stations all add comfort without changing the base floor. If you're working with a sibling topic like alternative patio flooring or outdoor patio floor tiles, you'll find the same layering logic applies regardless of the base surface you've chosen. If you want to explore alternative patio flooring options, consider layered comfort add-ons like mats and tiles that work over your existing base.
What to ask a contractor before you sign anything
Whether you're getting quotes for a full install or just hiring someone to handle the base prep before you lay your own pavers, these questions separate competent contractors from ones who will leave you with a failed patio in three years.
- What is your planned base thickness and compaction method? (Answer should be at least 4 to 6 inches of compacted gravel for pavers or tile, not just sand on dirt.)
- What slope are you building into the base, and where does the water drain to? (Target: 1/8 to 1/4 inch per foot away from structures.)
- For tile installs: what mortar are you using, and what back-coverage percentage do you achieve? (Look for 95% mortar coverage in wet/exterior areas per ANSI A108.5 guidance.)
- For freeze-thaw climates: what is your cold-weather installation protocol, and what mortar spec do you use for exterior tile? (Should reference improved modified dry-set mortar and ANSI A108.20.)
- What is the wet DCOF rating of the tile you're recommending, and do you have the spec sheet? (Must be 0.42 or higher for any wet-area application.)
- Do you install edge restraints on pavers, and what type? (Should be plastic or aluminum with spikes, not just sand or mortar bead.)
- What is your warranty on labor, and how do you handle callbacks if shifting or cracking appears in the first year?
- Can you provide two or three references for a similar project in this climate, and can I see those installations in person or via photos?
- Are you using polymeric sand for paver joints, and will you seal the surface after installation? What product do you use and what is the reapplication interval?
- Is a permit required for this project in my municipality, and will you pull it?
A contractor who can answer these questions clearly and confidently, without getting defensive, is almost always worth the quote. The ones who wave off base thickness questions or can't name their mortar product are the ones whose work you'll be ripping out in five years. Get everything material-specific in writing before work starts, and take photos of the base layer before it's covered so you have documentation if problems arise later.
FAQ
What’s the best patio floor covering if I want the lowest long-term cost, not the lowest install price?
Compare total replacement cycles, not just per-square-foot pricing. Concrete pavers are often cheaper over time because they’re patchable (replace individual units) and can last 30 to 50 years, while resurfacing overlays commonly have a much shorter lifespan and require repeating repairs or reseals in earlier years.
Can I install outdoor porcelain tile directly on an existing concrete slab?
You can in some cases, but only if the slab is stable, flat, and properly prepped for thinset bond. Any existing cracking, movement, or weak spots can telegraph through and cause grout or tile failures in freeze-thaw climates, so plan on a contractor-grade prep and verify the mortar and back-coverage method before proceeding.
How do I choose between pavers and porcelain tile for a freeze-thaw area?
If you want a DIY-friendly option with forgiveness, choose concrete pavers and focus on base compaction plus correct drainage slope. If you choose large-format porcelain, expect stricter requirements (modified dry-set mortar, 95% mortar back-coverage, and correct wet DCOF) and consider hiring an experienced exterior tile crew.
What matters more for preventing patio damage, slope or the base thickness?
Both matter, but the base work is the foundation of the slope. The drainage path has to be built into the compacted base, then the surface layer follows it. If the base is not compacted and graded correctly, even the best covering can crack or heave because water is trapped or redirects to weak spots.
What’s the safest surface finish for a wet patio or pool deck?
Use a matte or textured finish, not polished or glossy. Polished surfaces can become dangerously slick when wet. Also confirm wet DCOF performance for the specific tile product and avoid cleaning products that can reduce surface slip resistance over time.
How can I tell whether my patio currently has a grading problem before buying materials?
After a rain, watch for ponding spots and measure runoff direction. If water pools for more than a short time, address grade and drainage first, because a new floor covering typically cannot fix trapped water. Mark where water collects, then plan base rework or drainage improvements accordingly.
Are polymeric sand and sealants both necessary for pavers?
Polymeric sand in paver joints is specifically about reducing weed growth and water infiltration between units, it is not the same as surface sealing. Whether you also seal depends on your local conditions and the paver type, but the critical step is using the correct base, slope, and joint material so water moves away safely.
Will sand-set tile or stone on a thin layer work if I’m just doing a small DIY patio?
For freeze-thaw areas, avoid “thin and hopeful” installs. Porcelain and stone need the right mortar system, prep, and full coverage to stop water from migrating under the surface. If you cannot verify the exact mortar spec and installation method, pavers are usually the more forgiving DIY choice.
Do I need sealing every year for natural stone?
Not always every year, but many stones and grout combinations do require regular re-sealing depending on porosity and sun exposure. In humid or shaded areas, plan for more frequent checks and consider extending reseal intervals only after confirming the sealer still beads water properly.
Is gravel actually a good choice for a main entertaining patio?
Usually no, gravel is best for low-traffic side areas and informal paths. It shifts underfoot, can be uncomfortable barefoot, and furniture legs can sink and wobble. If you want an entertaining surface, pavers or tile typically provide a more stable, cleaner setup for dining and seating.
Can I use an outdoor rug over a concrete patio without creating mold issues?
Yes, but avoid letting it trap moisture against the slab. Use a ventilated approach such as a slatted rug pad, and lift or roll the rug after heavy rain or extended wet periods, especially in humid climates.
What DIY step is most likely to cause paver failure?
Skipping or rushing the compacted base. Even with the right pavers, insufficient base compaction and incorrect grading can lead to settling, rocking, and drainage problems. Rent a plate compactor and verify level often while you work, not after the surface is locked in.
How do I choose a transition detail if my patio meets a lawn, sidewalk, or door threshold?
Plan a smooth, intentional edge so water and feet do not catch. Use transition pieces or a consistent height step-up, and consider how the patio surface thickness compares to the surrounding surfaces. A sudden lip can create trip hazards and makes maintenance harder.
What should I ask a tile contractor to avoid a short-lived installation?
Ask for their specific exterior mortar product and confirm back-coverage practices for the tile format you’re using. Also ask how they handle surface prep and water management at edges and penetrations, because those details are common failure points in cold climates.
If my patio surface cracks, can I repair just the affected area, or will I need to redo everything?
Often you can patch pavers by replacing individual units, and many composite or rubber tile systems can be rearranged or swapped. Overlays and bonded resurfacing are different, once the bonded layer fails you may need wider section repairs or full removal, especially if freeze-thaw forces reopen cracks.
When is composite decking a bad choice for patio floors?
Composite is a poor fit when you want a simple flat overlay on a slab without building structure underneath. It requires a frame, plus gaps for drainage and airflow. If your goal is an at-grade patio surface over existing concrete, pavers or tile usually match the job better.