The best patio landscaping is the one that actually fits how you use your outdoor space, survives your local climate, and matches what you're willing to maintain year after year. That sounds obvious, but most patio landscaping mistakes happen because someone picked plants they loved at the nursery without checking hardiness zones, or designed a layout that looks great in photos but funnels foot traffic straight through the grill area. This guide walks you through the real decisions, in order, so you end up with a plan you can actually execute and enjoy.
Best Patio Landscaping: Layout, Plants, Budget, and Next Steps

Elise Prescott
10 Jun 2026
Start with your patio's real purpose and your honest constraints
Before you buy a single plant or stone, write down what your patio is actually for. Entertaining groups? Quiet morning coffee? Cooking outside three nights a week? Watching kids play? Each purpose shapes every decision that follows. A cooking-focused patio needs a layout that separates prep, cooking, and dining zones so guests don't walk through your working area. Outdoor kitchen flow often works best as distinct prep to cooking to dining zones, with the cook’s station positioned so guests’ paths aren’t cut off or forced through the working route separates prep, cooking, and dining zones. A relaxing retreat needs shade and privacy more than square footage. Knowing your primary use case keeps you from overbuilding or planting the wrong things entirely.
Then get honest about your constraints. Budget is the obvious one, and mid-range landscaping with plants, hardscape, and basic irrigation typically runs $12 to $25 per square foot in 2026, with regional labor multipliers pushing costs higher in coastal cities. But maintenance tolerance matters just as much. If you travel frequently or simply don't enjoy yard work, a low-maintenance native plant scheme beats a high-drama tropical planting that dies the moment you skip two weeks of watering. Write down your style goal too: modern and minimal, cottage and layered, desert-adapted, or tropical. That word or two will guide every material and plant choice.
Assess your site before you design anything
Walk your patio at different times of day and actually watch where the sun hits, where shade falls by noon, and where wind consistently comes from. A south-facing patio in Phoenix and a north-facing one in Minneapolis need completely different plant and shade strategies. Shade from the house itself, trees, or neighboring structures changes what groundcovers and border plants will survive, so map it before committing.
Soil and drainage: two tests worth doing
Compacted soil is one of the most common reasons patio bed plantings fail. Test it by pushing a rod or screwdriver into the ground at eight to ten spots around the planting area. If you can push it 12 to 18 inches without much resistance, you're in good shape. If it stops at 4 to 6 inches, you have compaction that needs to be broken up with a fork or rented aerator before planting.
For drainage, do a simple percolation test: dig a hole about 12 inches deep, saturate it with water, let it drain, then refill it and time how fast the water drops. If it drains more than an inch per hour, you're fine for most plants. If water sits there for hours, you'll need to address drainage before planting, either by amending the soil with organic matter, grading the area, or installing a French drain. Drainage work typically adds $1,000 to $4,000 to a project budget but it's far cheaper than replanting dead beds every other year. Also grade any hardscape surface to slope roughly 1/4 inch per foot away from the house to keep water moving.
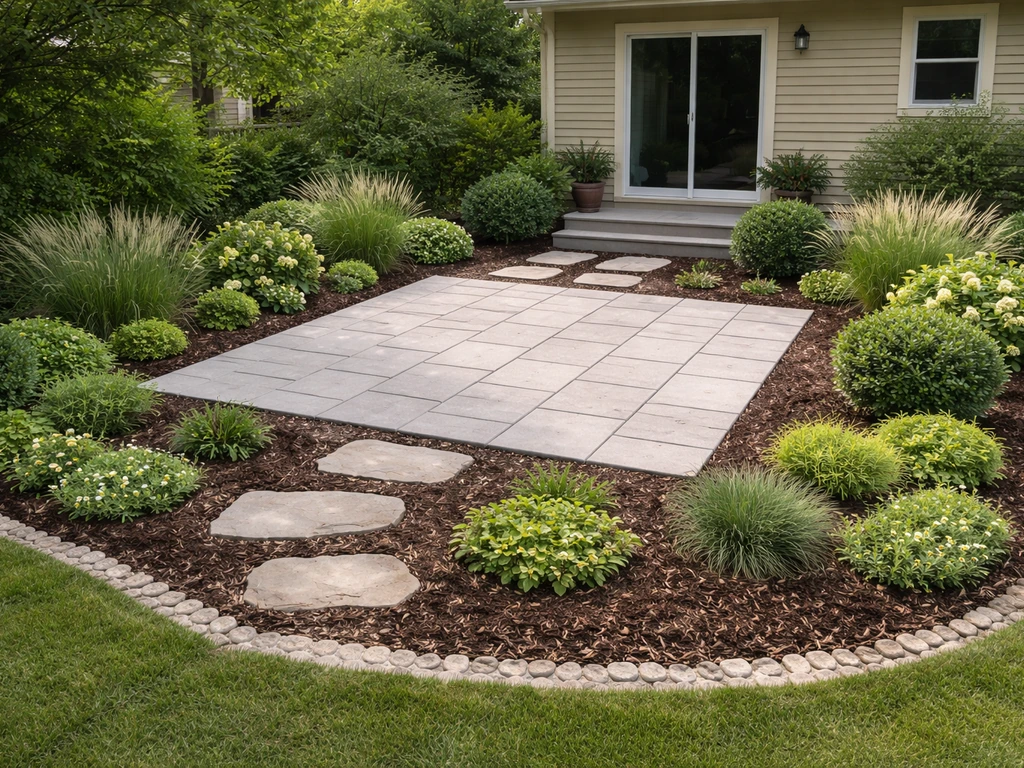
Layout: beds vs. containers, privacy, pathways, and flow
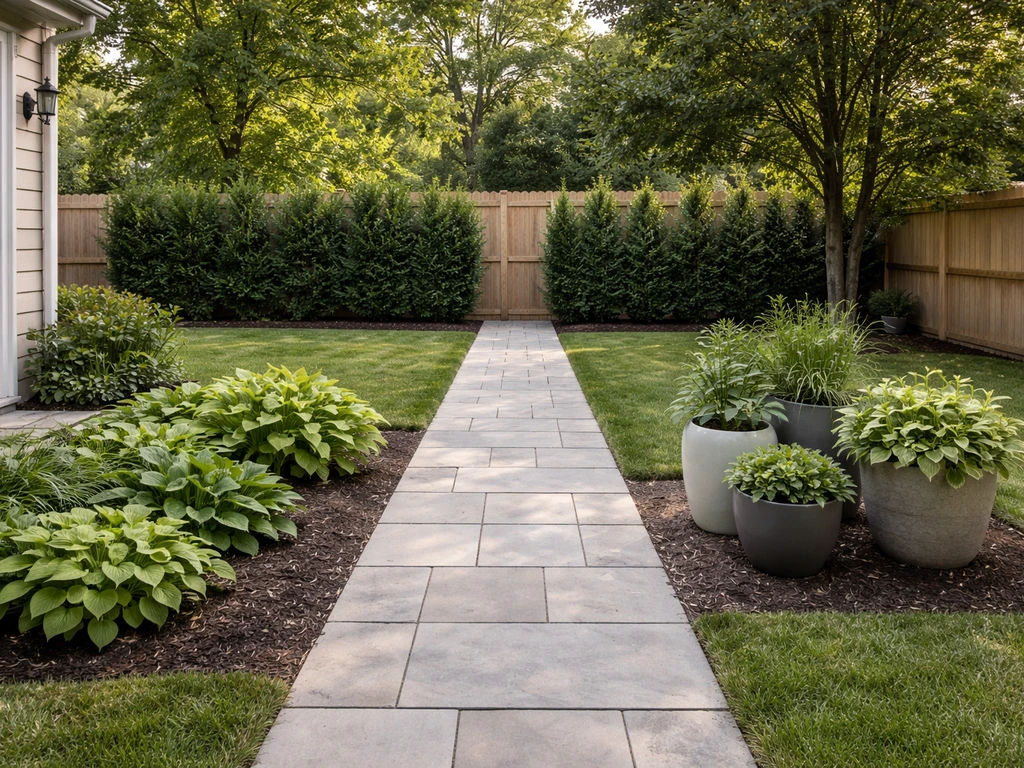
Layout is where most people skip straight to aesthetics and regret it later. Think about traffic first. You need a clear walkway of at least 36 inches from any door to the yard, and your dining and lounging areas should sit to one side of that path rather than across it. For cooking patios, offset the grill station from the seating area so guests can move freely without stepping into your cooking zone. This creates a natural boundary while keeping the cook part of the conversation.
In-ground beds vs. containers
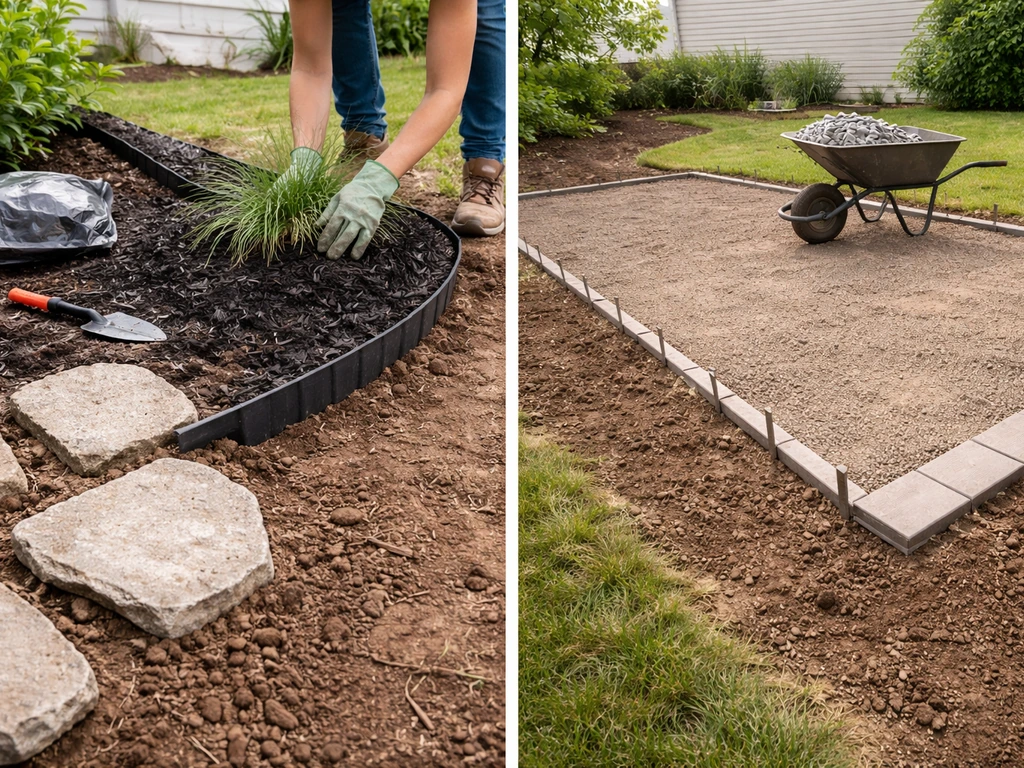
In-ground planting beds give you more root space, better moisture retention, and a more permanent look. They work well along fences, walls, and patio edges where you want structural plantings that grow in and fill out over a few seasons. Containers are better when you're renting, when soil quality is poor, or when you want flexibility to rearrange or overwinter tender plants. They also let you put plants exactly where aesthetics or function demand, even on concrete. A mixed approach, anchored beds at the perimeter with containers near seating for color and fragrance, tends to work best for most patios. If you're still deciding between an in-ground bed layout and a container setup, this guide on in-ground planting beds vs. containers is a solid next step when you’re building the best patio garden.
Privacy screens and pathways
For privacy, evergreen shrubs and ornamental grasses are usually more effective long-term than lattice or fabric screens because they fill in, block wind, and look better every year. A row of arborvitae, clumping bamboo (clumping varieties only, not running), or tall ornamental grasses like Miscanthus can create a living wall along a property line in two to three seasons. For stepping stone pathways through planting areas, stones should be at least 12 inches wide and spaced to match a natural walking stride, typically 18 to 24 inches on center. Dry-lay them first and walk the path several times before you set anything permanently.
Picking plants that will actually thrive
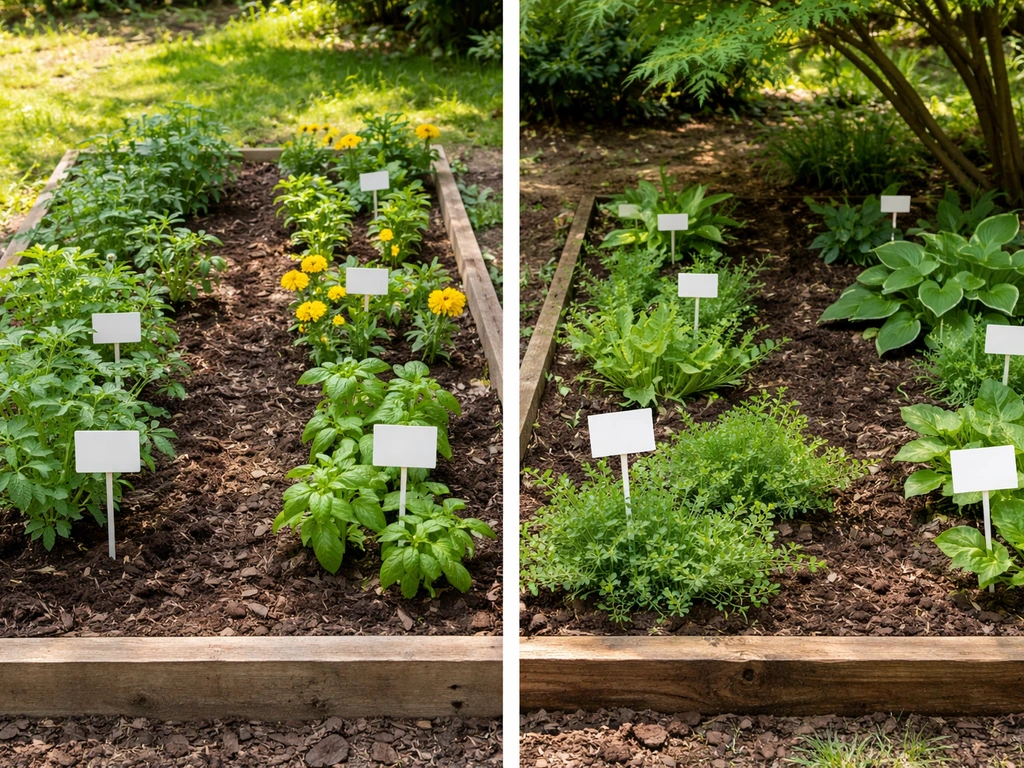
The single most important rule: only plant within your USDA hardiness zone. A plant that thrives in zone 9 will not survive a zone 6 winter no matter how much you love it. Check your zone first, then filter every plant on your wish list through that lens. After that, match plants to your specific site conditions: sun exposure, soil drainage, and moisture availability.
Layering for visual structure
The beds that look best and are easiest to maintain use three layers: a tall background layer (shrubs or ornamental grasses, 3 to 6 feet), a mid-layer of perennials (1 to 3 feet), and a low edge layer of groundcovers or spreading perennials under 12 inches. This structure creates depth, controls weeds naturally as plants fill in, and gives you seasonal interest without constant replanting.
Low-maintenance plant choices by condition
| Condition | Groundcover (under 12 in) | Mid-layer perennial | Background shrub/grass |
|---|---|---|---|
| Full sun, dry | Creeping thyme or sedum | Coreopsis lanceolata (lance coreopsis) | Ornamental grass (Miscanthus or Little Bluestem) |
| Full sun, average moisture | Candytuft (8–12 in mounds) | Coneflower (Echinacea) | Arborvitae or native viburnum |
| Part shade, average moisture | Ajuga or sweet woodruff | Astilbe or native ferns | Oakleaf hydrangea or inkberry holly |
| Full shade, dry | Pachysandra or liriope | Hostas | Itea or native serviceberry |
For the lowest possible maintenance, lean heavily on established native perennials. Once rooted in after one to two seasons, natives like coreopsis and coneflower handle drought, crowd out opportunistic weeds, and come back reliably each year. Flowering and fruiting groundcovers are attractive but need more cleanup, so factor that in if you're going low-effort. Also keep spacing generous enough for air circulation: crowded plants in wet climates invite disease, and the time you save on watering gets eaten up by treating fungal problems.
Hardscape and finishing touches
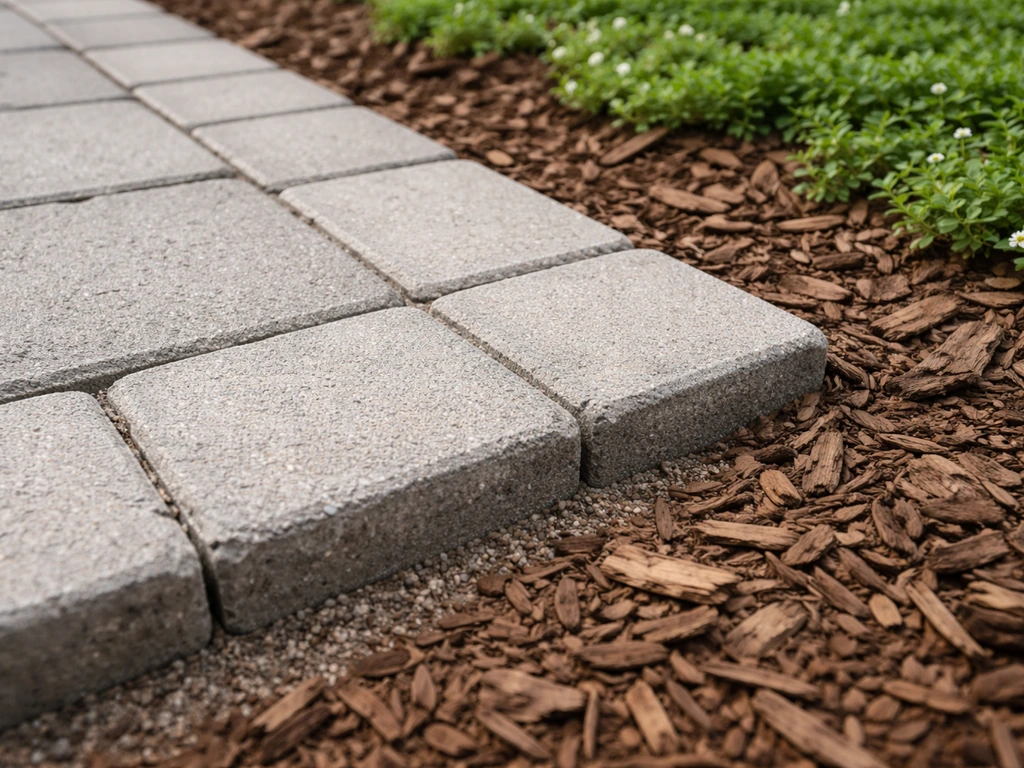
Edging is what separates a patio that looks designed from one that looks like it just happened. Concrete paver edging, sometimes called a soldier course, is durable and gives a clean visual line. Metal edging (steel, aluminum, or Corten steel) is sleeker for modern designs and handles curves better. Whatever you choose, edging keeps mulch in beds and lawn or gravel out, which directly reduces maintenance over time.
Mulch depth and groundcovers
Organic mulch like wood chips or bark should go down 3 to 4 inches deep. Inorganic mulch (gravel, decomposed granite) works at 2 to 3 inches. Both depths suppress weeds and retain soil moisture. Keep mulch a few inches away from plant stems and shrub trunks to prevent rot. Refresh organic mulch every one to two years as it breaks down. Gravel looks clean but be aware that in areas with heavy tree cover, raking leaves and debris out of gravel is genuinely tedious and becomes a maintenance burden that many people underestimate.
Focal points and visual anchors
Every patio landscape benefits from at least one clear focal point: a specimen plant, a large decorative pot, a water feature, or a fire pit area. Focal points give the eye somewhere to land and make the space feel intentional rather than scattered. If you're planning a fire pit or pizza oven in the patio space, that feature often becomes the natural focal point and can anchor the entire layout, with planting beds and pathways radiating outward from it. Symmetry isn't required, but repeated plant groupings or consistent container materials tie the space together visually.
Shade, comfort, and where to place your equipment
Plants and hardscape decisions directly affect where you can install patio covers, fans, misters, lighting, and speakers. Tall background shrubs or a pergola-trained vine on one side can reduce wind load and provide partial shade, but they also compete for the overhead space where a patio cover or ceiling fan would go. Think through both layers at the same time rather than designing them separately.
Shade structures
Attached pergolas, sail shades, and full patio covers work best when the landscaping around them doesn't block the attachment points or create combustible material too close to heaters. Patio heaters need a minimum of 7 feet of clearance from floor to unit and specific clearances from any combustible material on the sides and above, depending on the model. Evergreen shrubs planted too close to a propane or natural gas heater are a real safety concern, so check manufacturer clearance specs before you plant anything directly adjacent to a heater location.
Fans, misters, and speakers
Ceiling fans mounted on a pergola or covered patio work best in open, unobstructed airflow zones. Dense plantings directly upwind of a fan reduce its effectiveness. Misting systems need a clear perimeter to distribute properly and shouldn't be aimed at wood structures or planting beds where excess moisture creates fungal problems. For speakers, weather-resistant outdoor speakers should be mounted at ear level or angled down from above, and dense shrub plantings can actually help by reducing echo and creating a more acoustic-friendly environment. Just make sure speaker mounting surfaces are solid and accessible for occasional maintenance.
Lighting placement
Landscape lighting is easiest to install during the landscaping phase rather than retrofitting it later. Path lights along stepping stone routes, uplights at the base of specimen plants or focal point trees, and string lights on pergola or fence structures add nighttime dimension without adding maintenance. Solar path lights work fine in full-sun zones; wired low-voltage LED systems are more reliable in shaded areas or high-use zones where you want consistent output.
Budgeting and deciding what to DIY vs. hire out
Here's the honest breakdown: planting beds, container setups, mulching, pathway stepping stones, and basic edging are genuinely manageable DIY projects for most homeowners. A 300-square-foot patio project that would take a professional crew 35 to 40 hours will take a determined DIYer 40 to 50 hours, but you save significant labor cost. The tasks worth hiring out are grading and drainage work (mistakes here are expensive to fix), large hardscape installation requiring proper base compaction, and electrical work for lighting or permanent speaker wiring.
A phased plan that won't break the budget
- Phase 1: Hardscape foundation. Grade for drainage, install edging, lay any paver or stepping stone pathways. This is the most disruptive work and sets up everything else.
- Phase 2: Structural plantings. Install background shrubs and privacy screening plants first, since they take the longest to establish and mature.
- Phase 3: Mid-layer perennials and groundcovers. Fill in beds with your perennial selections and groundcovers, mulch to 3–4 inches, and install drip irrigation or soaker hoses if budget allows.
- Phase 4: Comfort and finishing. Add patio cover, ceiling fan, lighting, speakers, or misting system once plantings are in and zones are defined.
- Phase 5: Seasonal color and containers. Add containers and annual color once the permanent structure is established, adjusting each season without major expense.
How to vet a landscaping contractor
If you're hiring out any portion of this project, use this checklist before signing anything. The landscaping industry has a wide range of quality and a lot of one-truck operations that disappear after taking a deposit.
- Verify they carry general liability insurance and workers' comp, and ask for a certificate directly from their insurer, not just a copy they hand you
- Check their contractor license status with your state's licensing board, not just their word that they're licensed
- Ask for three references from projects completed in the last 12 months and actually call them
- Get itemized written quotes from at least two contractors, broken down by materials, labor, grading, and drainage separately so you can compare line by line
- Ask specifically about plant warranties: reputable landscapers typically guarantee plants for one growing season
- Clarify who pulls permits if grading, drainage, or electrical work is involved, it should be the contractor, not you
- Avoid any contractor who asks for more than 25 to 30 percent upfront, or who quotes a suspiciously low number without a detailed scope of work
Your pre-project checklist
- Measure the patio and surrounding planting area accurately, noting door locations, existing hardscape, and utility lines
- Identify your USDA hardiness zone and note any microclimates (frost pockets, reflected heat from walls, wind corridors)
- Complete the soil compaction probe test at 8–10 spots and do a percolation drainage test in at least two locations
- Sketch the traffic flow: mark the 36-inch clearance lane from door to yard, and identify where cooking, dining, and lounging zones will sit
- List your three to five must-have plants or materials, then cross-check each against your hardiness zone and site conditions
- Decide which phases you'll DIY and which you'll hire, then get quotes before finalizing your plant and material choices
- Plan lighting and any equipment rough-in (conduit, water lines for misters) during phase 1 so it's not an expensive retrofit later
Patio landscaping done right feels like an extension of the house, not an afterthought bolted on after the fact. The patios that end up on people's wish lists, the ones you see connected to a pool edge, anchored by a fire pit, or built around an outdoor kitchen, all got there through the same basic process: purpose first, site conditions second, plants and materials third. Many homeowners start by planning the space that flows best from the pool edge, because the best patio around pool should feel cohesive, comfortable to walk on, and easy to maintain. For more specifics on choosing the best fire pit patio setup, review size, fuel type, clearances, and seating layout. Start there and the rest of the decisions get a lot easier.
FAQ
How do I choose the right plant palette if my patio has both sun and shade zones?
Treat it like two separate microclimates, group plants by sun tolerance, then place the most tender or shade-only plants in the consistently shaded lane. Before buying, map sun for at least three time blocks (morning, early afternoon, late afternoon) and label the zones on a simple sketch so you do not “mix” requirements within the same bed.
What spacing rule should I follow so the “best patio landscaping” look stays full, but doesn’t cause disease?
Use mature-size spacing, not nursery spacing. In wet or humid regions, increase spacing slightly from the label guidance to improve airflow, and avoid planting tall background plants directly next to low edge groundcovers, which often traps moisture at the crown.
Can I use gravel or decomposed granite as a weed solution, and will it ruin my plants?
It can work, but only if the plants are in separate soil beds with proper edging. Use edging to stop gravel from washing into planting areas, and if you mulch near plants, keep gravel surfaces distinct from the mulch ring around stems (a few inches gap) to reduce rot and overheating.
What if my patio beds sit on top of compacted soil from construction, how long should I wait after drainage fixes?
After grading or drainage improvements, allow the area to settle and test drainage again with the percolation hole. If water behavior changes after a heavy rainfall, redo the surface grading or add supplemental drainage before planting, since establishing roots into a “temporary” drainage problem often fails within one season.
How thick should I build up soil for raised in-ground beds versus standard planting beds?
Raised beds generally need more imported topsoil to reach a workable rooting depth, while standard beds rely on improving native soil (and fixing compaction first). As a practical step, aim for enough depth to match the plants’ typical root zone and ensure you can still maintain a clear slope away from the house for drainage.
Is it better to install drip irrigation or sprinklers for patio landscaping?
Most patio landscaping ends up better with drip irrigation because it targets the root zone, reduces leaf wetness, and pairs well with mulch. Sprinklers can still work for certain lawns or broad turf edges, but for mixed beds and containers, drip plus simple controller zones usually keeps maintenance lower and disease risk down.
How do I prevent mulch from piling against plant stems on patios with heavy foot traffic?
Create a mulch “donut” around each plant by leaving a small air gap at the crown and using edging to confine material. If you have frequent walking near beds, consider lower, more durable edging materials (like soldier course pavers) so people do not displace mulch every week.
What’s the fastest way to test whether my patio drainage is a grading problem or a soil infiltration problem?
Do a short drain test after a thorough soak. If water pools in the same spot regardless of where you pour water nearby, the issue is likely infiltration or compacted layers. If pooling shifts with small surface changes, it is probably grading, and adjusting slope or adding a small catch basin can fix it before you dig deeper.
How should I design stepping stone paths so guests do not shortcut through beds?
Align the path with actual movement lines from doors to seating and from seating to the grill, then widen “decision points” (turns and thresholds) so people naturally step onto stones. Dry-lay and walk the route in shoes you use outdoors, then finalize spacing where steps feel consistent rather than where stones look symmetrical.
What should I consider before planting shrubs for privacy near patio lighting or security lights?
Check mature size, but also the light direction. Dense shrubs can block light and create dark corners, so leave a sightline gap where cameras and motion sensors need coverage, and prune to keep the lower canopy from absorbing light right at sensor height.
Can I install a fire pit or pizza oven as a focal point without destroying my landscaping layout?
Yes, but start by placing the heat source first, then design planting around clearances and airflow. Keep combustible plants and mulched edges farther back than you think, and do not locate tall shrubs where you will need future access for cleaning, fuel supply, or safety inspections.
When should I hire out electrical work for patio landscaping lighting or speakers?
Hire it when wiring becomes permanent (low-voltage transformers in fixed locations, conduit runs, or anything tied into your home panel). DIY is usually fine for plug-in lighting systems, but for buried cable paths under hardscape or for integrating with controls, a pro reduces the risk of future troubleshooting and water intrusion.
What’s a realistic DIY versus pro split for the “best patio landscaping” approach?
DIY is most efficient for layout, planting, mulching, edging, and container work. Hire grading, drainage corrections, and any base compaction for pavers or stonework, because small errors there cause settlement and water pooling that are expensive to fix after the plants fill in.
How can I avoid buying plants that look good in photos but are too messy for patios?
Ask two practical questions before purchase: “What’s the annual cleanup?” (seed heads, leaf drop, fruit mess) and “What’s the worst season?” Many natives and ornamentals are low-maintenance, but patio-adjacent choices still need to account for wind-blown debris, sticky sap, and thorny stems near seating.