
The best patio garden combines a clear site read (sun hours, drainage, load limits) with the right layout for your space, a decent soil recipe, and irrigation that actually works for your climate. Get those four things right and almost everything else, from plant selection to maintenance, follows naturally. Skip any one of them and you will be fighting the garden instead of enjoying it. For more design ideas and examples, see our guide to the best patio landscaping for practical layouts, plant lists, and budget tiers.
Best Patio Garden Guide: Plan, Build & Maintain with Costs

Elise Prescott
13 Jul 2026
Quick-Read Decision Checklist Before You Spend a Dollar
Work through this list before buying a single bag of soil or a single container. It takes about 20 minutes and saves weeks of rework.
- Layout: Decide between containers, raised beds, in-ground planters, built planters, or a vertical wall system. Your surface type (concrete slab, wood deck, pavers, rooftop) narrows the choice immediately.
- Exposure: Count actual sun hours at your specific patio location, not a general guess. Note prevailing wind direction and any shade cast by the house, fencing, or neighboring structures at different times of day.
- Budget: Set a realistic range before looking at products. Rough tiers are $500–$2,000 for a solid container garden setup, $2,000–$8,000 for a raised-bed or built-planter install, and $8,000–$25,000+ for a full hardscape-integrated garden with irrigation, pergola shade, and professional planting.
- Timeline: Container gardens can be functional in a weekend. Raised beds with irrigation take 2–4 weekends DIY or 1–2 weeks with a crew. Permitted structural work (built planters on a deck, rooftop gardens) can run 4–12 weeks including permit approval.
- DIY or hire: If your project involves structural modifications, rooftop loads, new irrigation hookups with backflow prevention, or permitted electrical for lighting, hire a licensed professional for those specific scopes even if you DIY the planting work.
- Permits: Check with your local building department. Raised structures, deck modifications, plumbing tie-ins, and any work on a rooftop typically require permits in most U.S. jurisdictions.
- Maintenance commitment: Decide honestly how many hours per week you will spend on the garden. Containers in hot climates need watering daily in summer; drip irrigation with an EPA WaterSense-qualified smart controller closes that gap significantly.
Goals, Scale and the DIY vs. Hire Decision
Most homeowners want one of three things from a patio garden: food production (herbs, vegetables, fruit), visual beauty and privacy (screening plants, seasonal color, evergreen structure), or a combined outdoor living room that blends greenery with comfortable seating and climate control. Your goal determines how intensive the project gets. A kitchen herb garden in four large containers is a weekend project. A rooftop terrace with built planters, an automated drip system, and a pergola overhead is a multi-week, multi-trade job.
Scale matters for budget and for structural reasons. Container gardens on a ground-level concrete slab have almost no load concerns. The same containers moved to a wood deck or a second-floor balcony immediately raise structural questions you need answered before you add weight. A good rule of thumb: if your project adds more than 20–25 psf of dead load to a deck or balcony, or if you are placing any planters on a roof, get a structural assessment first. The cost of an engineer's review ($300–$800 in most markets) is trivial compared to the cost of a structural failure or a failed insurance claim.
DIY is realistic for container setups, simple raised beds on grade, self-watering planter installs, and basic drip irrigation. Hire a pro, or at minimum hire out specific scopes, when the work involves: cutting or adding to an existing deck frame, any rooftop garden over an occupied space, new plumbing connections to a municipal supply (backflow prevention requirements vary by state and utility), permitted retaining or built-planter walls over 30 inches, and tree or large shrub planting adjacent to foundations or underground utilities.
Site Assessment: Sun, Shade, Wind, Microclimates and Drainage
Walk your patio at 8 a.m., noon, and 4 p.m. on a clear day and photograph the shadows. Count the hours of direct sun hitting the area where you plan to garden. Under 4 hours is shade, 4–6 hours is part-shade/part-sun, and 6+ hours is full sun. Most edibles need 6–8 hours. This single measurement eliminates half the plant selection questions right away.
Wind is the factor most homeowners underestimate. A rooftop terrace or a patio on a corner of the house can experience wind speeds 20–30% higher than a sheltered backyard at the same address. Exposed west-facing patios in the Plains states, elevated decks in the Mountain West, and oceanfront properties on both coasts all need wind-resistant planting strategies: lower-growing plants, heavier containers that will not tip, and windscreen structures or hedges as a first line of defense.
Drainage and slope need to be confirmed before you place a single raised bed. The ideal patio surface drains at least 1–2% slope away from the house. Standing water under or around planters creates rot, mosquito habitat, and in freeze-thaw climates it accelerates hardscape damage. For in-ground planting adjacent to a patio, dig a 12-inch test hole, fill it with water, and see how long it takes to drain. If it takes more than 24 hours, you are looking at clay-dominant or compacted soil, and raised beds or above-grade planters become the practical choice.
Soil type also matters for any in-ground planting at patio edges. Sandy soils drain fast and need more irrigation and organic matter. Heavy clay needs amendment (gypsum, compost, coarse organic matter) or you skip in-ground planting entirely and go raised. In arid regions like the Southwest, caliche layers can sit as shallow as 12–18 inches below grade and block root growth completely. A simple soil probe or a 12-inch diameter hole dug to 24 inches will reveal what you are working with.
Structural Assessment and Load Limits
This section is the one most DIY guides skip, and it is the one that matters most for safety and insurance. Soil is heavy. A single large planter filled with standard potting mix can weigh 80–200 pounds. Multiply that by six planters on a second-story deck and you are adding 500–1,200 pounds of dead load to a structure that may have been designed primarily for people and furniture.
The 2018 IBC and IRC design rule for decks and balconies requires a design live load equal to 1.5 times the live load of the area served, with a minimum of 60 psf and a maximum of 100 psf. In practice, most residential wood decks are designed for 40–60 psf total load including dead load. Wet soil and planter materials can push saturated substrate weights to 100–120 lb/ft3 (roughly 1,600–1,920 kg/m3 for mineral growing media). An 8 cm deep substrate system weighs approximately 20.7 lb/ft2 saturated; a 10 cm system about 25.2 lb/ft2. These numbers add up fast when you cover even a modest 100 sq ft of deck with planters.
For rooftop gardens and green roof applications, the governing standards are ASTM E2397 (for determining dead and live loads of vegetative roof systems) and ANSI/SPRI VF-1. The Whole Building Design Guide recommends treating both retained water and substrate as dead loads and designing the roof structure accordingly. FM Global Data Sheet 1-35 adds insurer requirements: root-resistant membranes or root barriers, a protection board above the membrane, plant-free zones of roughly 50 cm around penetrations and perimeters, and wind-uplift consideration above 150 feet.
Practically, here is the workflow for any elevated or rooftop garden: hire a structural engineer to confirm allowable dead load for the surface, get the manufacturer's weight specs for your growing media in saturated condition (using ASTM E2399 test data from the supplier is far better than generic averages), confirm the membrane manufacturer's vegetative-roof warranty requirements before placing anything on it, and check whether your homeowner's insurance requires FM Global-compliant assemblies. Skipping any of these steps can void your roof warranty and create an uninsured liability.
For ground-level patios, the structural question shifts to soil pressure on footings and pavers when placing heavy built planters directly on a slab. Typical concrete patio slabs are 3.5–4 inches thick and designed for uniform loads, not concentrated point loads. A large built stone planter concentrated on one corner of an unreinforced slab can cause cracking. Distribute weight with a compacted gravel base or, for very heavy planters, get a concrete contractor to confirm the slab can handle it.
Layout Options: Containers, Raised Beds, In-Ground, Built Planters and Vertical Walls
Each layout type has a practical use case, a cost range, and a set of tradeoffs. The right choice usually depends on your surface type, budget, and how permanent you want the installation to feel.
| Layout Type | Best Surface | Typical Cost Range | Structural Risk | Flexibility | Best For |
|---|---|---|---|---|---|
| Container Garden | Any (concrete, deck, pavers) | $200–$2,000 | Low (per-pot weight check only) | High (movable) | Herbs, annuals, small vegetables, renters |
| Raised Beds (freestanding) | Ground level, pavers, concrete | $300–$3,000 | Low to moderate | Medium (semi-permanent) | Vegetables, perennials, cutting gardens |
| In-Ground Planters (at patio edge) | Adjacent to slab/pavers | $500–$5,000+ with hardscape | Low (grade level) | Low (permanent) | Screening plants, foundation planting, trees |
| Built/Masonry Planters | Concrete slab, grade | $1,500–$10,000+ | Moderate (concentrated load check needed) | Very low (permanent) | Architectural features, formal gardens, privacy walls |
| Vertical Wall Systems | Any wall/fence surface | $400–$4,000 | Low to moderate (wall anchor loads) | Medium | Small spaces, herbs, ferns, ornamentals, balconies |
Containers are the most forgiving entry point. The key sizing rules from extension research: herbs and greens need a minimum 1–5 gallon container, fruiting vegetables like peppers and determinate tomatoes need 5–10+ gallons, and indeterminate tomatoes or dwarf fruit trees need 15–20+ gallons with at least 18–24 inches of depth. Undersized containers are the single most common reason container vegetable gardens underperform.
Raised beds on grade offer a middle ground between containers and in-ground planting. A standard 4x8 foot raised bed at 12 inches depth holds about 32 cubic feet of growing media, which weighs roughly 2,000–2,400 lbs saturated, so they stay on grade-level surfaces only. For deck placement, fill depth must be reduced and the weight confirmed against the deck's structural capacity before building.
Vertical wall systems work especially well on small balconies and narrow urban patios where floor space is genuinely scarce. They need reliable irrigation (drip or self-watering modules) because vertical pocket planters dry out extremely fast in sun. Anchor loads are modest, but the wall or fence must be able to support 5–15 lbs per linear foot of fully saturated panel, so confirm anchor points before installation.
Design Templates and Space Planning by Patio Size
Small Balconies (Under 80 sq ft)
The priority is vertical space and lightweight media. Use fabric grow bags (significantly lighter than ceramic or concrete pots), a wall-mounted herb planter on the railing, and one or two larger containers for focal ornamentals. A self-watering reservoir system almost eliminates daily watering. Stick to plants under 3 feet tall to avoid shade and wind-catch issues on upper-floor balconies. Good candidates: lettuce, basil, cherry tomatoes in a 15-gallon bag, compact peppers, and trailing sweet potato vine for visual fullness.
Mid-Size Patios (80–300 sq ft)
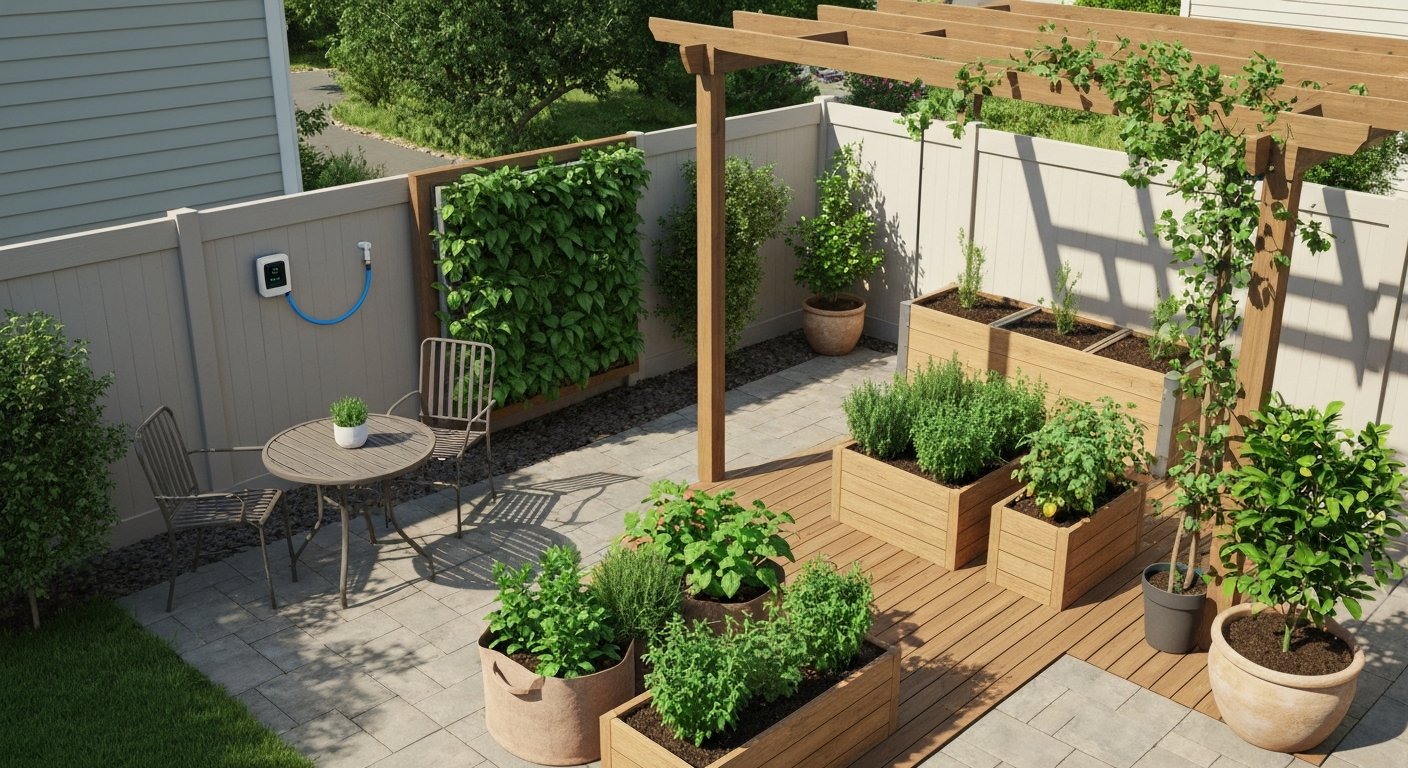
This is the most common patio footprint and it gives you real design options. A proven layout: define a seating zone first (leave at least a 10x10 foot clear area), then build the garden around the perimeter in containers or freestanding raised beds. One 4x4 or 4x8 raised bed, supplemented by 4–6 large containers and a vertical planter on the back fence or wall, covers both food production and ornamental goals without overwhelming the space. A simple drip system with a battery-powered timer adds $80–$200 and removes most of the daily maintenance burden.
Large Terraces and Pool-Adjacent Layouts (300+ sq ft)
At this scale, you can genuinely integrate hardscape and planted zones in a way that feels designed rather than assembled. Define distinct zones: cooking/dining, lounge, and garden/planting. Built-in planters along retaining walls or property edges give structure and permanence. Near a pool, plant selection needs to account for chlorine splash, reflected heat from the water and deck, and root proximity to pool plumbing. Stick to non-invasive root systems, avoid plants that drop excessive leaf litter into water, and maintain at least a 3–5 foot setback for any large shrubs or trees from the pool edge. For a deeper look at poolside planting strategies, the best patio around pool topic covers those specifics in detail. Drip irrigation zoned separately from any lawn irrigation is essential at this scale.
Materials and Structures Compatibility
Not every planter, raised bed, or planting scheme works with every patio surface or structure. Here is the compatibility picture at a practical level.
| Surface/Structure | Container Garden | Raised Beds | Built Planters | Drip Irrigation | Key Concern |
|---|---|---|---|---|---|
| Concrete slab (ground level) | Yes | Yes (check weight for large beds) | Yes (check concentrated load) | Yes | Drainage slope; avoid standing water under planters |
| Clay/concrete pavers | Yes | Yes (on grade) | Yes with base prep | Yes | Paver heaving under heavy planters in freeze-thaw climates |
| Composite decking | Yes (check joist load) | Lightweight only; 4–6 in max media depth | Not recommended without structural review | Yes | Moisture under planters degrades decking; use planter feet/spacers |
| Wood deck | Yes (check joist load) | Lightweight only | Not recommended without engineer sign-off | Yes | Wood rot under planters; weight distribution critical |
| Pergola/overhead cover | Hanging baskets only (anchor rated) | N/A | N/A | Yes (drip from overhead) | Anchor load ratings; wind sway with large baskets |
| Rooftop/flat membrane roof | Yes (use lightweight media, confirm load) | Only with structural engineer approval | Only with engineer + membrane warranty compliance | Yes (critical) | ASTM E2397 load calcs; root barrier; membrane warranty; FM Global requirements |
On wood decks and composite decking, always use planter feet or risers to create an air gap. This prevents moisture trapping and dramatically extends the life of the decking material beneath. Composite decking is particularly vulnerable to sustained moisture and organic debris contact. A simple rubber or plastic riser set under each planter costs almost nothing and prevents expensive board replacement.
Pergolas and patio covers open up overhead gardening options (hanging baskets, mounted vertical planters, trained vines) but introduce wind-load and structural-anchor questions. Most residential pergolas are designed for furniture and human loads, not for large planted systems. Before training a wisteria or climbing rose over a pergola, confirm that the structure can handle the mature weight. A mature wisteria on a 10x12 pergola can weigh 200–400 lbs. That is worth a quick check with a carpenter or contractor.
Soil, Media and Planter Recipes That Actually Perform
The wrong growing media is the most common reason a patio garden struggles. Garden soil dug from the ground is almost always wrong for containers and raised beds. It compacts, drains poorly, and can introduce pests and weeds. Here is what actually works.
Container and Raised Bed Mix
The most reliable all-purpose recipe from land-grant extension research is a 1:1:1 ratio by volume of compost, peat moss or coco coir, and perlite or coarse vermiculite. A 2:1:1 variant (2 parts compost, 1 part peat/coir, 1 part perlite) works well for raised beds where you want more nutrient retention. Target media pH between 5.5 and 7.0 for most vegetables and ornamentals. Physically, the mix should have 10–20% air space and 40–60% volumetric water content when moistened. A simple squeeze test tells you: a fistful of moist media should hold together when squeezed but fall apart when dropped. If it stays in a wet ball, drainage is poor.
Before using bulk compost, especially for food production or rooftop installations, test it for soluble salts and contaminants. High soluble salts are a common problem with poorly composted or municipal biosolid blends and will visibly burn plant roots within weeks of planting. Extension labs in most states test compost samples for $15–$40.
In-Ground Amendments for Patio-Adjacent Planting
For in-ground planting at the patio edge, start with a soil test from your county extension service ($10–$20). Sandy soils need 3–4 inches of compost tilled in to 12 inches and benefit from water-retentive amendments. Clay soils need coarse organic matter, gypsum (for calcium-deficient clays), and ideally a French drain or perforated pipe at the planting zone if slope drainage is inadequate. Do not add pure sand to clay, a common mistake that creates a concrete-like mix without significantly improving drainage.
Weight and Load Calculations for Planters and Potted Trees
This is critical for any elevated surface. Dry potting mix (engineered container media) typically has a bulk density around 0. Use laboratory oven‑dry bulk‑density together with measured moisture content to compute wet/saturated unit weight for load estimates, and prefer site soil tests or ASTM test methods rather than generic averages for structural planning Typical mineral soil dry bulk density ranges about 1.10–1.40 g/cm3 (≈68.5–87.1 lb/ft3).. 3–0.5 g/cm3 when dry, substantially lighter than mineral soil. However, saturated growing media in a large container can still weigh significantly more than you expect. As a working estimate: a 15-gallon container (roughly 2 cubic feet of media) with saturated lightweight perlite-heavy mix weighs approximately 40–60 lbs total with the pot. A 25-gallon ceramic pot with standard potting mix and a mature plant can weigh 150–200 lbs saturated. For structural planning on decks and balconies, always use saturated weight, not dry weight. Group planters near deck beams and posts, not at midspan between joists, to distribute load to the strongest points of the structure.
Root containment is a separate issue from weight. Trees and large shrubs in pots on decks or membraned surfaces need root barriers, either built into the planter lining or as a separate geotextile layer, to prevent root penetration of membranes and composite decking. Citrus, olive, and dwarf apple trees commonly planted in patio containers can produce root systems aggressive enough to damage roofing membranes within 3–5 years if uncontained. Use a rigid root barrier rated for long-term root resistance, not just a basic landscape fabric.
Drainage Design for Planters
Every planter needs adequate drainage holes sized to prevent standing water. For most manufactured containers, standard hole diameters of 1/2 to 1 inch (or multiple 1/4 to 3/8 inch holes) provide sufficient drainage in normal rain events. Built planters on a membrane or deck surface also need a high-level overflow outlet sized to handle intense local storm events without surcharging water onto the deck or membrane. In high-rainfall regions (Pacific Northwest, Gulf Coast), this overflow protection is not optional. A gravel layer at the planter base improves drainage flow to outlets but does not compensate for undersized or blocked drain holes.
Plant Selection by Climate Zone
Plant lists are where regional differences really bite people. A recommendation that works perfectly in coastal Southern California is a waste of money in Minnesota and may barely survive a Phoenix summer. Here are zone-specific starting points based on USDA hardiness zones and climate type.
| Climate Region | USDA Zones | Reliable Edibles | Ornamentals/Structure | Key Challenge |
|---|---|---|---|---|
| Pacific Northwest (coastal) | 7b–9b | Kale, chard, lettuce, herbs, blueberries | Japanese maple, ferns, heuchera, hydrangea | Low summer sun, cool temps, slugs |
| California (coastal/Mediterranean) | 9a–11a | Tomatoes, peppers, citrus, herbs, strawberries | Lavender, rosemary, bougainvillea, agave | Drought, water restrictions, fire season |
| Southwest (arid/desert) | 8b–11b | Herbs, peppers, figs, pomegranate, native greens | Agave, palo verde, lantana, desert marigold | Extreme heat, caliche soil, water cost |
| Great Plains / Midwest | 5a–7a | Tomatoes, beans, herbs, squash | Black-eyed Susan, coneflower, ornamental grasses | Wind, wide temp swings, clay or sandy soils |
| Southeast (humid subtropical) | 7b–10a | Herbs, peppers, sweet potato, figs, greens | Encore azalea, camellia, banana, ornamental grasses | Humidity, fungal disease, heat stress |
| Northeast / Mid-Atlantic | 5b–7b | Tomatoes, herbs, greens, beans, strawberries | Boxwood, ornamental grasses, coneflower, rudbeckia | Short season, late frost, deer pressure |
| Mountain West (high altitude) | 4b–7a | Short-season tomatoes, herbs, kale, root vegetables | Native grasses, sedum, yarrow, penstemon | Late spring frost, UV intensity, dry air |
For edible gardens, the most reliable patio performers across almost all U.S. climates are basil (full sun, warm season), cherry tomatoes in containers 15 gallons or larger, bush beans, lettuce and spinach for cool-season gaps, and sweet peppers. Herbs like rosemary, thyme, and oregano are especially forgiving in containers and need very little irrigation once established.
Irrigation and Water Management
Watering by hand is fine for 4–6 containers. Beyond that, a simple drip system pays for itself in plant health and time saved within a single growing season. The basics: point emitters deliver 0.25–2.0 GPH per emitter, operating at 5–60 psi (pressure-compensating emitters work well at the lower end of that range and are highly recommended for uneven terrain or rooftop installations where pressure varies). Line-source drip tape runs at roughly 0.1–2 GPH per 100 feet depending on emitter spacing.
Any irrigation connected to a municipal water supply requires an approved backflow preventer under most U.S. plumbing codes. The device type (pressure vacuum breaker, double-check valve, reduced pressure zone) depends on your local code and the nature of the water source. Do not skip this. Municipal utilities can and do fine homeowners for non-compliant irrigation hookups, and the device itself costs $20–$150 at most hardware stores.
For water efficiency, an EPA WaterSense-qualified smart controller (weather-based or soil-moisture/ET-based) can cut outdoor water use significantly and satisfies the requirements for most municipal rebate programs. In arid climates like the Southwest and California, these controllers often pay back their $80–$250 cost within one or two seasons through reduced water bills. Pair them with a soil moisture sensor for container zones where evapotranspiration estimates alone can be inaccurate.
Climate Control and Comfort: Shade, Misting, Fans and Heaters
The most ambitious patio garden fails if nobody wants to spend time on the patio because it is too hot, too cold, or too bright. Climate control and plant health are actually aligned goals on most patios, because the same shade structure that makes you comfortable also protects cool-season herbs from bolting and tender tropicals from leaf scorch.
In hot, dry climates, a high-pressure misting system (1,000 psi, 10–15 micron droplet size) can drop ambient temperatures by 15–25°F in the misting zone and raises humidity enough to benefit tropical plants and Mediterranean herbs during extreme heat events. In humid climates (Southeast, Gulf Coast), high-pressure misting is generally counterproductive since the ambient humidity is already high. In those regions, outdoor ceiling fans, shade sails, and pergolas with slatted or louvered roofs provide comfort without adding moisture.
For shoulder-season comfort in northern climates, infrared patio heaters mounted on a pergola or under a patio cover extend the garden season by 4–8 weeks in the spring and fall. Position heaters where they do not directly blast foliage for extended periods, as intense radiant heat directed at plants within 18–24 inches can cause tip burn on tender greens and herbs.
Feature Integration: Fire Pits, Pizza Ovens, Lighting and Hardscape Transitions
A patio garden does not exist in isolation. It interacts with every other feature on the patio, and the integration decisions matter more than most homeowners realize until something goes wrong. Fire features and plants need clear separation: the National Fire Protection Association and most local codes require at least 10 feet of clearance between an open fire feature and combustible structures or dense plantings. On a small patio this means the garden zones and fire zone need to be deliberately separated in the layout, not improvised after installation. If you are planning a fire pit alongside your garden, the best fire pit patio topic covers that spatial planning and code compliance in detail.
Pizza ovens introduce similar fire-safety considerations but also add a productive dimension to an edible patio garden. Herbs and vegetables grown steps away from a wood-fired oven make for a genuinely functional kitchen garden. The structural and clearance requirements for built-in pizza ovens are significant, particularly regarding substrate weight on decks and chimney clearance from pergolas and plant material. For those specifics, the best patio pizza oven topic covers the installation requirements thoroughly.
Lighting in the garden zone should be low-voltage LED path lights, uplights at planter bases, or string lights on the pergola overhead. Avoid high-lumen spotlights directed at plants for more than 12 hours, as extended artificial light exposure disrupts flowering cycles in short-day plants like chrysanthemums and some peppers. For hardscape transitions between the planting zones and seating areas, a consistent edging material (steel edging, stone border, or a flush paver row in a contrasting color) creates visual clarity and prevents mulch or soil migration onto patio surfaces.
Maintenance, Pest Management, Accessibility and Safety
Container and raised-bed gardens need more frequent fertilization than in-ground planting because irrigation water leaches nutrients faster. A liquid fertilizer applied every 2–3 weeks during the growing season, or a slow-release granular fertilizer at planting and mid-season, handles most container gardens adequately. Raised beds benefit from a 1–2 inch compost top-dress each spring.
Pest management on patio gardens is mostly about early detection and physical barriers. Aphids, spider mites, and whitefly are the most common container garden pests in most U.S. climates. Insecticidal soap spray (1 tablespoon of pure castile soap per quart of water) handles most soft-bodied insect infestations on edibles without residue concerns. Japanese beetle pressure in the Midwest and Mid-Atlantic regions may require Neem oil treatment or hand-picking. Slugs are a persistent problem in Pacific Northwest and Southeast humid gardens; copper tape around raised bed edges and diatomaceous earth applied to the soil surface are the most reliable non-toxic controls.
Accessibility matters if any household member uses a mobility aid or has limited bending capacity. Raise beds to 24–30 inches for comfortable standing or seated gardening. Ensure pathways between containers are at least 36 inches wide (48 inches is better for wheelchair access). Container weight is a safety consideration too: large pots that need regular repositioning should have locking casters rated for their saturated weight, or they should simply stay put.
Fire safety in the context of patio gardens is relevant if you are in a wildfire-prone region (California, Colorado, Pacific Northwest, Southwest). Zone 0 and Zone 1 of defensible space guidelines from CAL FIRE and similar state agencies apply to plant material within 5 and 30 feet of the structure respectively. This means no highly flammable ornamentals like juniper or ornamental grasses within the immediate structure zone, even in containers. Choose fire-resistant plants (lavender, ice plant, yarrow, and most succulents) for plantings close to the house.
Budget Tiers and Realistic Cost Ranges
| Tier | Scope | Estimated DIY Cost | Estimated Installed Cost (Pro) | What You Get |
|---|---|---|---|---|
| Starter ($) | 4–6 containers, basic potting mix, hand watering | $200–$600 | $500–$1,200 | Herb garden, seasonal annuals, small edible setup |
| Mid-range ($$) | Raised bed(s), drip irrigation, smart controller, pergola shade sail | $1,000–$3,500 | $3,000–$8,000 | Productive food garden, comfortable seating zone, automated watering |
| Premium ($$$) | Built planters, full drip system with zones, pergola or patio cover, lighting, misting | $4,000–$10,000 | $10,000–$25,000+ | Integrated design, year-round use, full climate control |
| Structural/Rooftop ($$$$) | Engineered green roof or rooftop terrace with structural review, membrane protection, drainage composite | $15,000–$50,000+ | $25,000–$100,000+ | Full rooftop garden with engineered systems, permits, professional design |
The biggest variable in professional installation costs is labor rate by region. A landscape contractor in San Francisco or New York City charges 40–60% more per hour than one in the Midwest or South. Get at least three bids for any project over $3,000, and ask each contractor to break out material and labor separately so you can make an informed comparison.
Step-by-Step DIY Workflow for a Mid-Size Patio Garden
- Complete the site assessment: measure sun hours, note drainage direction, confirm patio surface type and any elevated load concerns.
- Set the layout: mark container positions with chalk or stakes before buying anything. Verify traffic flow and seating clearance.
- Select containers and raised beds: choose sizes appropriate for intended plants (see container sizing guide above). Order 10–15% more growing media than your calculated volume to account for settling.
- Mix or purchase growing media: use the 1:1:1 compost/peat-coir/perlite recipe or a quality bagged container mix rated for vegetables if growing edibles. Avoid pure topsoil in containers.
- Install drainage: confirm drain holes are present and clear. Add planter feet or risers on deck and composite surfaces.
- Install drip irrigation: run main supply line, add emitters at plant locations (0.5–1 GPH for small containers, 1–2 GPH for large containers and raised beds), install backflow preventer at supply connection, install battery timer or smart controller.
- Plant: install plants at correct depth, water in thoroughly, apply 1–2 inches of mulch to raised beds and top of large containers to reduce evaporation.
- Set fertilization schedule: apply liquid fertilizer at half strength the first two weeks, then full-label rate every 2–3 weeks during active growth.
- Monitor for the first two weeks: check soil moisture daily, watch for drainage issues, adjust emitter rates if plants show drought or overwatering stress.
- Seasonal transition: in cold climates, protect containers from hard freezes (move tender plants inside or to a garage, drain irrigation lines before first freeze).
Hiring a Contractor: What to Ask and What to Expect
For any project that goes beyond basic container placement, knowing how to evaluate a contractor separates a smooth project from a frustrating one. The landscape and patio garden space has low barriers to entry, so credentials and references matter more than a polished website.
- Ask for proof of a contractor's license and general liability insurance before signing anything. In most states, landscape contractors doing structural work (built planters, walls, decking modifications) require a general contractor license.
- Confirm who pulls the permits. The licensed contractor should pull all permits, not ask you to do it. If they suggest you pull permits to save money, that is a red flag.
- Understand the subcontractor chain. A landscape project involving irrigation, electrical for lighting, and structural work typically involves 2–3 licensed subcontractors (plumber for backflow preventer and irrigation tie-in, electrician for lighting, carpenter or structural contractor for deck modifications). Ask who they are and verify their licenses.
- Get an itemized written contract with material specs, quantities, and a payment schedule tied to milestones, not arbitrary dates.
- Ask for a maintenance plan and a planting warranty (typically 1 year for plants, 1–3 years for hardscape materials is standard in the industry). Clarify what voids the plant warranty (drought, homeowner errors).
- Request references from projects of similar scope completed within the last two years. Actually call them.
- Discuss water source and irrigation compliance. A responsible contractor proactively confirms backflow prevention and local irrigation ordinance compliance before starting.
- For patio landscaping questions that go beyond the garden itself, including planting at the hardscape edge and coordinating plant selections with the broader yard, the best patio landscaping topic provides expanded guidance on working with landscapers and coordinating design across the full outdoor space.
Permit timelines vary widely. A simple residential raised-bed project with no structural or plumbing work often needs no permit at all. A project adding new plumbing, modifying a deck, or building masonry planter walls over 30 inches typically requires permits and inspections, and approval timelines range from 1–2 weeks in small municipalities to 6–12 weeks in large urban jurisdictions. Build that timeline into your project planning, especially if you are targeting a spring planting date.
FAQ
How do I start a site assessment for the best patio garden?
Measure sun exposure (morning/afternoon, seasonal changes) in each patio zone for at least a week; map soil type, depth to structural deck or roof, surface drainage paths, and existing utilities. Test soil pH, texture and organic matter (home kit or lab) if planting in-ground or large beds. Check load capacity for patios, decks or roofs: for occupied roof gardens use IBC/ASCE guidance (design live loads 60–100 psf as applicable) and consult structural engineer if adding saturated media, heavy planters, or hardscape. Note microclimate factors (wind, reflected heat, frost pockets) and access for water/electric, maintenance, and plant replacement.
What structural checks and load numbers should I use for rooftop or deck planters?
Use ASTM E2397/E2399 guidance or manufacturer lab data to estimate saturated substrate unit weight (typical saturated media ≈100–120 lb/ft3 for engineered mixes). Convert substrate depth to areal load (e.g., 8 cm ≈20.7 lb/ft2). Add dead loads for planters, pavers, furniture and people. Apply local code/IBC/ASCE deck rules (live loads typically 60–100 psf) and FM Global if insurance matters. If total anticipated load approaches 50% of design capacity or you’re unsure, hire a structural engineer and obtain signed calculations before installing heavy features or large contiguous soil areas.
Which layout options are best for small and large patios?
Small patios: containers, railing planters, vertical walls, tiered shelving and hanging baskets to maximize plant area without heavy loads. Medium patios: combination of large containers (10–20+ gal), raised beds (12–18 in depth), and modular planters; integrate seating and paths. Large patios or roof decks: engineered planters, extensive green‑roof systems with drainage composites, pavers over pedestals to allow drainage, and in‑ground planting where permitted. For pool‑adjacent patios use root‑resistant planters and non‑shedding plants; for edible zones prioritize accessible raised beds or self‑watering containers.
How do I choose plants by sun/shade and climate zones?
Group plants by full‑sun (6+ hrs), part‑sun/part‑shade (3–6 hrs) and shade (<3 hrs). For hot/dry climates choose drought‑tolerant Mediterranean and succulent species plus herbs (lavender, rosemary, oregano, thyme, salvias, agave). For humid/wet climates choose disease‑resistant natives and tolerant ornamentals (switchgrass, sedges, ligularia for shade). For temperate zones include vegetables and herbs (tomato, pepper, basil, cilantro) in containers sized per crop (see container sizing). For cold climates use short‑season veg, cold‑hardy perennials and consider season‑extension (cold frames, portable heaters). Use local extension recommended cultivars; see regional lists below for US climate zones.
What are practical plant lists for common U.S. climate regions?
Mediterranean/Hot‑Dry (CA, AZ, NM): rosemary, lavender, sage, olive (dwarf), pomegranate (dwarf), drought‑tolerant succulents, thyme, oregano. Hot‑Humid (SE US): crape myrtle (dwarf), gardenia, rosemary (needs good drainage), sweet potatoes (container), citrus in containers in warmer subtropics. Cold/Continental (Northeast, Midwest): container kale, spinach, chives, thyme, determinate tomatoes in season, ornamental grasses, dwarf conifers. Pacific Northwest (cool, wet): ferns, hostas, hydrangea (container), evergreen shrubs and edible berries (raspberry in large raised beds). For rooftop/large planters prefer shallow, low‑maintenance perennials and sedums for extensive systems; for vegetables follow Penn State Extension container guidelines for volumes and depths.
What container sizes and depths are needed for common crops?
Herbs/leafy greens: 1–5 gallon containers (6–12 in depth). Fruiting vegetables (peppers, determinate tomatoes): 5–10 gallon (12–16 in). Indeterminate tomatoes, dwarf trees, blueberries: 15–20+ gallons and 18–24 in depth. Climbing crops need added support; root crops require appropriate depth (e.g., carrots 12 in for full‑size). Use extension charts for crop‑specific volumes and plan for extra reserve water in warm sites.