
The best patio looks come from one thing: intentional decisions made before a single paver gets set or a piece of furniture gets ordered. That means matching your style to your climate, your flooring to your budget, and your layout to how you actually live outside. Whether you are starting from a blank backyard or refreshing a dated slab, this guide walks through every layer of a great patio, from the ground plane up to the overhead shade, so you end up with a space that is beautiful, durable, and genuinely usable twelve months a year.
Best Patio Looks: Guide to Styles, Materials & Costs

Elise Prescott
30 Jul 2026
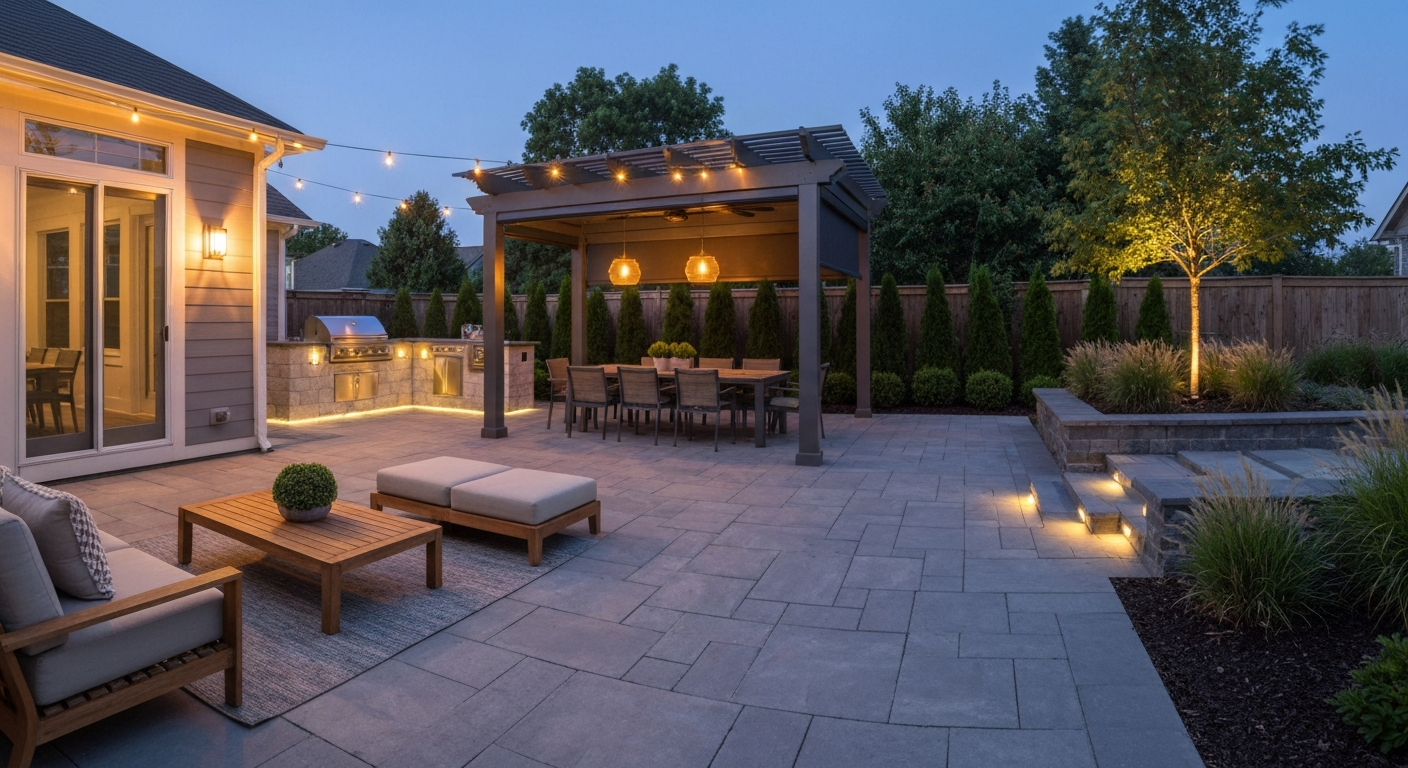
How to Use This Guide
Think of this as a build sequence, not a checklist. The early sections deal with goals, constraints, and style so that every downstream decision (flooring, furniture, lighting, climate control) flows from a clear brief. Skip ahead if you already know your style and need a materials comparison or a contractor-vetting checklist, but at least skim the layout and drainage sections first. Getting grade and slope wrong costs far more to fix later than it costs to get right the first time.
Start Here: Define Your Goals and Constraints
Before you fall in love with a Pinterest board, nail down four things: function, style, budget, and timeline. Function first: is this primarily a dining space, a lounging area, an outdoor kitchen, or all three? Each use drives different size requirements, surface materials, and power needs. Style comes next and should connect to your home's architecture, not fight it. Budget sets the ceiling on every other decision, so be honest about it early. And timeline matters because permits, contractor scheduling, and concrete cure times mean most projects take 6 to 16 weeks from contract to completion.
Accessibility deserves its own line item, especially if you are planning for aging in place or have family members who use mobility aids. The 2010 ADA Standards set a practical baseline: walking surfaces should run no steeper than 1:20 (5%), and you need at least 60 inches of clear turning space at key points. On-grade patios with smooth, stable surfaces are far easier to make accessible than elevated decks, and they often skip the permit threshold too. Many municipalities exempt on-grade concrete slabs from building permits, while elevated structures above roughly 8 to 18 inches above grade typically trigger zoning and building review. Always check with your local building department before breaking ground.
Budget tiers to know going in
| Budget Tier | Typical Spend (materials + basic labor) | What it realistically covers |
|---|---|---|
| Entry | $5–$15 per sq ft | Poured concrete slab, gravel, or basic paver grid with DIY labor |
| Mid-range | $15–$35 per sq ft | Stamped concrete, quality pavers, composite decking, simple pergola |
| Premium | $35–$75+ per sq ft | Natural stone, outdoor kitchen, motorized shade, custom lighting |
Style Guide: Finding Your Patio's Personality
The most common mistake I see is homeowners mixing styles from five different inspiration images and ending up with something that feels restless. Pick a primary style direction and then borrow one or two elements from a complementary aesthetic. Here is how the major styles break down in practical terms.
Modern
Clean lines, neutral palette (concrete gray, black, white, warm wood tones), and minimal clutter. Large-format porcelain tile or smooth concrete pavers work perfectly here. Furniture is low-profile and geometric. The risk is that pure modern can feel cold, especially in northern climates where people want warmth. Counter that with warm-toned wood accents in furniture or pergola beams.
Rustic and Farmhouse
Rough-cut natural stone, reclaimed or cedar wood, wrought iron, and earthy tones. This style forgives imperfection, which makes it a strong DIY candidate. Irregular flagstone or brick pavers fit naturally. The challenge in hot, humid climates (think coastal Southeast) is that wood and iron require more maintenance. Composite decking and powder-coated steel can capture the look with less upkeep.
Mediterranean and Spanish Colonial
Terra-cotta tile, Saltillo pavers, mosaic accents, wrought iron, and lush container plantings. This style thrives in warm, dry climates like Southern California, Arizona, and Texas. In freeze-thaw zones (Minnesota, Colorado, the Northeast), unglazed terra-cotta can spall badly unless you specify frost-rated tile with low water absorption per ASTM C373.
Coastal
Bleached tones, teak or teak-look furniture, rope accents, and a relaxed, slightly weathered feel. Works best with light-colored pavers or composite decking that won't absorb heat as aggressively as dark stone. Salt air is hard on metals, so every hardware choice here should be marine-grade stainless, aluminum, or coated steel.
Cottage and English Garden
Brick or tumbled pavers, overflowing planters, vintage iron furniture, and a soft, slightly overgrown edge. This style invites the most softscape integration of any aesthetic. Mixing it with a small kitchen garden or container berries (like a pot of heritage raspberries on the patio edge) feels completely at home here. For recommendations on compact varieties and container care, see our guide to the best patio raspberry.
Minimalist
Similar to modern but with even less visual noise. One material, one furniture collection, and every object earns its place. Gravel or smooth large-format pavers with a single seating grouping and architectural plantings. This is the easiest style to maintain and the most unforgiving of clutter.
Hybrid approaches
Most successful patios are actually hybrids: modern structure with warm rustic furniture, coastal materials with cottage planting, Mediterranean tile with contemporary seating. The rule I follow is: one dominant material sets the floor, one style drives the furniture, and softscape ties them together. That three-part formula keeps even an eclectic mix from feeling chaotic.
Layout, Zoning, and Getting Circulation Right
A well-laid-out patio feels effortless to move through. A poorly planned one has people walking through the dining zone to reach the grill, or sitting with their backs to the view. Start by mapping your zones on paper: dining, lounging, cooking, and any specialty zone like a fire pit, hot tub, or container garden. Leave at least 36 inches of clearance between furniture groupings for easy movement, and 42 to 48 inches for primary circulation paths, especially if you are designing for accessibility.
Sightlines matter as much as square footage. Orient seating to face the best view, whether that is a garden, a water feature, or just the yard. Position the dining zone close to the kitchen door to keep food service practical. If you plan to add an outdoor kitchen or grill station, think about prevailing wind direction so smoke blows away from the seating area, not through it. For larger patios (above roughly 400 square feet), a slight grade change, a change in flooring material, or a low planting border can define zones without walls.
Pathways connecting the patio to the yard, garden, or gate deserve their own material treatment. Stepping stones set in gravel, a secondary paver pattern, or simply a contrasting border all signal a transition without requiring a step up or down. Keeping pathway slopes under 5% keeps the space comfortable for everyone, and it keeps water moving away from your foundation, which brings us to drainage.
Hardscape vs. Softscape: Finding the Right Balance
A patio that is 100% hardscape feels like a parking lot. One that is 100% softscape is just a garden. The sweet spot for most residential patios is roughly 60 to 70% hardscape and 30 to 40% softscape, though climate, style, and lot size all shift that ratio. In a hot, sun-baked Southwest yard, more planting means more cooling (and more irrigation). In a compact urban lot in the Northeast, raised planters and wall-mounted greenery maximize hardscape usability while still softening the space.
Integrating planting well means designing for it from the start. Inset planting beds in a paver field, leave irregular gaps in flagstone for ground cover, or frame the patio perimeter with mixed shrub borders. Use the USDA 2023 Plant Hardiness Zone Map to check that your plant choices will actually survive your winters: a plant that looks great in a California catalog can die in its first Colorado winter if you choose the wrong zone. Evergreens and ornamental grasses offer year-round structure; flowering perennials add seasonal interest without needing replacement every year.
Drainage is where hardscape and softscape planning collide. A solid impermeable patio generates runoff that has to go somewhere. Per ACI 302.1R guidance, hardscape surfaces should slope at a minimum of 1/8 inch per foot (about 1%) and ideally 1/4 inch per foot (about 2%) away from the house, with at least 6 inches of drop over the first 10 feet adjacent to foundations. Permeable paver systems, per EPA green infrastructure guidance, can significantly reduce runoff by allowing water to infiltrate through the joint aggregate rather than sheeting off. This is worth considering if your municipality has stormwater regulations or if you have a low-lying yard that pools after rain.
Materials and Flooring: The Real Comparison
Flooring is the single biggest cost driver and the most permanent decision you will make. Here is an honest breakdown of every major option, including performance, durability, and regional fit.
| Material | Cost (installed) | Durability / Freeze-Thaw | Slip Resistance | Maintenance | Best For |
|---|---|---|---|---|---|
| Concrete pavers (interlocking) | $12–$25/sq ft | Excellent if ASTM C936-compliant; individual units replaceable | Moderate to good; textured faces help | Annual joint sand top-up, optional sealing | Most climates; DIY-friendly; permeable option available |
| Poured concrete | $6–$12/sq ft | Good with air entrainment (4–7% air, per ACI); can crack | Brushed finish improves traction | Seal every 2–3 years; repair cracks promptly | Budget builds; large flat areas; clean modern look |
| Stamped concrete | $12–$22/sq ft | Same as poured; sealer required in freeze-thaw zones | Varies; deep texture = better grip; smooth stamps = slippery | Reseal every 2–3 years; color fades without maintenance | Mid-range budgets wanting natural stone look |
| Natural stone (flagstone, bluestone, slate) | $20–$50/sq ft | Good if low-absorption stone selected; check ASTM C373 values | Irregular surface helps; smooth slate can be slippery wet | Occasional sealing; re-pointing mortar beds | Premium rustic, cottage, Mediterranean styles |
| Wood decking (cedar, ipe, redwood) | $15–$35/sq ft | Climate-dependent; ipe outlasts cedar significantly | Moderate; grooved boards improve wet traction | Annual cleaning; oil or seal every 1–2 years | Elevated structures; coastal; warm climates |
| Composite decking | $20–$45/sq ft | Excellent; won't rot, warp, or splinter | Most products rated slip-resistant; check manufacturer data | Annual wash; no sealing or staining needed | Low-maintenance priority; coastal salt air; modern look |
| Outdoor porcelain tile | $18–$40/sq ft | Excellent if frost-rated (verify ASTM C373 absorption) | Specify DCOF ≥ 0.42 (wet) per ANSI A326.3 | Low; grout joints need annual inspection | Modern, Mediterranean styles; covered patios |
| Gravel / decomposed granite | $3–$8/sq ft | Excellent; nothing to crack or spall | Moderate; uneven underfoot for mobility aids | Re-top every 1–2 years; edge containment required | Budget builds; cottage gardens; permeable drainage |
A few things that table cannot capture. With concrete pavers, Belgard and similar manufacturers back their products with lifetime structural warranties, but only when installation meets ICPI and ASTM C936 standards. Consult ICPI Tech Specs for specific requirements on minimum longitudinal slopes (commonly 1–2% for pedestrian pavements), base depth, bedding sand, and compaction tolerances. That means proper base depth, compacted aggregate sub-base, and correct bedding sand. Cut corners on the base and the warranty is void before the first winter. With outdoor tile, the DCOF (dynamic coefficient of friction) number is the only objective slip-resistance metric that matters for outdoor use. Any tile spec sheet should list the DCOF value per ANSI A326.3; if it doesn't, ask for it. Anything below 0.42 wet is a liability risk on an outdoor surface that will get rained on.
Regional climate is the final filter. In freeze-thaw zones (roughly USDA zones 3 through 6), avoid high-absorption materials. Poured concrete should be air-entrained at 4 to 7% to resist freeze-thaw scaling per FHWA and ACI guidance. Natural stone must have low water absorption per ASTM C373; dense granite and bluestone typically pass, while some sandstones and limestones do not. Saltillo tile and unsealed terra-cotta will spall in Zone 5 or colder. In hot, dry climates, UV stability and heat retention matter more than freeze-thaw resistance: dark stone and dark concrete can reach surface temperatures above 140°F on a summer afternoon in Phoenix or Las Vegas.
Outdoor Furniture, Fabrics, and Arrangement
Outdoor furniture fails for three reasons: wrong material for the climate, wrong scale for the space, and wrong arrangement for actual use. Let's solve all three.
Materials by climate
- Teak: exceptional longevity (20+ years with oiling, longer without); heavy; best for coastal or humid climates; premium cost
- Aluminum (powder-coated): lightweight, rust-proof, ideal for coastal salt air, available at every price point; can feel less substantial
- All-weather wicker over aluminum frame: great aesthetic, holds up in most climates; avoid cheap resin wicker with steel frames that rust through
- Wrought iron: heavy and stable; needs annual rust-check and touch-up paint in humid or coastal climates; excellent in dry inland climates
- Recycled HDPE (high-density polyethylene): virtually indestructible, zero maintenance, holds color well; looks can range from Adirondack classic to modern depending on brand
Fabrics and cushions
Solution-dyed acrylic (Sunbrella is the benchmark brand) is the only fabric worth using on outdoor cushions that stay outside. It is UV-stabilized, mold-resistant, and cleanable with a diluted bleach solution without color loss. Polyester and olefin are cheaper but fade and mold faster in humid or coastal environments. Cushion thickness matters for comfort: 4 to 5 inches of high-density foam is the minimum for a seating area meant to hold people for a dinner or an evening. Thinner cushions flatten fast and look tired within a season.
Scale and arrangement
The most common furniture mistake in small patios is buying oversized sectionals that leave no circulation room. Measure your patio, subtract at least 36 inches on all sides for walking clearance, and then choose furniture to fit the remaining footprint. For a 12 x 16 foot patio, a four-piece seating set is realistic; a large sectional is not. In larger spaces (20 x 24 feet and above), anchor each zone with an outdoor rug scaled to the grouping: the front legs of all furniture pieces should sit on the rug. This is the single easiest way to make a large patio feel designed rather than furnished.
Lighting and Ambiance
Good patio lighting layers three types: ambient (general illumination), task (surface-specific for cooking, dining, steps), and accent (highlighting plants, walls, or architectural features). A patio that has only one type of light, usually a single overhead fixture, always feels flat or overly bright. Layer all three and you can dial the mood from bright and functional to soft and cinematic with a dimmer.
Fixture types and placement
- String lights (bistro lights): best ambient layer for pergolas and covered areas; warm 2200–2700K color temperature creates immediate evening atmosphere; LED versions run cool and last years
- Recessed step lights and path lights: the most important safety layer; illuminate grade changes, pathway edges, and the transition from patio to yard
- Directional spotlights (uplighting): place at the base of specimen trees, large planters, or architectural walls; use warm white (2700–3000K) for natural-feeling illumination
- Pendant and ceiling-mount fixtures: appropriate for covered patios and pergolas; choose wet-rated or damp-rated fixtures depending on exposure
- In-ground well lights: durable, nearly invisible during the day; good for uplighting trees or garden features at the patio edge
Every outdoor receptacle and hardwired fixture must have weatherproof enclosures, and all outdoor outlets at residential dwellings require GFCI protection per NEC Article 210.8. Hot tub and spa circuits have additional NEC requirements (dedicated circuits, specific breaker ratings, and setback distances from water). This is not a DIY electrical task for most homeowners. Hire a licensed electrician for any new circuit runs, and pull the permit. A smart control system, either a dedicated outdoor dimmer paired with smart plugs or a full low-voltage landscape lighting controller, lets you set scenes and schedules so the patio lights come on automatically at dusk without you having to think about it.
Climate Control, Shade, and Staying Comfortable Year-Round
Heat and glare are the primary reasons people stop using their patios in summer. Cold is the reason they stop using them in fall and winter. Solving both is the difference between a patio you live on and one you look at. Here is a breakdown of every major solution with honest pros and cons.
| Solution | Coverage | Pros | Cons | Best Climate Fit | Approx. Cost (installed) |
|---|---|---|---|---|---|
| Pergola (open lattice) | Partial (30–50% shade) | Structural; supports vines, fans, lights; permanent asset; many styles | Open top = limited rain protection; UV still reaches users | All climates; especially good in moderate zones | $5,000–$25,000+ |
| Solid patio cover (attached or freestanding) | Full overhead coverage | Complete rain/sun protection; integrates ceiling fans and lighting; adds living space | Requires permits in most jurisdictions; higher cost; reduces natural light | Hot sun climates (Southwest, South); rainy climates (Pacific NW) | $8,000–$40,000+ |
| Retractable awning | Full when extended | Versatile; retract for open sky; motorized options with wind sensors | No rain protection in high winds; motor maintenance; limited span width | Moderate climates; homeowners wanting flexibility | $2,000–$8,000 |
| Shade sail | Full under sail | Low cost; design-forward; easy to install; comes in many sizes | No rain protection; requires strong anchor points; UV-rated fabric degrades over time | Dry, low-wind climates; Mediterranean/modern aesthetics | $200–$1,500 DIY |
| Ceiling fan (outdoor-rated) | N/A (air movement) | Dramatically reduces perceived temperature; keeps bugs down; low operating cost | Requires covered overhead structure and electrical; no cooling in still, humid heat | All covered patios; essential in humid Southeast and Southwest | $150–$600 (fan + install) |
| Misting system | Zone-wide cooling | Can drop perceived temperature 15–25°F in dry heat; low install cost for basic systems | Ineffective in humid climates; leaves mineral deposits; needs winterizing in cold climates | Dry/arid climates: Arizona, Nevada, inland California, Texas | $300–$2,500 |
| Patio heater (propane or electric infrared) | Spot to zone coverage | Extends season into fall/winter; electric infrared is clean and odor-free | Propane requires tank management; heaters ineffective in high wind without enclosure | Cooler climates; covered or semi-enclosed patios | $150–$1,500 |
A few practical notes on that table. Misting systems are genuinely transformative in Phoenix or Palm Springs but essentially useless in Houston or Miami because the ambient humidity is already high enough that the mist cannot evaporate fast enough to pull heat away. Before investing in a misting system, check your NOAA Climate Normals data for average summer relative humidity. Consult NOAA U.S. Climate Normals (1991–2020) at U.S. Climate Normals | National Centers for Environmental Information (NCEI) to find station-level average summer humidity and other baselines used for matching materials and plant lists to local climate exposures. If your afternoon humidity routinely sits above 60%, invest that money in shade and fans instead. For hot tub integration, which adds another layer of climate enjoyment to a patio, electrical and structural planning need to happen early in the design process.
Pergolas deserve an extra note on material choice. Aluminum and vinyl pergolas are lower maintenance than wood but can feel less substantial. Cedar and Douglas fir are beautiful and workable for DIY builds but need staining or sealing every two to three years in wet climates. Powder-coated steel is the most durable framing material for a pergola and is the standard for high-end prefab systems. If you are planning a serious covered patio structure (a full roof, not just a lattice), check your local permit requirements early. Most jurisdictions require a building permit for attached structures regardless of size, and some require engineering drawings for larger spans.
Sound, Tech, and Special Features
Outdoor audio has improved enormously in the last five years. Landscape-rated in-ground speakers (Sonance, Polk Audio Atrium, and similar) deliver full-range sound without the visual clutter of surface-mounted boxes. For most patios, two to four satellite speakers wired to a weatherproof amplifier with a streaming input gives excellent coverage. All speaker wiring run through conduit in a new patio build costs almost nothing at rough-in stage and an enormous amount if you have to trench and repave later. Run conduit for audio, lighting control, and irrigation at the same time as your electrical rough-in.
Privacy screens are a structural feature worth thinking about early. Horizontal cedar slat screens, cable trellis systems with climbing plants, and outdoor curtains on a covered pergola all solve visual privacy from neighbors without requiring a fence permit in most jurisdictions. Outdoor curtains in a heavy canvas or outdoor-rated polyester are the most budget-friendly option and can transform an exposed patio into something that feels genuinely intimate at night.
For homeowners considering a greenhouse or covered growing structure adjacent to the patio, the design language can absolutely carry over from the main patio, especially in a cottage, Mediterranean, or farmhouse aesthetic. Container edibles are another patio feature worth planning for: container-grown raspberries (especially compact heritage varieties) work well in large 15 to 25-gallon containers on a sunny patio edge and require far less space than in-ground canes.
Permits, Drainage, and What to Do Before You Build
Drainage is the most skipped step in DIY patio projects and the most expensive to fix after the fact. Every patio surface needs a positive slope away from the house: 1/4 inch per foot is the standard target per ACI 302.1R, with 1/8 inch per foot as the minimum acceptable in most contexts. Near the foundation, aim for at least 6 inches of drop over the first 10 feet. If your lot is flat or slopes toward the house, you need to engineer a drain solution, either a French drain, a channel drain at the patio edge, or a permeable paver system that infiltrates water in place rather than directing it. Permeable pavers meeting EPA Best Management Practice guidelines for stormwater are increasingly favored by municipalities and can reduce or eliminate the need for a separate drainage solution on many sites.
On permits: on-grade concrete slabs are often exempt from building permits (Seattle, for example, explicitly exempts them), while elevated decks and attached covered structures almost universally require one. The threshold varies locally: South Orange, NJ defines a patio as a structure at or below 18 inches of elevation; Stamford, CT flags anything 8 inches or above for zoning review. These are just examples. The only way to know your specific threshold is to call your local building department before committing to a design. The permit process sounds annoying but it protects you at resale and keeps your contractor accountable.
DIY vs. Hiring a Pro: An Honest Decision Guide
Most patio projects have a split: some elements are genuinely DIY-accessible, and some are not. Here is a clear breakdown to save you the mistake of either hiring out everything unnecessarily or tackling something that will cost more to fix than to hire correctly.
| Task | DIY Feasibility | Key Reason |
|---|---|---|
| Gravel or decomposed granite patio | High | No structural base required; hand tools; easily adjusted |
| Basic paver patio on flat grade | Moderate to High | Labor-intensive but learnable; ICPI installation guides are detailed |
| Poured or stamped concrete | Low | Requires mixer, forms, finishing skill, and timing; poor DIY results show forever |
| Natural stone dry-lay flagstone | Moderate | Achievable on flat sites; irregular shapes require patience and a good eye |
| Outdoor electrical (new circuits, GFCI) | Low | NEC compliance requires licensed electrician in most jurisdictions |
| Pergola kit assembly | Moderate to High | Many prefab kits are designed for two-person DIY installation |
| Custom-built pergola with concrete footings | Moderate | Footing depth/concrete mix and ledger attachment are critical to get right |
| Misting system (standalone) | High | Compression fittings and tubing; no electrical required for basic systems |
| Retractable awning installation | Moderate | Structural anchor points into framing are the critical step; motor wiring if motorized |
| Drainage and grading | Low to Moderate | Errors are expensive and invisible until it rains hard; worth a grading consultation |
How to Vet a Patio Contractor
Finding the right contractor is where a lot of otherwise well-planned projects go sideways. The lowest bid is almost never the right choice, and neither is the slickest website. Here is what I look for before signing anything.
- Verify their contractor's license number directly with your state licensing board, not just from their business card
- Confirm they carry general liability insurance (minimum $1 million per occurrence) and workers' compensation; ask for a certificate of insurance naming you as additional insured
- Ask specifically about their experience with your chosen material: a contractor who is excellent at stamped concrete may not know ICPI paver installation standards
- Request three references from projects similar in scope and material to yours, and actually call them
- Ask whether they pull permits and whether the project requires one; a contractor who volunteers to skip permits to save time is a red flag
- Get at least three written bids with itemized line items (materials, labor, base preparation, drainage work) so you can compare them meaningfully
- Ask how drainage and slope will be managed and what their grade tolerance is; a blank stare here is a warning sign
- Confirm their installation process meets ICPI, ASTM, or ACI standards for your chosen material, and verify that the material itself meets ASTM C936 (pavers), ANSI A326.3 (tile DCOF), or relevant specs
- Get a written warranty on both materials and workmanship, and understand what voids each
- Clarify payment schedule: a contractor asking for more than 30–40% upfront on a residential project is outside normal practice
Maintenance: Keeping Your Patio Looking Its Best
The best patio looks are not a one-time event. They are the result of reasonable, consistent maintenance. Pavers need joint sand replenished every few years and gentle power-washing annually (Belgard and other major manufacturers document this in their warranty maintenance guides). Sealed concrete and stamped concrete need resealing every two to three years, especially in UV-heavy or freeze-thaw climates. Natural stone benefits from periodic sealing with a penetrating stone sealer. Composite decking needs only an annual wash. Tile grout joints should be inspected annually and repointed if cracking to prevent water intrusion under the tile bed.
Furniture and fabric maintenance is straightforward with solution-dyed acrylic: clean with mild soap and water, rinse, and allow to dry completely before storing or covering. Store cushions in a ventilated deck box or bring them inside during winter in freeze-thaw climates. Metal frames should be inspected annually for rust spots and touched up immediately to prevent spread. Teak furniture should be oiled annually if you want to preserve the warm honey color, or left to silver naturally if the weathered gray look fits your aesthetic.
Misting systems need to be fully drained and blown out before the first freeze in cold-winter climates, similar to irrigation systems. Retractable awning mechanisms benefit from an annual lubrication of the arm joints and a check of the motor brushes if motorized. Outdoor lighting fixtures should be checked at the start of each season: replace any corroded or cracked fixtures before they create an electrical hazard, and confirm GFCI outlets are testing correctly with the test/reset buttons.
Your Next Steps
Start with a site sketch. Measure your patio area, note which direction faces south (where sun will be strongest), mark where the house door is, and note any existing drainage patterns. That one piece of paper will sharpen every conversation you have with a contractor or a material supplier. Then work through the sequence this guide follows: lock in your goals and budget, choose your style direction, select your floor material, plan lighting and climate control together (they share infrastructure), and get permit clarity before anything else. The patios that look genuinely great five years after they are built are the ones where the owner spent a week planning before they spent a dollar building. For inspiration and a step-by-step vision, see my guide to building the best patio ever.
FAQ
What core standards and codes must an accurate patio guide reference for accessibility, drainage, electrical safety, and permits?
Reference the 2010 ADA Standards for Accessible Design (running slope, turning space, accessible routes), local building/municipal codes for permit thresholds (on‑grade vs. elevated patios), ACI/ICPI guidance for slab slopes and drainage (1/8–1/4 in/ft typical), and NEC/NFPA rules for outdoor electrical/GFCI and weatherproofing. Cite the exact local municipal code or building department for permit triggers.
Which climate and plant hardiness data are required to make regionally relevant material and planting recommendations?
Use NOAA U.S. Climate Normals (1991–2020) for station‑level temperature/precipitation baselines to assess UV, precipitation and freeze risk; use the USDA 2023 Plant Hardiness Zone Map for minimum‑temperature plant suitability and to correlate freeze/thaw vulnerability of materials and planting palettes.
What stormwater and permeable‑pavement guidance is needed for responsible patio drainage design?
Cite EPA guidance (Soak Up the Rain and National Menu of BMPs) and local municipal permeable pavement manuals to decide infiltration vs. attenuation, eligible outfalls, design details, and maintenance intervals for permeable pavers, pervious concrete and porous asphalt.
Which material performance standards and test metrics should be used to compare paving and surface options?
Use ASTM/ICPI/ASTM C936 for concrete pavers (compressive strength, absorption, freeze‑thaw limits), TCNA/ANSI tile standards and DCOF (wet dynamic coefficient ≥0.42 where required), ASTM C373 water absorption for porcelain/tile freeze‑thaw classification, brick/stone supplier technical notes (BIA) and manufacturer datasheets for slip ratings and warranties.
What structural and concrete mix details are essential for durability in freeze‑thaw climates?
Specify air‑entrained concrete (target ~4–7% entrained air) with appropriate w/c ratio, proper curing and compaction; reference FHWA/PCA/ACI literature on freeze‑thaw performance and ACI 302.1R for slab construction tolerances and mix guidance.
What slope, grading and foundation drainage practices must be included to prevent water intrusion and ponding?
Recommend surface slopes of ~1/8–1/4 in/ft (≈1–2%) away from the house, positive drainage for at least 6–10 ft adjacent to foundations, and cite ACI/ICPI guidance and local code rules for required falls near foundations. Include permeable options per EPA BMPs where stormwater regulations apply.