
The best patio raspberries are compact, everbearing container cultivars like 'Raspberry Shortcake', 'Heritage', and 'Anne', they fruit reliably in 15- to 30-gallon containers, need no trellis, and fit neatly on a deck, balcony, or patio corner. If you are after the look rather than the fruit, raspberry-colored accessories and plants can pull the same warm-pink palette into your outdoor space without the pruning commitment. And if you have the room, weaving a row of canes into a patio border or against a fence turns an edible plant into a legitimate design feature. This guide covers all three paths, with real cultivar comparisons, container specs, zone-by-zone planting calendars, and honest notes on what actually works versus what looks good in a catalog.
Best Patio Raspberry Varieties and Container Growing Guide

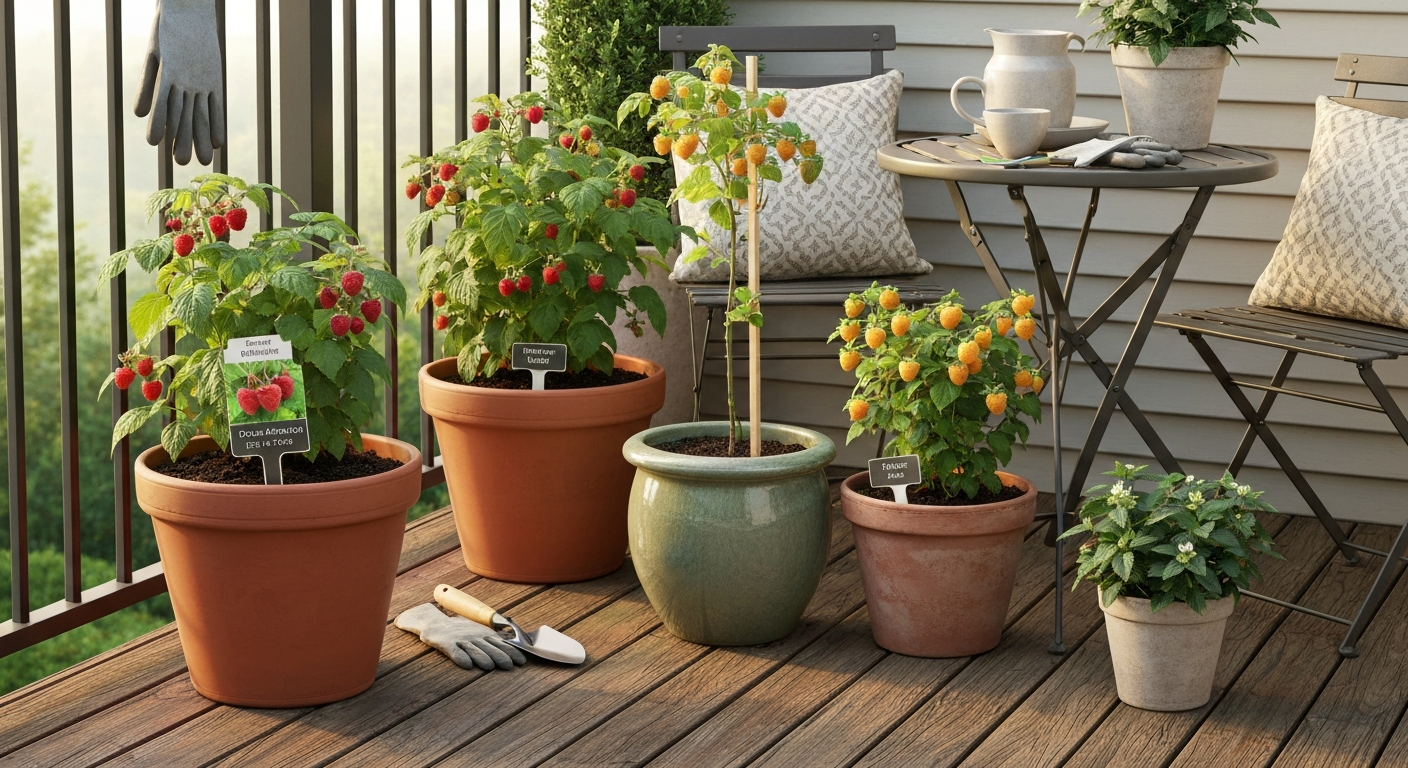
Three ways to bring raspberries to your patio, pick your path first
Before you buy a plant or a pot, it helps to get clear on what you actually want, because the three raspberry patio strategies require very different time and money commitments. Getting this decision right up front saves a lot of frustration.
| Strategy | Best for | Effort level | Typical cost to start | What you get |
|---|---|---|---|---|
| Container raspberries (edible) | DIYers with small patios, balconies, or decks | Medium — ongoing pruning and feeding | $30–$80 per plant + container | Fresh fruit, fragrance, seasonal interest |
| Raspberry-colored accents | Design-first homeowners, renters, quick makeovers | Low — no plant maintenance | $20–$200 for cushions, pots, lighting | Consistent color year-round, zero upkeep |
| Edible integration (in-ground border or raised bed) | Homeowners with patio-adjacent garden space | High — annual pruning, soil prep, trellis | $50–$150 per 10 ft of canes + bed materials | Highest yield, longest-lived planting, best design impact |
If you are planning a full outdoor overhaul, adding a cover, rethinking the layout, or connecting the patio to a garden greenhouse structure, the edible integration path pairs naturally with those bigger projects. If you are more focused on aesthetics right now and just want the raspberry color story in your space, the accent route is genuinely underrated and can look stunning. This guide digs deepest into the container and edible-integration paths because that is where the most questions come up.
Top patio raspberry varieties, ranked with honest pros and cons
Not all raspberry cultivars are suited to containers or small spaces. The varieties below are ranked for patio use based on compact growth, container performance, fruit quality, and ease of care for home gardeners. Pollination note for all of them: raspberries are self-fertile, so a single plant will produce fruit without a companion, a big advantage on tight patios.
Dwarf and thornless container picks
'Raspberry Shortcake' is the top pick for true container growing. Bred specifically as a dwarf, thornless plant, it tops out at 2–3 feet, requires no staking, and fits in a 15- to 20-gallon container comfortably. Yield per plant is modest, expect a pint or two per season, but the lack of thorns and the tidy habit make it genuinely patio-friendly. It is a floricane type, fruiting in early to mid-summer, and it is hardy to USDA Zone 5. The thornless canes are also a real safety advantage around kids and pets on a patio.
'Autumn Bliss' is a compact primocane (fall-bearing) variety that grows 3–4 feet tall and handles container life reasonably well in a 20-gallon pot. It is one of the better performers in the Pacific Northwest and Zones 4–8 according to OSU cultivar trial data. Fall-bearing types like this one are also easier to prune, you simply cut everything to the ground in late winter, which suits container growing where managing old canes is a hassle.
Everbearing varieties for the longest harvest window
'Heritage' has been the benchmark everbearing red raspberry for decades and still earns its place on the list. It is a primocane-fruiting variety that produces in late summer and again the following summer if you manage the canes for two crops. It grows 4–5 feet tall, so it needs a 25- to 30-gallon container and a simple stake or small trellis. It is extremely well documented in university trials, Cornell Berry Breeding trials consistently list it among the most reliable producers for home growers in Zones 4–8. Disease resistance is good but not exceptional; in humid climates, watch for gray mold and cane blight.
'Anne' is a yellow/golden everbearing variety that is worth calling out separately. The flavor is milder and sweeter than red types, and the color is a striking design element in its own right. It performs well in containers (25–30 gallons), is hardy to Zone 4, and Cornell trial data puts it among the better-yielding yellow varieties for home gardens. The yellow color also means birds are less likely to raid it since they are attracted to red more strongly, a small but real practical advantage on an open patio.
Trailing varieties (for fences and patio walls)
Trailing raspberries, sometimes called boysenberry or loganberry types, are actually a different group and are not ideal for containers. If you have a patio fence or a low trellis at the patio edge, 'Brandywine' (a purplecane type) or 'Tayberry' can be trained along it attractively. These are strictly floricane types, Zone 5–9, and they need in-ground or very large (30+ gallon) planting volumes to perform. They are a great choice when your patio meets a garden bed or a side fence where you want a productive privacy screen.
| Variety | Type | Growth habit | Container suitable? | USDA hardiness | Harvest season | Disease resistance | Pollinator needed? |
|---|---|---|---|---|---|---|---|
| Raspberry Shortcake | Floricane, dwarf | 2–3 ft, mounding | Yes — 15–20 gal | Zone 5–9 | Early–mid summer | Good | No (self-fertile) |
| Autumn Bliss | Primocane (fall) | 3–4 ft upright | Yes — 20 gal | Zone 4–8 | Late summer–fall | Good | No (self-fertile) |
| Heritage | Primocane (everbearing) | 4–5 ft upright | Yes — 25–30 gal | Zone 4–8 | Late summer + summer | Moderate | No (self-fertile) |
| Anne | Primocane (everbearing) | 4–5 ft upright | Yes — 25–30 gal | Zone 4–9 | Late summer–fall | Good | No (self-fertile) |
| Brandywine (purplecane) | Floricane, trailing | 5–7 ft arching | No — in-ground or 30+ gal | Zone 5–9 | Mid-summer | Moderate | No (self-fertile) |
| Tayberry | Floricane, trailing | 6–8 ft arching | No — in-ground preferred | Zone 5–9 | Early summer | Moderate | No (self-fertile) |
Budget vs. premium picks, and where to buy healthy canes
For most homeowners, the sweet spot is buying bare-root canes in late winter or early spring from a reputable mail-order nursery. Bare-root plants from sources like Nourse Farms, Stark Bros, or a regional nursery that specializes in small fruits typically cost $8–$15 per cane and arrive dormant, ready to plant. They establish faster than you would expect. Potted plants from big-box garden centers are convenient but often cost $18–$35 per plant, and the quality is inconsistent, check the root ball before you buy and avoid anything root-bound or with visible cane lesions.
Budget pick: 'Heritage' bare-root canes from a mail-order nursery. You can get three canes for under $30, plant them in a single 30-gallon container, and have a productive plant by year two. Premium pick: 'Raspberry Shortcake' in a branded nursery container (it is a patented cultivar, so it costs more, typically $20–$35 per plant) is genuinely worth the premium if container growing on a small deck is your situation, the thornless, dwarf habit is not replicable with any budget alternative. For yellow varieties, 'Anne' sits in the middle at $10–$18 per bare-root cane and delivers premium flavor without the premium price.
Variety comparison at a glance
| Variety | Growth habit | Yield (home scale) | Winter hardiness | Disease resistance | Container suitability |
|---|---|---|---|---|---|
| Raspberry Shortcake | Dwarf, mounding, thornless | Low–moderate (1–2 pts/plant) | Zone 5 (moderate) | Good | Excellent — 15–20 gal |
| Autumn Bliss | Semi-compact upright | Moderate | Zone 4 (good) | Good | Good — 20 gal |
| Heritage | Upright, vigorous | High (3–5 pts/plant) | Zone 4 (good) | Moderate | Good — 25–30 gal |
| Anne (yellow) | Upright, vigorous | Moderate–high | Zone 4 (good) | Good | Good — 25–30 gal |
| Brandywine | Arching, trailing | High (in-ground) | Zone 5 (moderate) | Moderate | Poor — needs in-ground |
| Tayberry | Long trailing canes | High (in-ground) | Zone 5 (moderate) | Moderate | Poor — needs in-ground |
Container and soil specs, sizes, drainage, and the right mix
OSU Extension's raspberry culture guide (EC-1306) is direct on this: 20- to 30-gallon containers work well for mature raspberry plants, and that matches my own experience. Smaller containers, anything under 15 gallons, stress the roots in summer heat and dry out too fast on a sunny patio. If you are on a rooftop deck or elevated balcony, check your structure's rated load before placing several large planters. The International Residential Code typically sets deck live loads at 40 pounds per square foot as a baseline, but local codes vary, so confirm with your building department before filling a row of 30-gallon containers with wet soil. A filled 30-gallon container can weigh 120–180 pounds.
For container diameter, a good rule of thumb from UK and US extension sources combined: 15–18 inches minimum diameter for a single dwarf plant, 20–24 inches for a vigorous everbearing cultivar. The depth matters too, aim for at least 16–18 inches of root depth. Drainage holes are non-negotiable; at least 4–6 holes of 1/2 inch or larger in the bottom. Elevating the container on pot feet or a simple wood frame improves drainage further and prevents the base from sitting in pooled water.
The potting mix recipe that actually works
Do not use straight garden soil in a container, it compacts, drains poorly, and suffocates raspberry roots within a season. A reliable, extension-tested mix by volume is: 60% coir or peat moss, 20% finished compost, and 20% perlite or pumice. MU Extension and Master Gardener handbooks back this general ratio, and it is what I use. Pre-moisten the coir or peat before mixing because dry peat repels water initially and you will get uneven wetting in the container. Add 1/2 cup of granular sulfur or an acidifying amendment per 20-gallon volume if your tap water or compost is alkaline, raspberries want a soil pH of 5.8–6.5.
- 60% coir or peat moss — provides structure and moisture retention
- 20% finished compost — supplies baseline nutrients and beneficial microbes
- 20% perlite or pumice — ensures drainage and prevents compaction
- Optional: 1/2 cup granular sulfur per 20-gallon container if pH needs adjustment
- Optional: slow-release acidic fertilizer granules (e.g., Holly-tone) mixed in at planting
- Pre-moisten peat or coir before mixing — dry peat repels water
- Test pH annually — container media drifts more quickly than in-ground soil
How to plant patio raspberries, step by step by zone
Timing your planting to your USDA zone makes a real difference in first-year establishment. Raspberries planted at the wrong time stress out, sulk for months, and sometimes die, not because of the plant, but because the timing and setup were off.
- Choose your site: Raspberries need 6–8 hours of direct sun. On a patio, this usually means the sunniest corner or along a south- or west-facing wall. Avoid low spots where cold air settles in spring.
- Time your planting by zone: Zones 4–5 — plant bare-root canes in April to early May when soil temps reach 40°F+. Zones 6–7 — late March to mid-April. Zones 8–9 — February to March, or fall planting in October–November. Zone 10 — fall to winter planting only; summer heat is too stressful for establishment.
- Prepare your container: Fill with pre-moistened potting mix to within 3 inches of the rim. Check that all drainage holes are clear. If adding slow-release fertilizer, mix it into the top 6 inches of media.
- Set planting depth: Bare-root canes should be planted with the crown (the junction of roots and cane) no more than 1–2 inches below the soil surface. Planting too deep is a common mistake that leads to crown rot.
- Spacing in large containers: For a 30-gallon container, plant 2–3 canes spaced 6–8 inches apart. For a single-cane dwarf like Raspberry Shortcake, one plant per 15–20 gallon container is ideal.
- Water in thoroughly: After planting, water until it drains freely from the bottom. This settles the mix around the roots and removes air pockets. Keep the mix consistently moist (not wet) for the first 4–6 weeks.
- First-year setup: Drive a 4–5 ft stake into the container for Heritage or other tall cultivars and tie canes loosely with soft twine. For Raspberry Shortcake, no stake is needed. Apply a 1–2 inch layer of pine bark mulch on top of the container mix to conserve moisture.
- Cut back bare-root canes at planting: Trim to 6–9 inches above soil level at planting. This looks alarming but encourages vigorous new primocane growth from the base and sets the plant up for better long-term production.
Pruning schedules, year one, floricane types, primocane types, and zone timing
Pruning raspberries is where most home growers get confused, and the confusion is understandable because floricane (summer-bearing) and primocane (fall-bearing, everbearing) types need completely different approaches. Getting this wrong does not kill the plant, but it does cost you a season of fruit.
Year-one pruning (all types)
In the first year, your only job is to let the plant establish. Remove any flower buds that form on primocane types in year one, sacrificing that first crop forces better root development and pays off with much higher yields in year two. For floricane types, you will not see fruit in year one anyway (floricanes only fruit on second-year canes), so there is nothing to remove except dead or weak canes. At the end of the first season, cut any thin, spindly canes (less than pencil thickness) back to the ground.
Floricane (summer-bearing) pruning schedule
- Late winter/early spring: Remove all dead or winter-damaged canes to the ground. Tip-prune surviving canes to 4–5 ft to encourage lateral branching.
- Early summer (after harvest): Immediately remove all canes that fruited (floricanes) — cut them to the ground. These canes are done and leaving them invites disease.
- Late summer: Thin new primocanes (this year's green canes) to 4–6 of the strongest per container or per 12 inches of row. Remove the rest at the ground.
- Fall: No major pruning needed. Let selected primocanes harden off before frost.
Primocane (everbearing/fall-bearing) pruning, two options
For fall-bearing types like Heritage and Autumn Bliss, you have two choices. The simpler one, cut everything to the ground in late winter, gives you one fall crop per year and is the easiest management system for containers. The more productive option, leave selected canes from the previous fall to produce a summer crop on their tips, then remove them after that summer harvest, gives you two crops per year but requires more careful tracking of which canes are which. For patio containers, the mow-everything-down approach is usually the right call: it is lower effort, keeps the plant tidy, and fall crops on primocane types are the better-quality harvest anyway.
Zone-specific pruning timing at a glance
| USDA Zone | Late-winter cleanup | Post-harvest floricane removal | Fall thinning |
|---|---|---|---|
| Zone 4–5 | April (after last hard freeze) | Late July–August | September |
| Zone 6–7 | Late February–March | July | Late September–October |
| Zone 8–9 | Late January–February | June–early July | October–November |
| Zone 10 | January | May–June | November |
Feeding, watering, and a full fertility plan
Container raspberries are heavy feeders compared to in-ground plants because nutrients leach out every time you water. That is not a problem if you stay on top of a simple fertilizer schedule, but let it slide for a few weeks and you will see yellowing leaves and reduced yield fast.
Fertilizer schedule by season
The target nitrogen (N) rate for mature raspberries is roughly 2–4 oz of actual N per plant per year, distributed across the growing season. UC IPM and Penn State Extension's raspberry fertility guides both land in this range for home-scale plantings. For containers, splitting this into smaller, more frequent applications prevents the salt buildup that can damage raspberry roots in confined media.
| Season / Timing | Fertilizer type | Rate / Application | Notes |
|---|---|---|---|
| Early spring (bud swell) | Balanced granular (10-10-10) or acidic slow-release (Holly-tone) | 1–2 tbsp per 20-gal container, worked into top inch of mix | Do not fertilize dormant plants; wait for green growth to begin |
| Late spring (active growth) | Water-soluble balanced fertilizer (20-20-20) or fish emulsion | Half-strength per label, every 2–3 weeks | Supports rapid cane elongation and leaf development |
| Early summer (pre-bloom) | Low-nitrogen, higher-phosphorus formula (5-10-10) | Per label for container size | Shift to phosphorus-forward feed to support flower and fruit set |
| Post-harvest (fall) | Low or no nitrogen — potassium sulfate or compost top-dress | Light compost mulch (1 inch) or 1 tsp potassium sulfate per container | Encourages hardening and root reserves; avoid late-season N which delays dormancy |
| Late fall / winter | None | No feeding during dormancy | Resume only when buds begin to swell in spring |
Watering best practices for containers and patio planters
Raspberry roots want consistent moisture but hate standing water. In a 20- to 30-gallon container on a sunny patio, plan on watering every 2–3 days in summer (daily in extreme heat above 95°F) and checking soil moisture with a finger or probe rather than sticking to a rigid schedule. Push a finger 2 inches into the mix: if it feels dry at that depth, water thoroughly until it drains from the bottom. If it still feels moist, wait. UMass Extension container fruit guidance recommends this feel-test approach over timed irrigation for home containers because container drying rates vary so much by sun exposure, pot material (terra cotta dries faster than glazed ceramic or plastic), and ambient temperature.
Drip irrigation or a soaker-ring setup for large containers is worth the small investment if your patio gets full afternoon sun in Zones 7 and warmer. Even a simple timer connected to a drip emitter on each container eliminates the biggest risk, letting a container dry out completely during a heat wave, which can kill or permanently stunt a raspberry plant. Keep water off the foliage when possible to reduce fungal disease pressure.
Nutrient deficiency quick check
- Yellowing older leaves with green veins (interveinal chlorosis on lower leaves): likely nitrogen deficiency — apply balanced fertilizer
- Yellowing new leaves with green veins: likely iron or manganese deficiency from high pH — acidify the mix and apply chelated iron
- Purple-tinted leaf undersides: likely phosphorus deficiency in cold soil — wait for soil to warm or apply liquid phosphorus
- Brown leaf edges and tip burn: likely salt buildup or potassium deficiency — leach container with extra water, then resume balanced feeding
- Weak, spindly cane growth: overall nutrient deficiency or insufficient light — address both feeding and siting
Pest and disease management on the patio
Container plants on a patio are generally less pest-prone than in-ground plantings simply because they are more visible and easier to inspect. That said, a few problems are common enough that every patio raspberry grower should know them.
The pests you are most likely to encounter
Spotted Wing Drosophila (SWD) is the number-one fruit pest for patio raspberries in most of the US. Unlike common fruit flies that attack overripe fruit, SWD females lay eggs in ripening berries using a serrated ovipositor, and you will not see damage until you pick the fruit. Penn State Extension recommends monitoring with a simple vinegar/red wine trap starting in mid-summer and harvesting fruit promptly (every 2–3 days) as your first line of defense. Row cover fabric applied just before ripening can exclude the pest without chemicals, and this is especially practical with contained plants on a patio. If you choose a chemical approach, check the EPA label for current registrations and pre-harvest intervals (PHIs) for raspberries before applying anything, especially on edible crops. For current registrations and exact pre-harvest intervals, consult blank" rel="noopener noreferrer">Example EPA pesticide product label/document (use EPA label resources and state PMGs for PHI and label details) and your state pesticide management guides before applying any pesticide to edible raspberries.
Spider mites become a problem in hot, dry conditions on patios, the microclimate between a wall and a container plant is exactly what they love. WSU's Raspberry IPM Manual and UC IPM guidance both recommend blasting foliage with a strong jet of water as a first step before any spray. If populations persist, insecticidal soap or neem oil (both OMRI-listed for organic use) are effective and appropriate for patio use near seating areas. Always verify that a product is OMRI-listed at OMRI.org if organic certification or reduced-risk use matters to you.
Common diseases and organic controls
- Gray mold (Botrytis): most common in cool, humid conditions; remove infected fruit immediately, improve air circulation around containers, avoid overhead watering
- Cane blight and spur blight: prune out affected canes below the lesion using sanitized pruners; destroy pruned material rather than composting it
- Root rot (Phytophthora): almost always caused by overwatering or poor drainage — the pot-feet and drainage-hole guidance above prevents this; if a plant collapses in wet weather, inspect roots for brown/mushy tissue
- Raspberry mosaic virus: transmitted by aphids; no cure — remove and destroy affected plants, control aphids with insecticidal soap, and source certified virus-free planting stock initially
Seasonal maintenance calendar by USDA zone
This calendar covers the core tasks for container primocane/everbearing types (the most common choice for patios). Floricane types follow the same general timing but add a mid-summer post-harvest cane removal step.
| Month | Zones 4–5 | Zones 6–7 | Zones 8–9 |
|---|---|---|---|
| Jan–Feb | Plants dormant; protect containers from freeze/thaw cycles by moving to unheated garage or wrapping | Begin late-winter cleanup by late February; check containers for heaving | Plant bare-root canes; begin light fertilizing when buds swell |
| March | Continue dormancy protection; order bare-root canes for April planting | Plant bare-root canes; apply first fertilizer at bud swell | Monitor new cane growth; water as needed; apply balanced feed |
| April | Plant bare-root canes after last frost; apply first fertilizer at bud swell | Active growth; begin bi-weekly water-soluble feeding; check for aphids | Thin new canes; monitor for SWD traps; pre-bloom phosphorus feed |
| May | Active growth; begin bi-weekly feeding; stake tall cultivars; check soil moisture daily | Pre-bloom phosphorus feed; monitor for SWD; harvest early floricane types begins | Harvest begins (everbearing types); pick every 2–3 days; monitor for gray mold |
| June | Pre-bloom phosphorus feed; monitor for mites; flower buds forming | Harvest in full swing; remove floricanes after picking; watch for SWD | Continue harvest; reduce nitrogen; post-harvest cleanup |
| July | Harvest begins for floricane types; pick every 2–3 days; SWD monitoring | Post-harvest cane removal; thin new canes; mid-summer water-soluble feed | Reduce watering as temps peak; light potassium feed; cane thinning |
| Aug | Peak harvest for everbearing types; maintain consistent watering in heat | Primocane fall crop begins on everbearing types; maintain moisture | Begin fall crop on everbearing types; harvest regularly; reduce feed |
| Sept | Fall crop on everbearing types; begin tapering off nitrogen | Fall harvest continues; taper nitrogen; apply potassium/compost top-dress | End of harvest; final cane thinning; compost top-dress |
| Oct–Nov | First frosts; protect or move containers; final thinning before freeze | Final cleanup; cut all canes to ground (primocane method) or leave floricanes for next year | Dormancy begins; cut back; reduce watering; protect if frost expected |
| Dec | Full dormancy; minimal watering; protect from hard freezes | Full dormancy; minimal care needed | Light dormancy; occasional water in dry winters; plan spring planting |
Harvesting and what to expect in year one vs. year two
Be realistic about year one: it is an establishment year, not a production year. A single 'Heritage' plant in a 30-gallon container might yield a cup of berries in its first fall. By year two, the same plant can produce 3–5 pints over the season if you have followed the fertility and pruning plan. 'Raspberry Shortcake' reaches peak production faster given its dwarf habit, but absolute yield per plant stays lower. Harvest raspberries when they pull free from the receptacle (the core) with no resistance and a slight tug, if you have to pull hard, they need another day. Pick every 2–3 days at peak season and refrigerate immediately. Fresh-picked patio raspberries keep only 1–3 days even refrigerated, which is actually the best argument for growing your own: store-bought berries are rarely this fresh.
Design ideas, making raspberries part of your patio aesthetic
Raspberries are not just functional, with the right placement they are genuinely beautiful. In late spring the white flowers are delicate and fragrant. In summer the canes arch gracefully and the ripening fruit adds warm color. In fall the foliage turns soft yellow-orange on many cultivars before dropping. Thinking about them as ornamental-plus-edible plants rather than strictly utilitarian opens up a lot of design options.
A row of 25- to 30-gallon containers planted with Heritage or Anne along a patio fence line doubles as a soft privacy screen from late spring through fall. If you are already planning a patio greenhouse structure to extend the growing season, raspberries are a natural interior plant, the protected microclimate in a patio greenhouse pushes harvest dates earlier in spring and later in fall in Zones 4–6, and the structure also keeps birds and SWD off the fruit. Similarly, if your patio hot tub area needs some plant screening without sacrificing space, a pair of dwarf Raspberry Shortcake containers on either side of the tub entry is a clean, practical solution that adds scent and color without the maintenance of a shrub border. If you want screening and planting ideas specific to a best patio hot tub, consult our guide to the best patio hot tub for placement and space‑saving tips.
For pure color play, if you want the raspberry palette without the plant maintenance, warm-pink cushions, terra cotta pots with deep rose glazes, and string lights with amber-to-pink tones can carry a raspberry color story across the whole space. Companion edible plants like alpine strawberries, lavender, and catmint pair beautifully with raspberry canes both visually and ecologically (lavender and catmint attract pollinators and repel aphids). For more inspiration on pulling together a complete patio look, the design principles around plant integration, color, and furniture placement are worth exploring as part of any broader patio planning project. For more inspiration on pulling together a complete patio look, see a gallery of ideas for the best patio looks that combine plants, color, and furniture placement. For more inspiration on pulling together a complete patio look, see the guide on creating the best patio ever.
When to hire a pro vs. doing it yourself
Container raspberry growing is solidly DIY territory, there is nothing here that requires professional help if you are comfortable with basic gardening tasks. The situations where hiring a pro makes sense are almost always about the surrounding structure rather than the plants themselves. If you are adding a raised bed integrated into a patio build, modifying deck structure to accommodate planters, installing an automated drip irrigation system, or considering a patio greenhouse structure to extend the season, those are the projects where a landscaper or contractor adds real value. Getting the structure right, drainage slopes, weight load compliance with local IRC standards, and proper irrigation rough-in, is far harder to retrofit than it is to build in from the start. For plant selection, soil prep, planting, and ongoing care, a few good extension publications and a couple of seasons of observation will make you competent faster than most people expect.
FAQ
What primary research questions must be answered to write an authoritative 'best patio raspberry' article?
List of targeted research questions to answer in the article: 1) Which raspberry cultivars are truly patio‑suitable (dwarf, compact, trailing, primocane/everbearing) and how do they compare for hardiness, mature size, yield, flavor, disease resistance, and container performance? 2) What are region‑specific recommendations (USDA zones 4–10) for cultivar selection, planting timing, and winter protection for container raspberries? 3) What exact container volumes, diameters, and drainage configurations are minimum vs. preferred for short‑term vs. multi‑year plantings and for different cultivar growth habits? 4) What potting‑mix recipes (by volume) and pH targets are optimal for caneberries in containers and how do they change seasonally? 5) What irrigation schedules, soil moisture targets and practical container irrigation systems (drip, self‑watering) are appropriate by container size and climate? 6) What fertilization program (N‑P‑K rates, timing, forms) and monitoring (soil/solution tests) are recommended for container raspberries at planting and during production years? 7) What pruning/trellising/training protocols differ for floricane (summer‑bearing) vs. primocane (everbearing) raspberries in containers, and what month‑by‑month tasks apply by USDA zone? 8) Which pests and diseases are most likely in patio/container settings (including SWD, aphids, cane borers, fungal diseases) and what IPM monitoring, cultural controls, organic (OMRI) and chemical options (with PHIs/label cautions) should be recommended? 9) What are weight/structural constraints for balconies/patio decks when using large planters, and what code or local‑authority checks should homeowners do? 10) How should raspberries be incorporated into patio design (placement for privacy, companion plants, color accents, proximity to hot tubs, under covers, greenhouse/polytunnel use) and what safety/aesthetic details matter? 11) When should a homeowner hire a landscaper, structural engineer, or greenhouse installer — and what scope, questions, and procurement tips should be included? 12) What budget vs. premium choices exist for plants, containers and greenhouse options, and what lifecycle cost comparisons should be shown?
What authoritative source material should be used for cultivar selection and trial data?
Use land‑grant university cultivar trial reports and extension cultivar fact sheets as primary sources. Examples: Oregon State University cultivar lists (EC‑1310/EC‑1621), Cornell Berry Breeding & trial reports, Penn State and UMass extension cultivar evaluations. These sources supply multi‑year yield, flavor, hardiness, disease‑resistance and localized performance data. Prefer peer reviewed or extension‑tested trial results over nursery marketing copy.
Which extension publications are required for container guidance, pruning, and home‑garden culture?
Cite extension culture guides with container and pruning details: OSU 'Growing Raspberries in Your Home Garden' (EC‑1306) for container sizing and pruning protocols; Penn State 'Raspberry Planting and Care for Home Gardeners' for illustrated pruning schedules; UMass and MU Extension container gardening publications for container best practices and mix guidance. Use multiple extension guides to reconcile regional differences.
What potting‑mix and soil‑science references are needed to specify exact container recipes?
Combine extension potting‑mix guidance and soil‑science handbooks: MU Extension vegetable/container mix recommendations (MG5), UMass and OSU container fruit mix guidance, and reputable gardening syntheses (e.g., Martha Stewart summary of extension recipes). Derive volume‑based recipes (ratios of peat or coir, compost/topsoil, perlite/pumice) and note pre‑moistening, pH targets and caution about overuse of uncomposted garden soil.
What sources must be consulted for fertilization, pH and nutrient schedules for caneberries in containers?
Use university caneberry fertilization guides and IPM/fertilizer pages: UC IPM 'Fertilizing Your Berries', Penn State raspberry production notes, and state extension fertilizer tables. These provide N‑P‑K rates by plant age and container size, seasonal timing, and soil test interpretation protocols to tailor feeding schedules and foliar vs. granular recommendations.
Which resources are essential for irrigation, moisture management and container watering frequency?
Use container‑specific irrigation guidance from UMass, MU Extension, and OSU plus crop evapotranspiration/crop coefficients for caneberries to convert to practical schedules. Sources should include recommendations for container volumes, seasonal frequency, self‑watering systems, and monitoring methods (tensiometers, probe or weight checks).