The best patio speakers in 2026 depend on your patio size, climate, and how deep you want to go with a system, but for most homeowners a pair of all-weather passive speakers (like the Polk Atrium series or Definitive Technology AW series) paired with a compact streaming amplifier gives the best balance of sound quality, durability, and real-world value. If you want something simpler, a self-powered Bluetooth outdoor speaker with a built-in amp cuts the complexity significantly. If you want a full multi-zone setup across a large yard, you'll need to plan wire runs, amp channels, and possibly a distributed audio system before you buy anything.
Best Patio Speakers Buying Guide: Picks, Placement, Setup

Elise Prescott
1 May 2026
How to choose patio speakers (size, coverage, placement)
Start with your patio's square footage and how you actually use the space. A typical outdoor speaker with a wide 120-degree dispersion pattern covers roughly 50 to 150 square feet of listening area. That's enough for a modest deck or a seating nook, but a large open patio or backyard needs multiple speakers to fill the space evenly. Trying to cover 600 square feet with one speaker just means cranking the volume until it sounds harsh, and your neighbors start noticing.
Placement matters more outdoors than it does inside because sound dissipates quickly in open air. The standard approach is to mount speakers closer together than you'd think necessary, aiming slightly downward toward the listening area rather than projecting outward. If you're mounting on a wall or eave, keep the speaker within about 8 to 10 feet of the primary seating zone. For larger patios, plan for at least two speaker pairs in different zones rather than relying on one loud pair.
A useful rule: design for the conversation, not the concert. Outdoor audio sounds best when speakers are close enough to fill the listening space at moderate volume. Pushing outdoor speakers to maximum volume also accelerates weather-related wear on the drivers.
Speaker types for outdoor patios
There are three main categories of outdoor patio speakers, and choosing the right type shapes everything else about your system, including the wiring, the amp you need, and how permanent the install is.
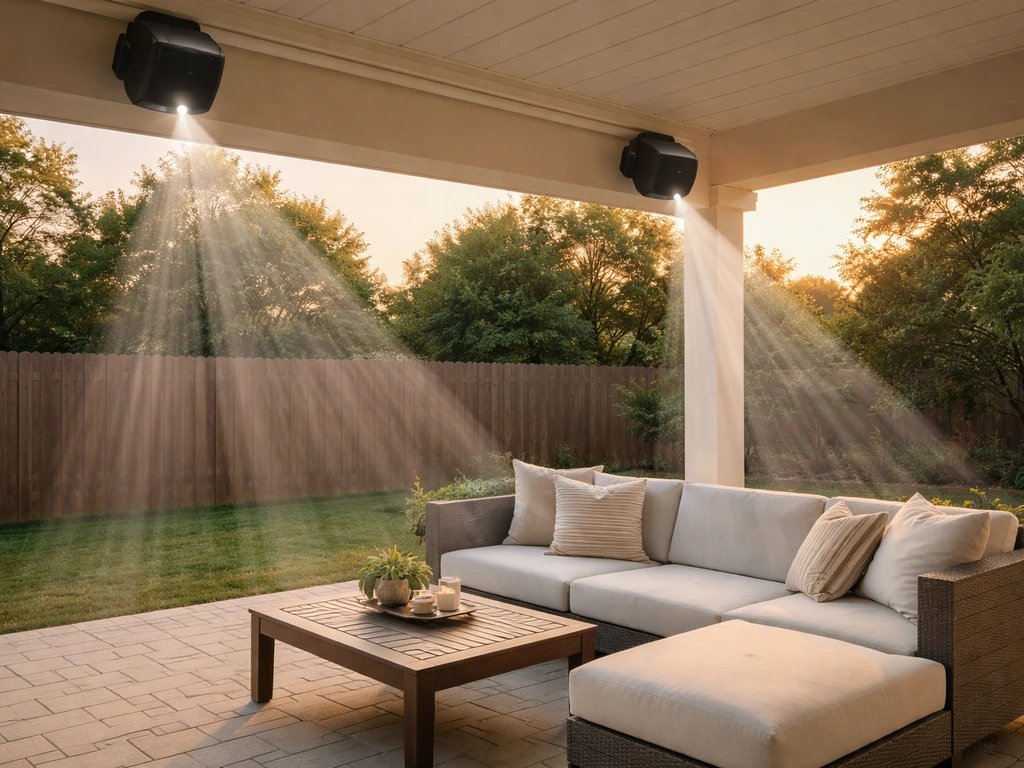
In-wall and in-ceiling speakers
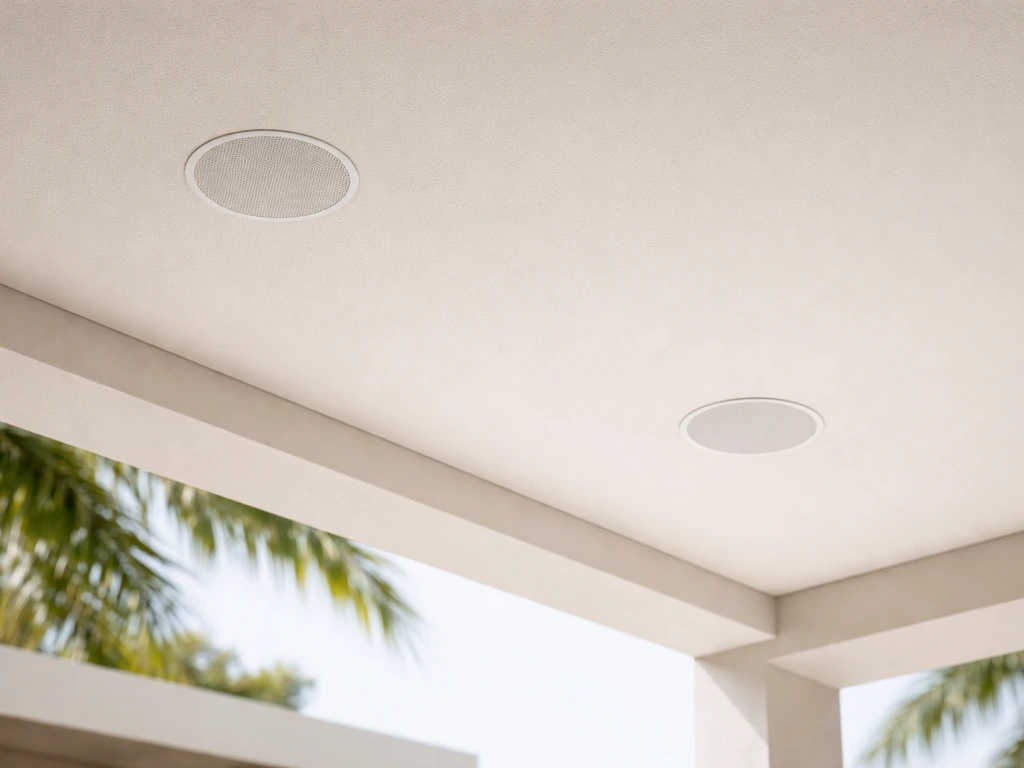
These are recessed into a covered patio ceiling or a soffit. They look clean, stay protected from direct weather, and project sound straight down into the seating area. They're a great choice for covered patios with a pergola or patio cover overhead. The downside is the installation is more invasive (you're cutting into a ceiling), and they require passive wiring back to an amplifier or receiver. Because they're protected by overhead coverage, you still want models rated for damp or wet locations depending on how exposed the space is.
On-wall (surface-mount) speakers
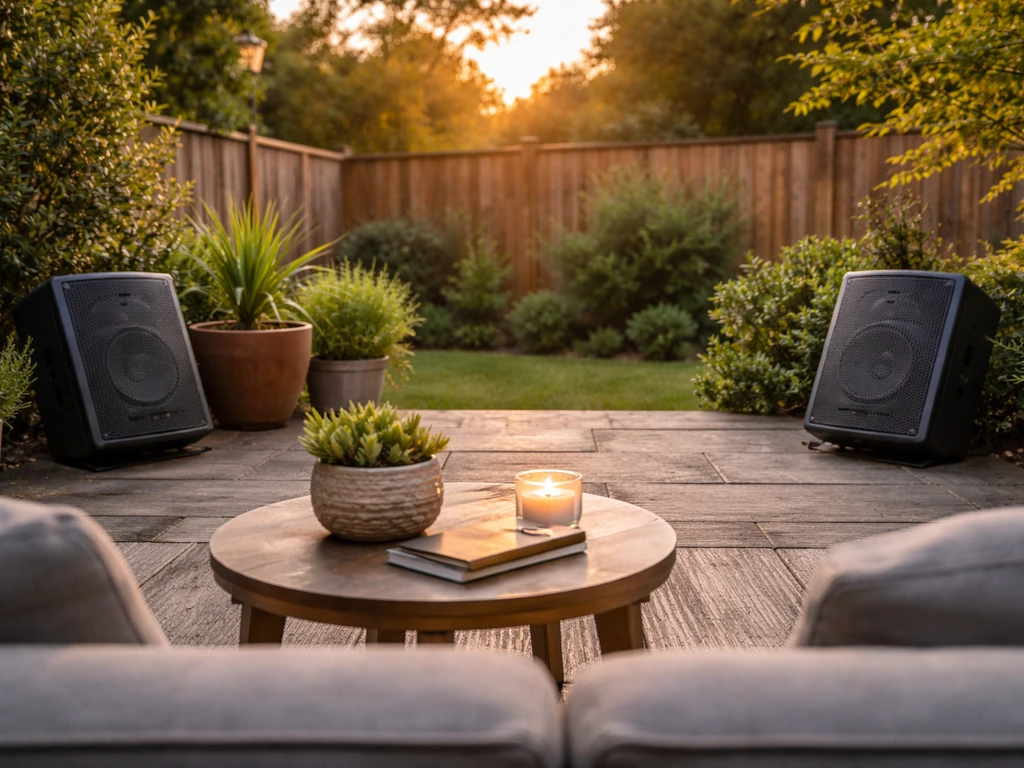
Surface-mount speakers are the most popular choice for patios. You bolt a bracket to the wall or eave, run a wire back to an amp, and you're done. Brands like Polk's Atrium series are purpose-built for this: their stainless steel and brass hardware is designed specifically to stay rust-free outdoors, and the Atrium series exceeds ASTM D5894 UV and salt fog testing standards. The Definitive Technology AW series is another strong option here, with a very wide dispersion pattern that works well for spreading sound across an open area. These are passive speakers that need an amplifier, which adds a step, but gives you better sound quality and longevity than most all-in-one options.
Freestanding and landscape speakers
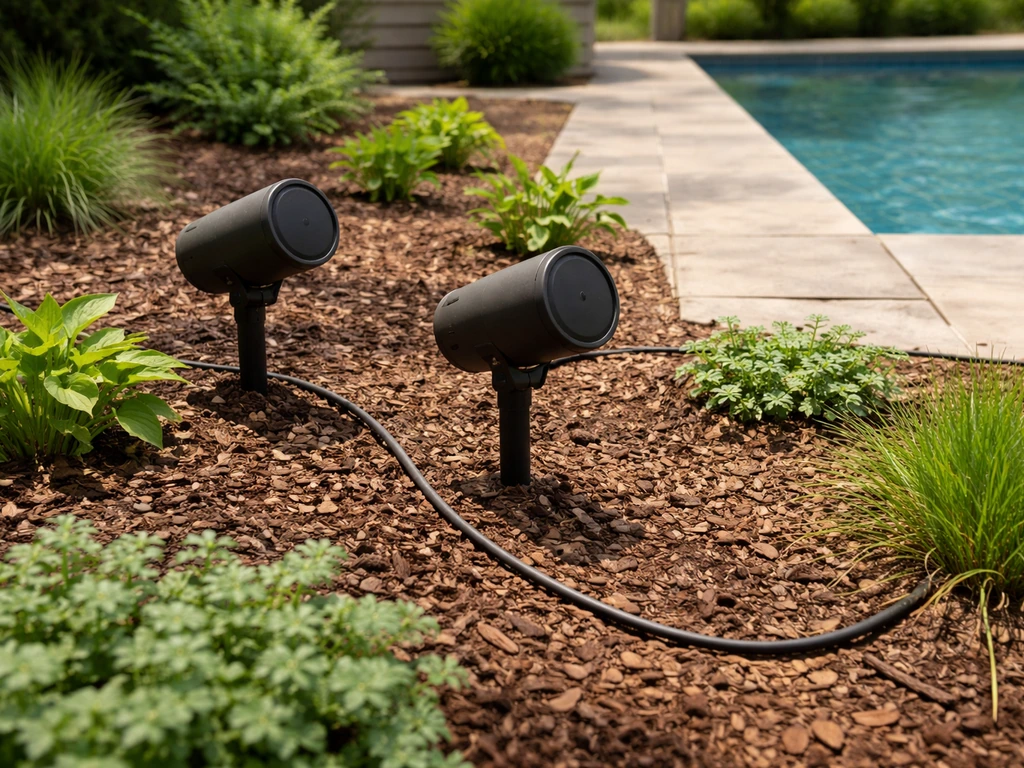
Landscape speakers sit on a stake in the ground and blend into garden beds. They're useful for covering a large yard or pool deck area where you can't easily run wires to a wall or ceiling. The Definitive Technology Dymension Outdoor LS-400 is a good example of a premium landscape option, engineered to handle rain, snow, and dirt. Freestanding Bluetooth speakers sit on a table or shelf and require no wiring at all. They're the simplest entry point, but you sacrifice sound quality and coverage compared to a hardwired system. Many self-powered outdoor Bluetooth speakers now include a built-in amplifier, which genuinely reduces system complexity if you don't want to deal with a separate receiver.
Weather resistance and durability: what the specs actually mean
This is where a lot of buyers get tripped up. "Outdoor-rated" on a spec sheet can mean anything from "survived a light mist" to "survived full submersion." Look for actual IP ratings and material callouts, not marketing language.
| IP Rating | What It Protects Against | Good For |
|---|---|---|
| IP33 / IP33C | Spraying water up to 60° from vertical, limited dust | Covered patios with minimal direct rain exposure |
| IP35 | Water jets from any direction, some dust protection | Semi-exposed patios, under eaves |
| IP55 | Low-pressure water jets from any direction, dust protected | Open or partially exposed patios |
| IP66 | Powerful water jets, fully dust-tight | Fully exposed areas, heavy rain climates |
| IP67 / IP68 | Temporary or continuous submersion | Near pools, very wet climates |
To put this in context: the Bose FreeSpace 360P Series II carries an IP35 rating, suitable for partially sheltered outdoor installations. The Bose FreeSpace FS2SE steps up to IP55, which handles direct outdoor exposure in most climates. Tom's Guide's 2026 outdoor speaker roundup highlighted a tested model with an IP66 rating, which is appropriate for fully exposed setups in places like the Pacific Northwest or Florida where rain is heavy and frequent. If you're in a drier climate like Arizona or Southern California, you may not need IP55 or higher, but UV resistance is non-negotiable.
Beyond IP ratings, check the hardware materials. Plastic screws and aluminum brackets corrode quickly in coastal or humid environments. Look for stainless steel hardware, UV-stabilized enclosures, and rust-resistant grilles. The Polk Atrium series is a good benchmark here: Polk specifies stainless steel and brass hardware with aluminum grilles specifically because those materials hold up outdoors long-term. If you're in a coastal area with salt air, military-grade salt/corrosion testing (like Polk's Mil-Std 883 compliance) is worth looking for.
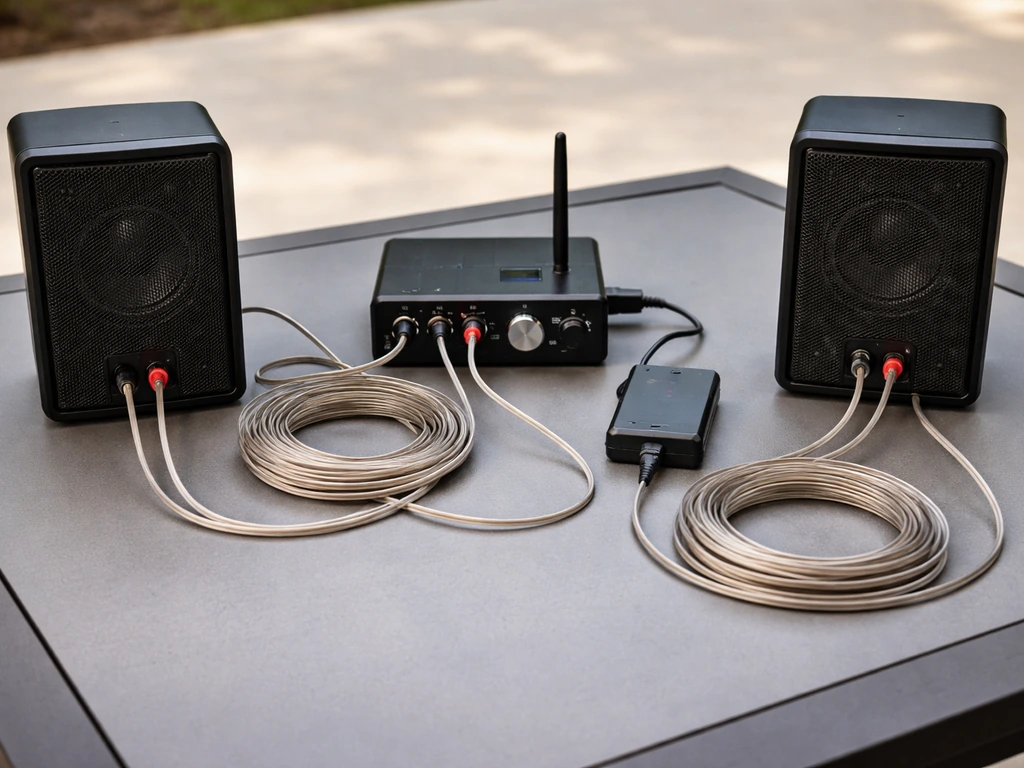
Planning your patio sound system (amps, wiring, streaming, zones)
This is the step most people skip, and it's why a lot of patio speaker setups end up sounding mediocre or becoming expensive to fix later. Before you buy any speakers, map out your system end to end.
Amplifiers and receivers
Passive outdoor speakers need an amplifier or AV receiver to drive them. If you're running a single pair of speakers off a covered patio, a compact 2-channel streaming amplifier (like the Sonos Amp or similar) is the cleanest solution. It connects to your home network, streams from any source app, and powers two speakers. For a multi-zone setup spanning a deck, a yard, and a pool area, you need an amplifier with enough channels to accommodate all your speakers. blank" rel="noopener noreferrer">Sonos recently introduced the Amp Multi, a multi-channel streaming amplifier designed specifically for multi-zone home use, which handles tuning adjustments based on speaker placement and room geometry. On its product page, Sonos lists Amp Multi channel output details and multizone streaming control through the Sonos app blank" rel="noopener noreferrer">Amp Multi, a multi-channel streaming amplifier designed specifically for multi-zone home use. That kind of tool is genuinely useful outdoors where reflections, open air, and irregular surfaces all affect the sound.
Wiring outdoor speaker runs
For runs of 80 feet or less, 16-gauge speaker wire is the standard recommendation. For longer runs or lower-impedance speakers (6-ohm or 4-ohm), go thicker: 14-gauge or even 12-gauge wire. Thicker wire has lower resistance, which preserves power delivery over distance. All outdoor passive speaker wiring should use direct-burial-rated speaker wire if it's going underground, even for short runs. Running in conduit is even better because it protects the cable and makes future upgrades much easier. Plan the wire route before you buy: measure the actual path (not a straight-line estimate), add 10 to 15 percent for routing around obstacles, and confirm whether you'll need to trench, run through walls, or pass through weatherproof conduit fittings.
High-impedance (70V/100V) distributed systems
If you're covering a large property with many speakers, a 70V or 100V distributed system is worth knowing about. In this setup, fixed-tap speakers can be daisy-chained on a single amplifier channel rather than requiring a separate channel per pair. It's the same approach used in commercial spaces, and it dramatically simplifies wiring for large outdoor zones. It's more of a pro or semi-pro install, but for homeowners with a large outdoor entertainment area it avoids running separate heavy-gauge wire runs to every location.
Streaming and source connections
Most homeowners today stream music from a phone or tablet app. A streaming amplifier (Sonos, Denon HEOS, or similar) handles this natively over your home Wi-Fi. If your Wi-Fi signal is weak on the patio, that's a problem to solve before the speakers go in, not after. In some cases it actually makes more sense to place a secondary music source closer to the outdoor zone rather than trying to route audio from inside the house over a long wire run. A good Wi-Fi extender positioned near the patio resolves most streaming reliability issues.
Patio speaker system setups by budget
Here's how a complete patio audio setup actually looks at three budget levels. These are system-level examples, not just individual product picks, because a single speaker recommendation without context for the amp and wiring is only half the answer.
Entry-level setup (under $300)
A self-powered outdoor Bluetooth speaker with a built-in amplifier is your simplest path. No wiring, no separate amp, no installation complexity. You get one speaker (or a stereo pair if the product supports it), Bluetooth streaming from a phone, and decent weather resistance if you choose a model rated IP55 or higher. Coverage will be limited to roughly 100 to 200 square feet around the speaker. This works well for a small deck, a bistro table setup, or a temporary arrangement. Just understand the tradeoff: you're giving up placement flexibility, sound spread, and sound quality compared to a wired system. Good for renters, small spaces, or homeowners who want to try outdoor audio before committing.
Mid-range setup ($400 to $900)
A pair of passive all-weather surface-mount speakers (like the Polk Atrium 5 or Definitive Technology AW5500) wired to a compact 2-channel streaming amplifier is the sweet spot for most homeowners. The Polk Atrium 5 covers up to roughly 300 square feet per pair, resists UV, salt, and corrosion, and its wide dispersion fills a covered patio or deck effectively. Wire it to a Sonos Amp or a Denon HEOS Amp, configure your streaming app, and you have a system that genuinely sounds good, handles all weather, and integrates with smart home setups. Budget: $200 to $350 for a quality speaker pair, $250 to $500 for a streaming amp, plus wire and mounting hardware.
Premium multi-zone setup ($1,500 and up)
For a full outdoor entertainment area covering a covered patio, a pool deck, and a lawn zone, you're looking at multiple speaker pairs, a multi-channel streaming amplifier (like the Sonos Amp Multi), buried direct-burial-rated speaker wire runs, and potentially in-ceiling speakers under a pergola cover alongside landscape speakers in garden zones. This level of setup benefits significantly from upfront system design: mapping zones, planning wire routes with conduit, selecting speakers appropriate for each zone's exposure level, and matching amp output to total speaker load. At this level it's often worth hiring an AV installer for the wiring rough-in, even if you handle the speaker placement and configuration yourself.
Installation tips and mistakes that kill outdoor sound
DIY vs. hiring a pro
Mounting a pair of surface speakers on a covered patio wall and running wire back through a wall penetration to an interior amp is solidly DIY territory. It's the outdoor equivalent of hanging a TV. Where things get complicated: running wire underground, working inside conduit buried through a yard, cutting in-ceiling speakers under a covered patio, or designing a multi-zone system with a distributed amp. For any of those tasks, getting a vetted local AV or low-voltage contractor to do the rough-in work is a smart investment. The speakers themselves are straightforward; it's the wire routing and weatherproofing that trip people up.
Common mistakes to avoid
- Wiring speakers out of phase: if one speaker's positive and negative terminals are reversed relative to the other, bass will sound thin and hollow. The Definitive Technology AW series manual specifically flags this as a common bass-loss culprit. Double-check your polarity on every speaker connection.
- Using indoor speaker wire outdoors: regular CL2 or CL3 wire isn't rated for direct burial or prolonged UV exposure. Use direct-burial-rated outdoor speaker wire for any run that exits the house or goes underground.
- Undersizing the wire gauge: using 18-gauge wire on a 120-foot run with 6-ohm speakers will degrade power delivery noticeably. Match your gauge to your run length and impedance.
- Placing speakers too far apart: spreading two speakers 40 feet apart on a large patio creates a stereo image no one can hear and leaves dead zones in the middle. More speakers placed closer is almost always better than fewer speakers placed far apart.
- Ignoring bass placement: for wall-mount passive speakers, position near a wall or soffit to reinforce bass. Moving the speaker away from all surfaces produces a thinner sound. If you need less bass, move the speaker out; for more, tuck it closer to a surface.
- Skipping a weather-resistant input cover: for any passive outdoor speaker with exposed binding posts, verify that a weather cover or protective cap is included or ordered separately. Moisture in a terminal block will cause corrosion and signal degradation quickly.
- Not planning the wire route before buying: measure actual wire path lengths, confirm where you'll penetrate walls or trench underground, and verify conduit options before ordering wire. Buying 50 feet of cable for a run that ends up being 85 feet is an avoidable frustration.
Budget and buying checklist
Before you add anything to a cart, run through these items. It saves a lot of return shipping.
- Measure your patio square footage and identify your primary listening zones. One zone or multiple?
- Decide on speaker type: in-ceiling (covered patio), surface-mount wall/eave, landscape stake, or portable Bluetooth. Each has different installation requirements.
- Check your climate and exposure level. Covered patio in the Southwest = IP35 minimum. Open yard in a rainy climate = IP55 or IP66. Coastal = verify salt/corrosion specs explicitly.
- Map your wire routes. Measure actual path lengths, identify wall penetrations or underground trenching needs, and confirm you'll use direct-burial-rated cable for any outdoor runs.
- Choose passive (needs a separate amp) or active/self-powered (amp built in). Passive sounds better and lasts longer; active is simpler and easier to install.
- If passive: select an amplifier or streaming amp with enough channels for your speaker count. Confirm it matches your speakers' impedance and power handling.
- Verify streaming source compatibility: does your amp connect to your home Wi-Fi and support your preferred music apps? If your patio Wi-Fi signal is weak, address that first.
- Check that mounting hardware (brackets, screws, input covers) is included or compatible with your installation surface. Stainless steel hardware is preferred for humid or coastal climates.
- Confirm your speaker wire gauge matches your run length: 16-gauge for runs up to 80 feet, 14-gauge for longer runs or low-impedance speakers.
- Decide DIY vs. pro for installation. Surface-mounting a speaker pair is DIY. In-ceiling cuts, underground burial, or multi-zone wiring rough-in is worth a pro consultation.
Once you've got your system dialed in, the setup naturally connects to other decisions about your outdoor space: your patio's Wi-Fi coverage will affect how well a streaming amp performs, and if you're planning a full outdoor entertainment zone you might also be thinking about a TV or projector setup alongside the audio. The speaker system is often the best starting point because good audio transforms how a patio feels, even before any screen goes up. Once you dial in the speakers, you can build a lineup of the best patio music sources and keep the sound consistent across your space good audio. A good outdoor patio projector can take the same backyard space from daytime hangout to movie night without a full theater setup.
FAQ
How do I figure out how many speakers I need for my patio if I do not know its square footage?
If you do not have the square footage, measure the listening area as length times width, then assume one pair of wide-dispersion speakers typically covers about 50 to 150 square feet per speaker unit depending on volume and openness. If the patio is open on one side, treat it like it is larger because sound disperses faster, so plan an extra speaker pair or a different zone rather than turning one pair up to uncomfortable levels.
Can I mix speaker brands or impedance ratings in the same system?
For passive speakers on the same amplifier output, mixing different impedance ratings can cause uneven loudness and, in worst cases, stress the amp if the load drops too low. If you want flexibility, match the impedance (for example, both 8-ohm or both 6-ohm) and keep channel wiring consistent. If you are unsure, use separate amplifier channels or a distributed 70V/100V approach designed for mixed tap levels.
What is the biggest mistake people make when placing outdoor speakers?
A common error is mounting them too far apart or aiming them straight out, which creates dead spots and harsh sound at the loudest seats. Instead, mount closer together than you think and aim toward the primary seating area, slightly downward, then fine-tune by moving the listening position rather than immediately increasing volume.
Should I weatherproof the speaker wire connections at the outside wall or only rely on outdoor-rated cable?
You need both outdoor-rated cable and weatherproof terminations. Use a weatherproof junction box or sealed connection method where the cable transitions near moisture sources, and keep splices out of standing water. Outdoor-rated wire reduces risk, but connection points are often where failures happen over time.
Do outdoor speakers need the same electrical grounding as indoor speakers?
They still need correct installation practices, but grounding requirements vary by amp model and local code, especially if cable routes near power or lightning protection. When running wiring through conduit or near electrical lines, keep separation, follow your amp’s manual for grounding and safety, and do not assume “outdoor” automatically means “code compliant grounding.”
Is there an audio benefit to using recessed ceiling speakers under a covered patio versus surface-mount speakers?
Recessed speakers often sound more natural on a covered patio because they project straight down into the seating zone and stay protected from direct weather, which reduces driver degradation. Surface-mount speakers can still perform very well, but you may need more careful aiming and placement because sound can bounce off walls and eaves depending on how your patio is shaped.
How loud should I set outdoor speakers, and what should I listen for to know it is too loud?
Set volume to where speech and vocals stay clear and bass does not turn muddy, then leave headroom for peak moments like parties. If you hear distortion, harshness at higher frequencies, or “thinning” of sound as you push volume, back off. The guide’s main tradeoff applies outdoors too, higher volume accelerates wear and increases the chance your neighbors notice.
Will thicker speaker wire always make the sound better?
Thicker wire mainly protects power delivery over distance and helps maintain output consistency, it does not automatically make speakers “sound better” when distances are short. Use the gauge guidance based on run length and speaker impedance, then prioritize correct wiring, proper channel matching, and tight placement before paying for extra-thick cable you do not need.
How do I choose between a streaming amp and a dedicated AV receiver for patio speakers?
A streaming amplifier is usually simpler for a single outdoor zone because it connects to Wi-Fi and powers two speakers directly. An AV receiver can be better if you already run multiple speakers indoors and want a unified home theater ecosystem, but it often adds complexity for multi-zone outdoors. If your priority is app streaming outdoors, a streaming amp typically reduces troubleshooting.
What should I check about Wi-Fi before installing a streaming amplifier?
Check signal strength at the intended patio location, not just near your router. If you routinely get low bars there, plan a Wi-Fi extender near the patio or place the amplifier closer to a better-signal area, then verify connectivity during a test setup. Also consider that metal structures and outdoor enclosures can weaken signals further.
Can I add more speakers later to an existing patio audio setup?
Yes, but plan for it now so you do not get stuck with incompatible wiring or insufficient amp channels. If you think you will expand zones, choose an amplifier with enough channels or consider a distributed 70V/100V design that can scale with fewer heavy wire runs. For a two-speaker amp setup, adding more later usually means adding another amplifier or switching to a multi-channel model.
Are IP ratings enough to guarantee long-term durability?
IP ratings tell you about water and dust resistance, but material and build quality still matter for long-term performance, especially in coastal environments. Look for stainless or corrosion-resistant hardware, UV-stabilized materials, and rust-resistant grilles, then consider salt air exposure as its own factor beyond just water exposure.
What is the safe way to run speaker wire through walls or under a patio without damaging it?
Use conduit where feasible, especially if the wire runs through or under areas that may get disturbed later. Measure the actual cable path, add routing margin for obstacles, and use weatherproof fittings where cable enters or exits. If you are trenching, consider the conduit so upgrades do not require tearing up finished landscaping.